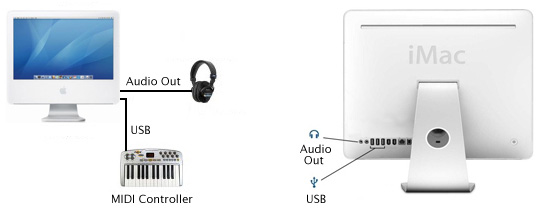
The computers in the MRC are setup like this.
The MIDI Controller has no sounds of its own. It simply transmits MIDI messages to the computer. The computer processes these MIDI messages and turns them into sound. You can listen through headphones available in the MRC.
Double click the Mount Network drives icon in the Dock.

Your network drives should appear on the desktop.

Double click the courses disk icon and open the folder for Musc108. You should see this.

Optional course downloads are in the Common folder.
During the MIDI portion of MUSC 108 you'll be dealing with three main programs: Excel, MIDIDisplay, and AU Lab. They are already installed.
Microsoft Excel
/Applications/Microsoft Office 2011/Microsoft Excel.app

Excel is a spreadsheet program designed to do calculations on text, date, and numerical data stored in rows and columns. It will be the main data editing program for MIDIDisplay.
AU Lab
/Applications/AU Lab.app

AU Lab is part of Apples XCode development system. Documentation for AU Lab can be found in the course common folder.
MIDIDisplay

MIDIDisplay was written by John Ellinger and translates MIDI
text messages into sound. The Mac OSX version is written in C++ using the wxWidgets
Library. The Windows version is written in Delphi 2010 using Pascal. MIDIDisplay for Mac requires AU Lab for MIDI playback and uses Apple's built in software synthesizer, the DLSMusicDevice.
DLS is an acronym for DownLoadableSounds and uses sounds licensed from Roland Corporation. MIDIDisplay for Windows uses Microsoft's built in synthesizer called GS Wavetable Synthesizer. If you want to use MIDIDisplay at home, versions for Windows and Mac
OS X can be found in the course common folder. Please do not distribute
it.
When working in the MRC lab outside of class time, you should use headphones.
There are two ways to adjust the volume on the iMacs
1) Use the volume control keys on the Apple keyboards.
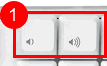
2) Use the Volume mini-menu
![]()
Location: /Applications/AU Lab
IMPORTANT: AU Lab must be opened before you open MIDIDisplay.
Location: /Applications/MIDIDisplay

The DLSMusicDevice will be automatically selected if available AU Lab is running.
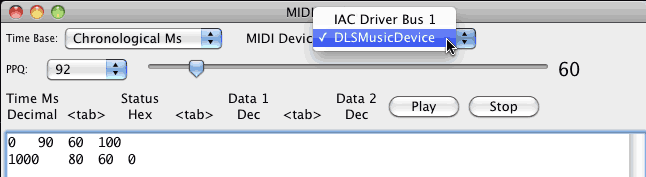
Type these MIDI commands into the MIDIDisplay window.
0	90	60	100
1000	80	60	0
MIDIDisplay expects data in the following format:
| time | tab | status | tab | data1 | tab | data2 |
| decimal | hex | decimal | decimal |
IMPORTANT:
MIDIDisplay does minimal error checking and expects the data
to be entered error free.
You should hear middle C played for one second.
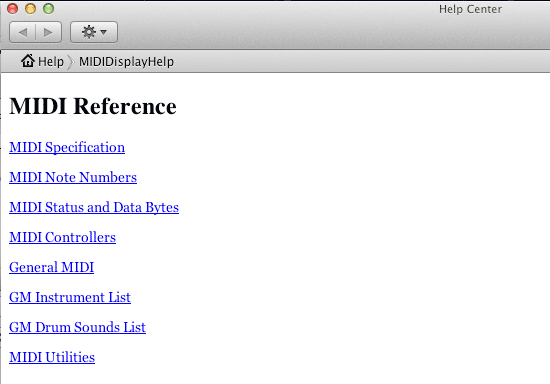
Some MIDI documentation is available from the Help menu in MIDI Display.
Open Excel. There are six labs in Unit 2. You'll need to create six worksheet tabs by choosing the Worksheet command from the Insert menu. Follow a similar procedure in all future labs.
1. Open a new Excel spreadsheet. Name it Lab02-FirstNameLastName.xls.
2. Create a total of six worksheet tabs. Name the tabs 02Lab1 through 02Lab6. Double click the tab to edit the name.

3. Label the four columns of row 1 as shown below.

This method works for short fragments of music, but quickly becomes tedious for longer pieces. Type the following data into MIDIDisplay. Type TAB not SPACE between numbers.
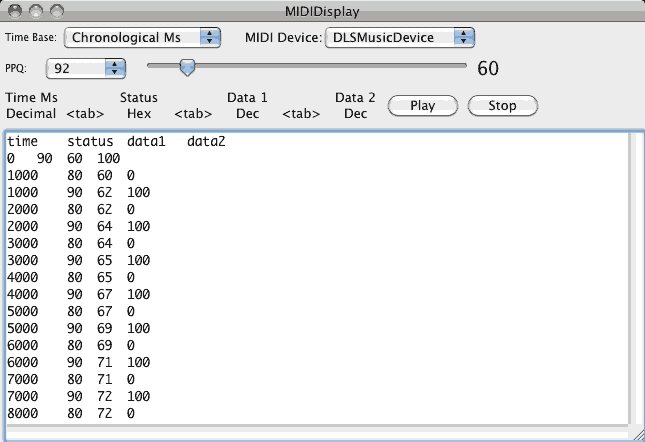
Click the Play Button. You should hear the C Major scale. Adjust the tempo as desired.
You can automate many note entry tasks in Excel. These concepts will pay off when working with large amounts of data.
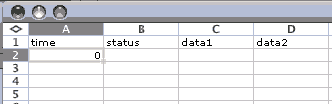
Select the 02Lab worksheet tab 02-1. The first row holds the labels: time status data1 data2.
Important Shortcut: Learn to use the keyboard shortcuts in Excel. Position your left hand thumb on the Apple key. Position your left hand index, middle, and ring fingers on the keys for v, c, and x respectively. Using the menu takes too long.
Enter a zero into cell A2 and then select A2.
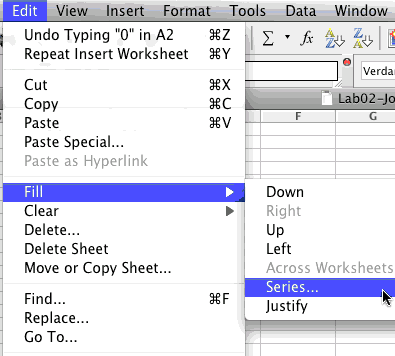
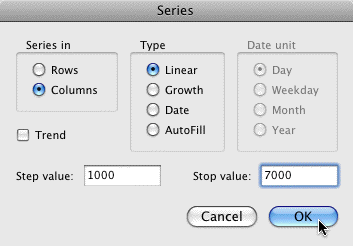
Use the Fill->Series item in the Edit menu to quickly enter the millisecond times 0, 1000, 2000, 3000 up to 7000.

The status byte of a MIDI message is used for several types of MIDI messages. The NON (note on) status byte falls in the range $90-$9F. It is sometimes defined as $9n where 9 is the NON message and n is the MIDI channel number. The sixteen MIDI channels are zero based from $0-$F in hex.
Create the NON (Note On) commands first. Once these are done you can do the NOF (note off commands).
Play the C Major Scale on MIDI channel 1. That means you need to fill column B with 90 (without the $)
Important: MIDIDisplay requires status bytes in hex.
Enter 90 in cell B2.
Copy B2.
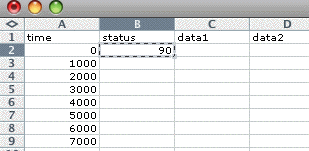
Then select cells B3:B9
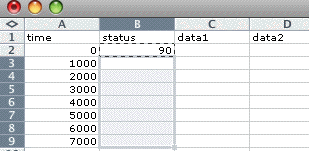
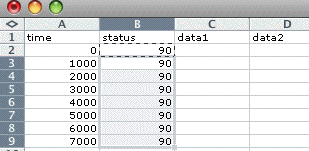
and paste. Column B should be filled with 90.
The data2 byte of a MIDI message represents velocity which translates to loud and soft. The range is 0-127 with higher numbers being louder.
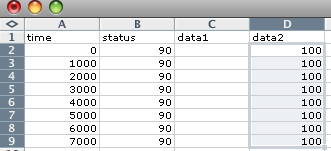
Type 100 into cell D2 and select D2.
This time you'll use a shortcut to copy and paste 100 into the remaining cells. Position the cursor over the "handle" at the lower right corner of the cell D2.
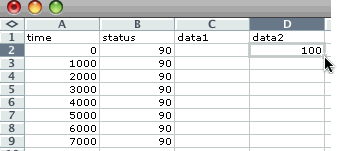
Click and drag the outline to cell D9 and and release the mouse button. Column D should be filled with 100.
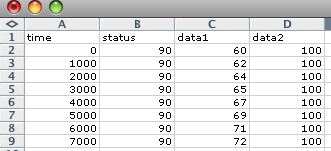
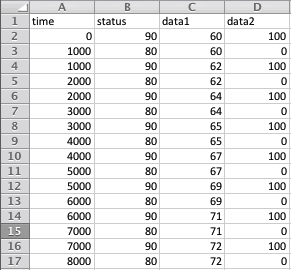
The data1 byte of a midi message indicates the note to play. Middle C on the piano is note number 60. Here are the MIDI note numbers for the notes Middle C to the C one octave higher.
| Pitch | C | C#/Db | D | D#/Eb | E | F | F#/Gb | G | G#/Ab | A | A#/Bb | B | C |
| MIDI | 60 | 61 | 62 | 63 | 64 | 65 | 66 | 67 | 68 | 69 | 70 | 71 | 72 |
| C Major Scale | C | D | E | F | G | A | B | C | |||||
| C Major Scale MIDI | 60 | 62 | 64 | 65 | 67 | 69 | 71 | 72 |
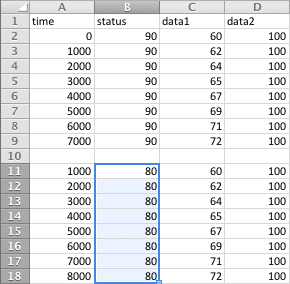
Enter the MIDI note numbers for the C major scale in column C. When you're finished, the NON part of the worksheet should look like this.
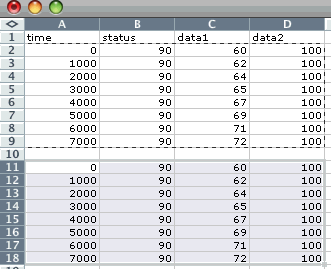
The plan is to copy the existing data and paste it into a new set of cells. You can use a formula to create the NOF messages. Once that is done you can sort the NON and NOF messages into chronological order.
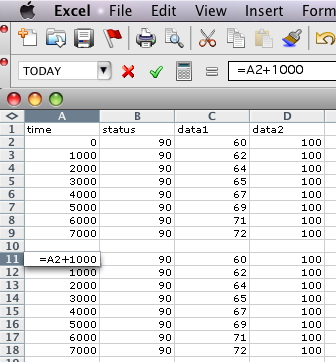
Make a copy of cells A2:D9 and paste them into cells A11:D18.
You can use a formula to automatically add 1000 to each NON time. That will make the duration of each note exactly 1000 ms, the duration of a full quarter note at a tempo of 60.
Select cell A11, enter the following formula and then press the Enter key. Note that all formulas begin with an = sign. Once you type the = sign you can click in cell A2 and A2 will be automatically entered into the formula. Continue to type "+1000" and the press the Enter key. The Enter key evaluates the formula.
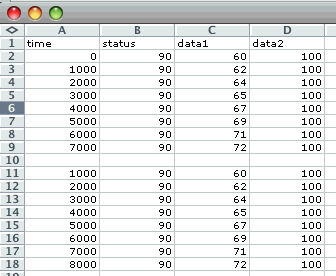
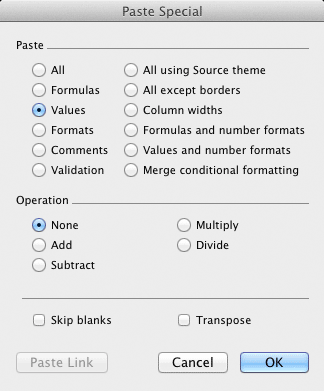
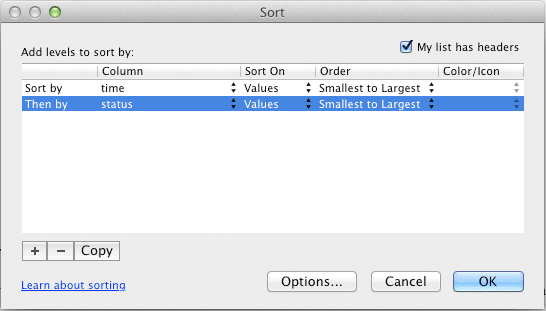
NUISANCE: If you tried to sort the NON and NOF values now, you'd get a lot of un-referenced cell errors (REF#). To prevent this, you need to use an Excel command called Paste Special.
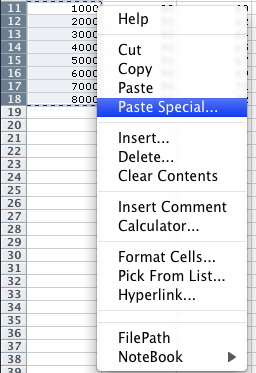
Select and copy cells A11:A18.
Then right click cell A11 and choose Paste Special from the popup menu. You could also choose it from the Edit menu.
When the Paste Special dialog appears select Values and click OK. The formula in the cells will be replaced by the values.
To produce the results you want, you need to sort using two filters, first by time ascending, and second by status ascending. Because row 1 is a header row make sure that the Header row button is selected.
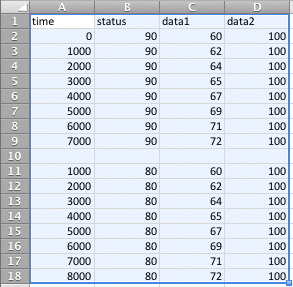
Here's how to interpret the time + MIDI message (status data1 data1)
In programming terms there are two methods of waiting: synchronous and asynchronous. In the synchronous method all computer processing stops until the time is up. This usually means unresponsive menus and mouse movements. The asynchronous method is preferred. The software starts a timer in the background that will go off at a given time. While the timer is running the computer is free to do other things. As soon as the time goes off the MIDI message is sent and the timer is reset for the next message.
Copy A1:D17 data from Excel.
Switch to the MIDIDisplay program.
Erase any data that is present. Shortcut: Apple-A (Edit menu - Select All), then press the delete key.
Paste the Excel data into MIDIDisplay
Click the Play button.
Adjust the tempo as desired.
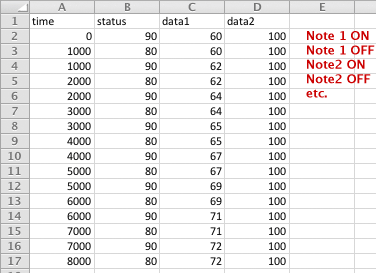
There are two methods used to turn a note off.
Let's try it.
Change the data2 bytes for all 80 status messages to 0.
Copy A1:D17 data from Excel and paste it into MIDIDisplay.
Click the Play button.
Copy A1:D17 data from Excel and paste it into MIDIDisplay.
Click the Play button.
Use 80 status and 0 velocity (data2).
Convert back to that format.
SPEED HINT:
It's really fast.
Continue with 02Lab2.
Revised John Ellinger, January - September 2013