CS 312 - Week 6.2 Class
CS 312 Audio Programming Winter 2020
Table of Contents
Announcements
Also on TOC home page.
- Project 1 requirements
Project 1 Guidelines - hw423_CSalesTrio favorites
CScalesTrio favorites.html
6.2 Class
Up until now we've been working with either my MIDIDisplay_DLS app or with the CAppleMidiSynth class that we've built in class. Both are tightly coupled to Mac OS and are not portable to other platforms.
For the remainder of the term we'll be using the following cross-platform software that runs on Mac, IOS, Windows, and Linux.
- RtMidi
- open source cross platform MIDI library
- RtAudio
- open source cross platform audio library
- libsndfile
- open source cross platform library for reading and writing .wav files
- Qt5
- cross platform GUI framework for developing desktop applications
Week 6.2 is focused on MIDI Input and MIDI Output using RtMidi.
Configuring your audio and MIDI devices on Mac, Windows, IOS, and Linux is different on each platform. You'll need to investigate Windows, IOS, and Linux platforms on your own. Labs and homework are required to use Mac OS. Once configured you can use the RtMidi, RtAudio, and libsndfile libraries.
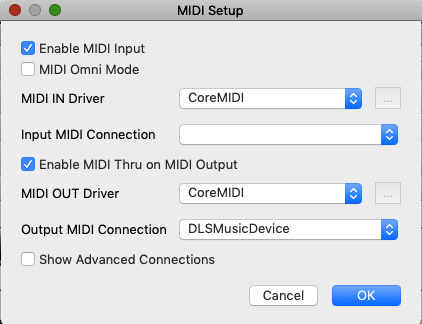
On Macs you configure your audio and MIDI devices using two Apple programs:
- Audio MIDI Setup
- AU Lab
Note:
These configurations should be permanent for your account in CMC but will not be permanent in WCC.
Audio MIDI Setup
Open the Audio Midi Setup (AMS) app in /Applications/Utilities Shortcut: Cmd-Shift-U.
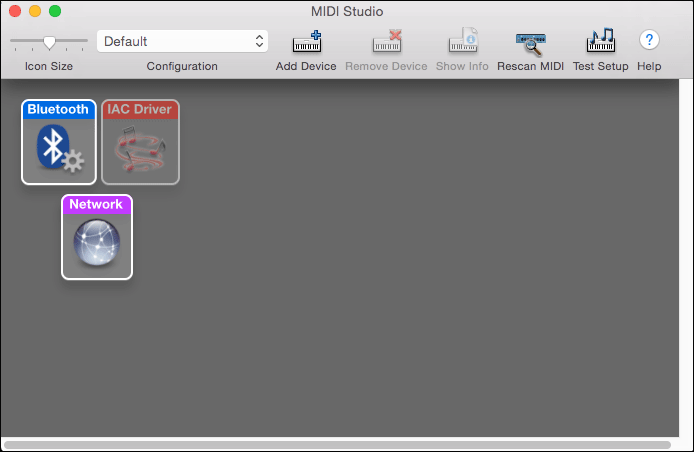
Choose Show MIDI Window from the Window menu.
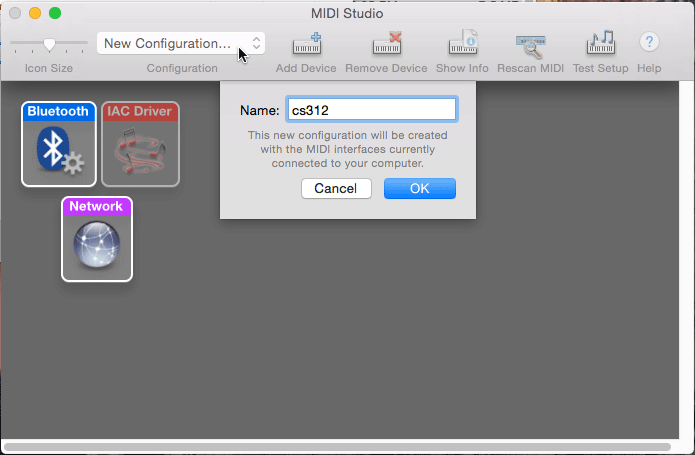
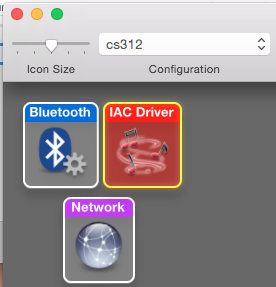
You'll need to create a new AMS configuration for yourself.
Choose New Configuration from the Configuration popup menu.
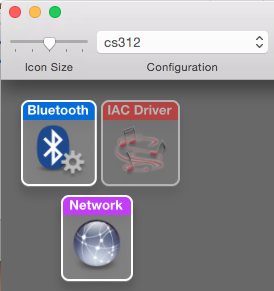
I named the new configuration cs312.
Click OK.
Activate the IAC Driver (Inter Application Communication) by double clicking.
In this picture it's shown as a deactivated gray icon.
Make sure the "Device is online" checkbox is checked.
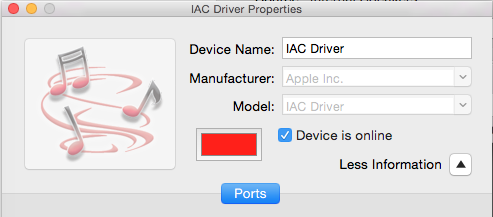
Close the Window.
The IAC Device icon should be displayed in its active state.
Close Audio Midi Setup.
AU Lab Setup
 Apple’s free digital audio mixing application, AU Lab, can be used as a host
 application for Audio Unit effects, including the AURoundTripAAC plugin,
 one of the Apple Digital Mastering tools. If you don’t already have Logic or
 another Audio Unit host application, download AU Lab to get started with auditioning
 your audio, detecting peaks and clipping, and performing double-blind listening tests.

From: https://www.apple.com/itunes/mastered-for-itunes/
We'll be using AU Lab to host the Apple supplied General MIDI software synthesizer called DLSMusicDevice. The same device we used in CAppleMidiSynth. AU Lab makes the DLSMusicDevice available as audio plugin to all third party software. AU Lab will make the DLSMusicDevice available to applications using RtMidi through the IAC Driver we enabled in Audio Midi Setup.
Open AU Lab in /Applications, or possibly /Applications/Utilities.

The following window should appear.
If not open the window by choosing New from the File menu.
Apply these settings.
- The Factory Configuration to Stereo Output
the Audio Input Device: to None
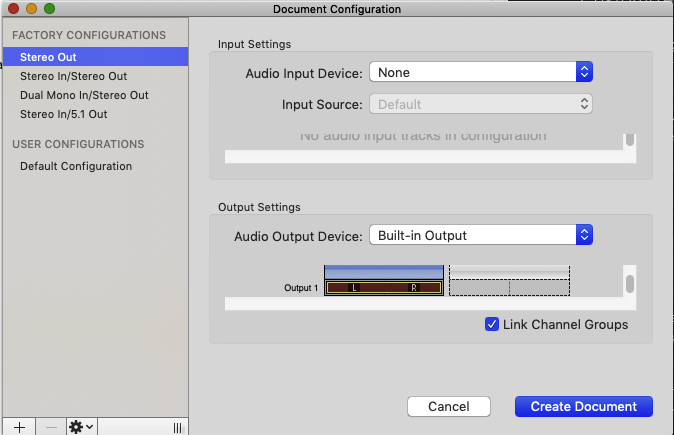
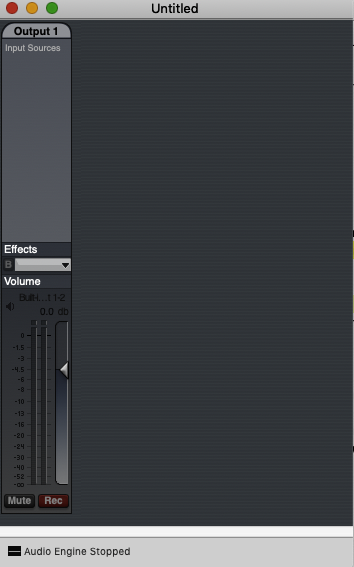
Click the Create Document button and a new Untitled window will appear with a single Output 1 channel strip.
Choose Add Audio Unit Instrument from the Edit menu.
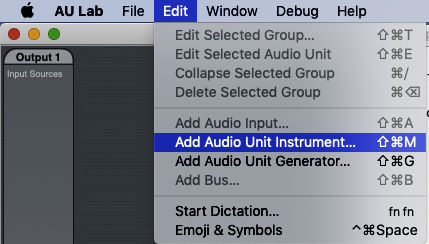
In the dialog that appears
- Verify Any MIDI Controller for your MIDI Input Source.
Verify DLSMusicDevice for instrument.
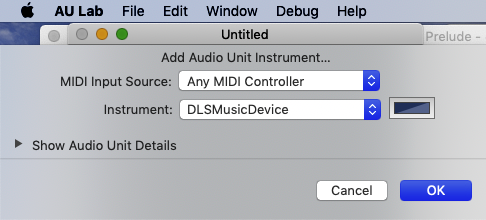
Click OK.
A new window will appear along with a new Output strip.
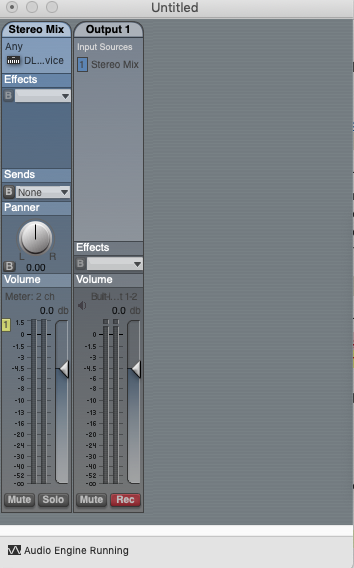
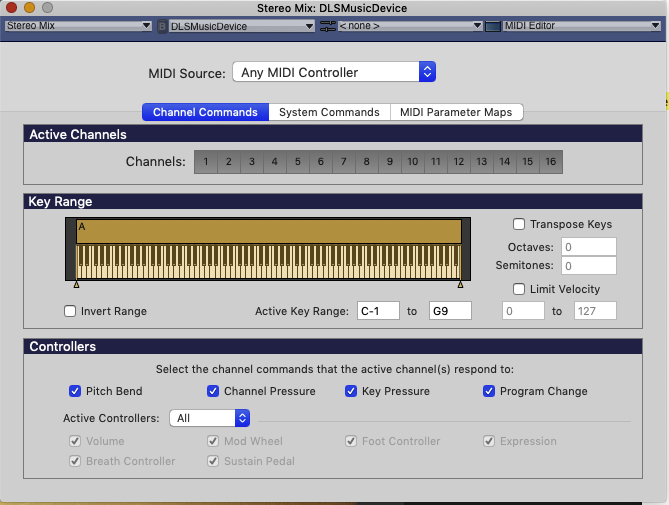
A companion window Stereo Mix: DLSMusicDevice may also appear. If not double click the small piano keyboard icon in the Stereo Mix channel strip.
Choose MIDI Editor from the rightmost popup menu.
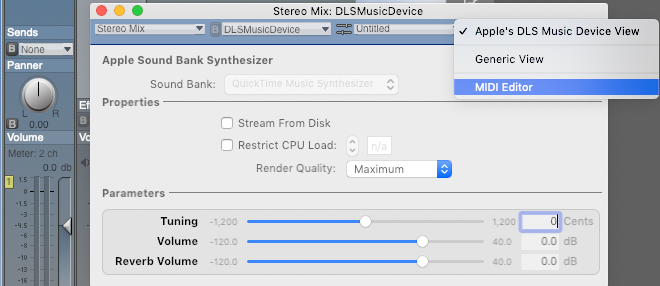
The MIDI Editor window will appear.
Click channel 1 and drag the mouse across channels 1-16 to select all 16 channels.
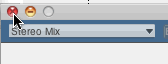
Close the window by clicking the red button at the top left of the window.
You'll be asked to save but don't bother. There's been a bug in AU Lab for several years. The configuration will not be saved. You have to go through these steps everytime you work with AU Lab. Once you memorize these steps it takes less than a minute.
I used this AU Lab setup routine in all my previous previous courses. Students complained that it was a pain to use because of the setup steps and that there must be an easier way. I developed the CAppleMidiSynth class for the CS312 W2020 course to be the "easier" way. However Apple is merging its desktop computer and IOS operating systems and the routines we used in the CAppleMidiSynth class are now marked "deprecated" and will eventually disappear. Not really disappear but moved to different frameworks that are built to use the new Apple development language called Swift. Third party C++ cross platform MIDI libraries like RtMidi and PortMidi will likely stay around to ease the transition.
MIDI input devices
Many MIDI input devices come include a piano keyboard of varying numbers of keys from 25 to the full 88 key piano keyboard. There are also MIDI wind controllers, drum controllers, video tracking controllers, gamepad controllers, and joystick controllers that are available.
The terms MIDI synthesizer and MIDI controller have specific meanings.
- MIDI Synthesizer
- A MIDI synthesizer has its own built in sounds that are played at the same time it outputs its MIDI messages.
- MIDI Controller
- A MIDI controller only outputs MIDI messages but has no sounds of its own. MIDI controllers depend on software instruments like the DLSMusicDevice or third party plug-ins to translate the MIDI messages into sound.
There are a few 25 key MIDI keyboard controllers available in the CMC lab 304 that you can connect to the computer via USB.
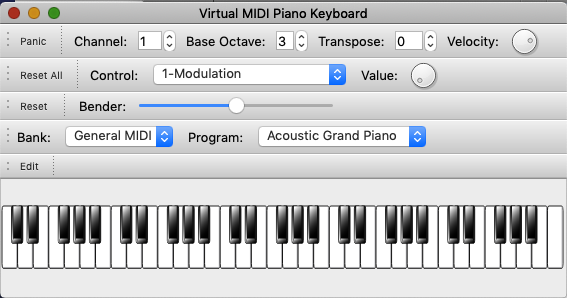
Virtual MIDI Piano Keyboard (VMPK)
Another option is to use a software MIDI keyboard controller like VMPK that we'll use in class today. Incidentally VMPK was built using the cross platform application framework Qt that will be introduced in Class 7.2. VMPK is open source and can be found at https://sourceforge.net/projects/vmpk/
Open /Applications/vmpk.app

A window with controls and a keyboard will appear.
Choose MIDI Connections from the Edit menu.
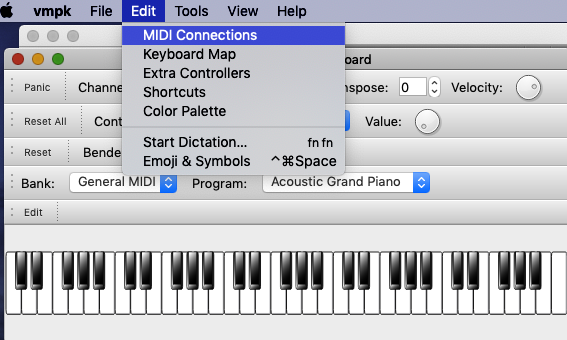
Make these settings.
Open MIDIDisplay_DLS
Choose VMPK Output from the MIDI Inputs menu.
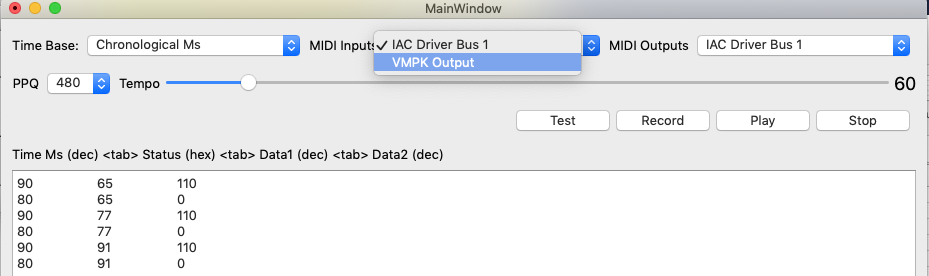
Use VMPK to test MIDI messages. You should see MIDI messages appear in the MIDIDisplay_DLS window. You'll note that timestamps are not displayed. We'll discuss that further down the page.
- Keyboard
- MIDI Channel
- Control for Volume, Pan, and Expression
- Bender
- Program change
- Velocity
Install RtMidi
MIDIDisplay_DLS uses the RtMidi API for input and can use it for output. However for MIDI output it also needs AuLab to be open and properly configured.
Introduction
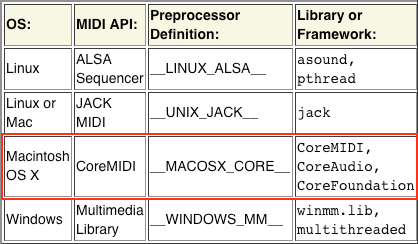
RtMidi is a set of C++ classes that provides a common API (Application Programming Interface) for realtime MIDI input/output across Linux (ALSA & JACK), Macintosh OS X (CoreMIDI & JACK), and Windows (Multimedia Library) operating systems. RtMidi significantly simplifies the process of interacting with computer MIDI hardware and software. It was designed with the following goals:
- object oriented C++ design
- simple, common API across all supported platforms
- only one header and one source file for easy inclusion in programming projects
- MIDI device enumeration
Where applicable, multiple API support can be compiled and a particular API specified when creating an RtAudio instance.
MIDI input and output functionality are separated into two classes, RtMidiIn and RtMidiOut. Each class instance supports only a single MIDI connection. RtMidi does not provide timing functionality (i.e., output messages are sent immediately). Input messages are timestamped with delta times in seconds (via a double floating point type). MIDI data is passed to the user as raw bytes using an std::vector<unsigned char>.
The introduction above was from the RtMidi Tutorial at https://www.music.mcgill.ca/~gary/rtmidi/.
Setup
Download RtMidi
cd $HOME312
git clone https://github.com/thestk/rtmidi.git
Move RtMidi.h and RtMidi.cpp to the common folder
Do not delete the rtmidi folder in $HOME312
# Move RtMidi.h and RtMidi.cpp to the common folder
mkdir $HOME312/common/RtMidi
cp  $HOME312/rtmidi/RtMidi.h $HOME312/common/RtMidi
cp  $HOME312/rtmidi/RtMidi.cpp $HOME312/common/RtMidi
RtMidi example code
c621_rt_midiprobe
RtMidi queries the operating system to find out what MIDI devices are available and registered. These devices can be either Digital Audio Workstations (DAW), software synths, software plugins, or external MIDI hardware synthesizers.
Setup
Execute in Terminal.
cd  $HOME312/cs312
mkdir hw62
cd hw62
mkdir c621_rt_midiprobe
# Copy RtMidi example code
cd c621_rt_midiprobe
mkdir build
touch CMakeLists.txt
cp $HOME312/rtmidi/tests/midiprobe.cpp c621_rt_midiprobe.cpp
Open the hw621_rt_midiprobe folder in vsCode.
CMakeLists.txt
This is a minimal CMakeLists.txt file. We'll use it as a starting point and modify it for use with future RtMidi examples.
Copy/paste
cmake_minimum_required(VERSION 3.5)
set(APPNAME "midiprobe")
project("{$APPNAME}")
set(CMAKE_CXX_FLAGS "${CMAKE_CXX_FLAGS} -std=c++17 -Wall ")

### set for your path
set( HOME "/Volumes/cs312-00-w20/StuWork/<your_email_name>" )

set(COMMON "${HOME}/common")
set(RTM "${COMMON}/RtMidi")
set(SOURCE_FILES
    ${RTM}/RtMidi.cpp
    c621_rt_midiprobe.cpp
)

include_directories(${COMMON} ${RTM} )
add_executable(${APPNAME} ${SOURCE_FILES})
Build and run
cd $HOME312/cs312/hw62/c621_rt_midiprobe/build
cmake .. && make && ./midiprobe
Output
The midiprobe project ran successfully but the output is not what we want. We've apparently built the RtMidi Dummy API (Application Programming Interface) for midiprobe. This is RtMidi's way of saying we didn't configure the compiler correctly.
[100%] Built target c621_rt_midiprobe

Compiled APIs:
  RtMidi Dummy

MidiInDummy: This class provides no functionality.


Current input API: RtMidi Dummy

There are 0 MIDI input sources available.

MidiOutDummy: This class provides no functionality.


Current output API: RtMidi Dummy

There are 0 MIDI output ports available.
RtMidi docs
Compile options are shown on the RtMidi home page:
http://www.music.mcgill.ca/~gary/rtmidi/index.html#compiling
The missing compile information is highlighted in red. In CMakeLists.txt change this
set(CMAKE_CXX_FLAGS "${CMAKE_CXX_FLAGS} -std=c++17 -Wall ")
to this (double underscore prefix and suffix to __MACOSX_CORE__)
set(CMAKE_CXX_FLAGS "${CMAKE_CXX_FLAGS} -std=c++17 -Wall -D __MACOSX_CORE__ ")
Append the necessary framework libraries to the end of CMakeLists.txt
# target_link_libraries must come after add_executable
target_link_libraries(${APPNAME} "-framework CoreMIDI")
target_link_libraries(${APPNAME} "-framework CoreAudio")
target_link_libraries(${APPNAME} "-framework CoreFoundation")
Notes
- -D is like #define in source code.
- Use target_link_libraries function to add the three OS X frameworks to link against.
Copy midiprobe to your course bin folder
cp $HOME312/cs312/hw62/c621_rt_midiprobe/build/midiprobe $HOME312/bin
Run midiprobe
Make sure VMPK is open and MIDIDisplay_DLS is closed.
Then execute this in Terminal.
midiprobe
My output
VMPK should be displayed as both and input source and an output port.
We'll need to know those port numbers in the next projects.
je$ midiprobe

Compiled APIs:
  OS-X CoreMIDI

Current input API: OS-X CoreMIDI

There are 2 MIDI input sources available.
  Input Port #0: IAC Driver Bus 1
  Input Port #1: VMPK Output

Current output API: OS-X CoreMIDI

There are 3 MIDI output ports available.
  Output Port #0: IAC Driver Bus 1
  Output Port #1: DLSMusicDevice
  Output Port #2: VMPK Input
c622_rt_cmidiin
The c721_cmidiin project is a MIDI Monitor type of application. It displays MIDI messages received by RtMidi.
Setup
Execute in Terminal.
cd  $HOME312/cs312/hw62
mkdir c622_rt_cmidiin
# Copy RtMidi example code
cd c622_rt_cmidiin
mkdir build
cp  $HOME312/cs312/hw62/c621_rt_midiprobe/CMakeLists.txt   .
cp $HOME312/rtmidi/tests/cmidiin.cpp c622_rt_cmidiin.cpp
Open the c622_rt_cmidiin folder in vsCode.
CMakeLists.txt
- set APPNAME to cmidiin
- change c621_rt_midiprobe.cpp to c622_rt_cmidiin.cpp in SOURCE_FILES
Build and run
cd $HOME312/cs312/hw62/c622_rt_cmidiin/build
cmake .. && make && ./cmidiin
Output
Would you like to open a virtual input port? [y/N]
ANSWER: n
Would you like to open a virtual input port? [y/N] N
  Input port #0: IAC Driver Bus 1
  Input port #1: VMPK Output

Choose a port number:
ANSWER: 1 (number of VMPK Output)
Play some keys on the VMPK piano keyboard.
You should see data every time you press (NON) and release (NOF) a MIDI keyboard key.
Byte 0 = 144, Byte 1 = 60, Byte 2 = 1, stamp = 0
Byte 0 = 144, Byte 1 = 60, Byte 2 = 0, stamp = 0.0720003
Byte 0 = 144, Byte 1 = 62, Byte 2 = 127, stamp = 0.367993
Byte 0 = 144, Byte 1 = 62, Byte 2 = 0, stamp = 0.0920104
Byte 0 = 144, Byte 1 = 64, Byte 2 = 19, stamp = 0.172997
Byte 0 = 144, Byte 1 = 64, Byte 2 = 0, stamp = 0.153997
Byte 0 = 144, Byte 1 = 65, Byte 2 = 52, stamp = 0.0660252
Byte 0 = 144, Byte 1 = 65, Byte 2 = 0, stamp = 0.193935
Byte 0 = 144, Byte 1 = 67, Byte 2 = 127, stamp = 0.0169934
Byte 0 = 144, Byte 1 = 67, Byte 2 = 0, stamp = 0.256055
Experiments
- Play some notes
status 144 = 0x90, note on
status 128 = 0x80, note off - Select a Control: Choose a control source from the popup menu and move the Value: knob
status 176 = 0xB0, control change - Move the Bender: slider
status 224 = 0xE0, pitch bend - Choose a new Program: from the popup menu. status 192 = 0xC0, patch change
- Watch the status bytes and and data bytes change.
Differences from MIDIDisplay_DLS
- status displayed in decimal
- NOF displayed as NON with velocity 0
- timestamps displayed in decimal seconds at the microsecond level
0.367993 = 367993us ≈ 370ms
Callback function
If you examine the source c622_rt_cmidiin.cpp you'll notice that all the MIDI input is handled by a single callback function.
void mycallback(double deltatime, std::vector<unsigned char> *message, void * /*userData*/)
{
  unsigned int nBytes = message->size();
  for (unsigned int i = 0; i < nBytes; i++)
    std::cout << "Byte " << i << " = " << (int)message->at(i) << ", ";
  if (nBytes > 0)
    std::cout << "stamp = " << deltatime << std::endl;
}
The callback function is registered to RtMidi inside main()
midiin->setCallback(&mycallback);
VMPK Preferences
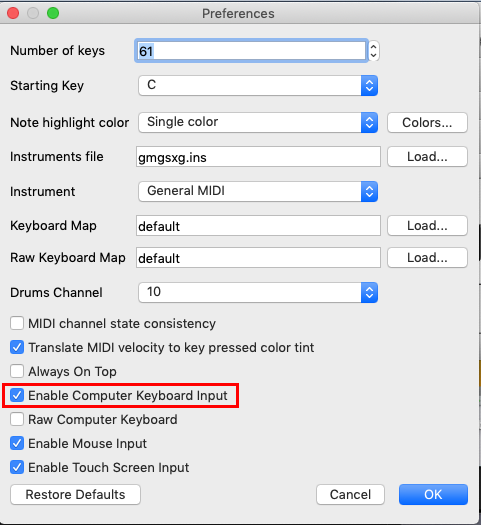
VMPK has a setting that turns keys you type on you computer keyboard in NON/NOF messages. Choose Preferences from the vmpk menu.
When the callback function is idle, main() can do other processing as shown by these two lines in main() that allow typing in between MIDI messages. You have to be in Terminal for this to work.
std::cout << "\nReading MIDI input ... press <enter> to quit.\n";
    char input;
    std::cin.get(input);
c623_rt_midiout.cpp
Setup
Execute in Terminal.
cd  $HOME312/cs312/hw62
mkdir c623_rt_midiout
# Copy RtMidi example code
cd c623_rt_midiout
mkdir build
cp  $HOME312/cs312/hw62/c621_rt_midiprobe/CMakeLists.txt   .
cp $HOME312/rtmidi/tests/midiout.cpp c623_rt_midiout.cpp
Open the c623_rt_midiout folder in vsCode.
CMakeLists.txt
- set APPNAME to midiout
- change c621_rt_midiprobe.cpp to c623_rt_midiout.cpp in SOURCE_FILES
Important:
Before running midiout make sure that
- MIDIDisplay_DLS
- VMPK is no longer open or active.
- Au Lab must be open and configured correctly as DLSMusicDevice.
Build and run
cd build
cmake .. && make && ./midiout
Output //
- You'll be asked "Would you like to open a virtual output port? [y/N]. Hit Enter to answer No.
- Then you'll be asked which port to use. Type the number corresponding to DLSMusicDevice.
Would you like to open a virtual output port? [y/N] # Hit return to answer N
     Output port #0: IAC Driver Bus 1
     Output port #1: DLSMusicDevice

   Choose a port number: 1 # DLSMusicDevice
Type Enter and you should hear MIDI note 64 (E above middle C) played on an Electric Piano.
midiout.cpp
These are the MIDI message routines from midiout.cpp. I've added additional comments.
// Send out a series of MIDI messages.

// Program change: 192, 5
//je  CMidiPacket mp = {0xC0, 5};  Electric Piano 2
message.push_back( 192 );
message.push_back( 5 );
midiout->sendMessage( &message );

SLEEP( 500 );

//je System Realtime message mp = {0xF1, 60};
//je SMPTE time code message to synchronize to video playback systems
message[0] = 0xF1;
message[1] = 60;
midiout->sendMessage( &message );

// Control Change: 176, 7, 100 (volume level 100 out of max 127)
//je  CMidiPacket mp = {0xB0, 7, 100};
message[0] = 176;
message[1] = 7;
message.push_back( 100 );
midiout->sendMessage( &message );

// Note On: 144, 64, 90
//je  CMidiPacket mp = {0x90, 64, 90};
message[0] = 144;
message[1] = 64;
message[2] = 90;
midiout->sendMessage( &message );

SLEEP( 500 );

// Note Off: 128, 64, 40
//je  CMidiPacket mp = {0x80, 64, 40};
message[0] = 128;
message[1] = 64;
message[2] = 40;
midiout->sendMessage( &message );

SLEEP( 500 );

// Control Change: 176, 7, 40  (volume level 40 out of max 127)
//je  CMidiPacket mp = {0xB0, 7, 40};
// why bother? - the note has just been turned off
message[0] = 176;
message[1] = 7;
message[2] = 40;
midiout->sendMessage( &message );

SLEEP( 500 );

// Sysex: 240, 67, 4, 3, 2, 247
//je  CMidiPacket mp = {0xF0, 67, 4, 3, 2, 0xF7};
//je  0xF0 marks beginning, 0xF7 marks end,
//je  67 is an assigned ID to a Japanese Manufacturer,
//je  4, 3, 2 whatever the manufacturer wants
message[0] = 240;
message[1] = 67;
message[2] = 4;
message.push_back( 3 );
message.push_back( 2 );
message.push_back( 247 );
midiout->sendMessage( &message );
Note:
The DLSMusicDevice will not always be Output Port #1. At home I have a multi-port MIDI interface and the DLSMusicDevice is Output Port #12.
Compiled APIs:
  OS-X CoreMidi

Current input API: OS-X CoreMidi

There are 11 MIDI input sources available.
  Input Port #1: IAC Driver Bus 1
  Input Port #2: The Laboratory
  Input Port #3: MIDI Express XT Port 1
  Input Port #4: MIDI Express XT Port 2
  Input Port #5: MIDI Express XT Port 3
  Input Port #6: MIDI Express XT Port 4
  Input Port #7: MIDI Express XT Port 5
  Input Port #8: MIDI Express XT Port 6
  Input Port #9: MIDI Express XT Port 7
  Input Port #10: MIDI Express XT Port 8
  Input Port #11: MIDI Express XT Sync Port

Current output API: OS-X CoreMidi

There are 12 MIDI output ports available.
  Output Port #1: IAC Driver Bus 1
  Output Port #2: The Laboratory
  Output Port #3: MIDI Express XT Port 1
  Output Port #4: MIDI Express XT Port 2
  Output Port #5: MIDI Express XT Port 3
  Output Port #6: MIDI Express XT Port 4
  Output Port #7: MIDI Express XT Port 5
  Output Port #8: MIDI Express XT Port 6
  Output Port #9: MIDI Express XT Port 7
  Output Port #10: MIDI Express XT Port 8
  Output Port #11: MIDI Express XT All Cables
  Output Port #12: DLSMusicDevice
Homework 6.2
hw621_cmidiin_cmp33
There are important difference between the MIDI timestamps of Mac OS X, RtMidi, and CMidiPacket.
- The Mac OS X MIDI timestamp is type UInt64 in microseconds since since the computer was booted up.
- RtMidi timestamps use the underlying Mac OS X timestamp but convert them into delta time differences between messages in fractions of a second of type double.
- CMidiPacket timestamps are type uint32_t in milliseconds starting at 0.
- Both RtMidi and CMidiPacket assume the first timestamp begins at zero.
- To convert RtMidi timestamps to CMidiPacket43 timestamps you'll need to convert the RtMidi timestamp to milliseconds and then keep a running total of the RtMidi delta times.
Setup
cd $HOME312/cs312/hw62
mkdir hw621_cmidiin_cmp33
cd hw621_cmidiin_cmp33
cp -R $HOME312/cs312/hw62/c622_rt_cmidiin/c622_rt_cmidiin.cpp .
cp -R $HOME312/cs312/hw62/c622_rt_cmidiin/CMakeLists.txt .
mkdir build
mv c622_rt_cmidiin.cpp hw621_cmidiin_cmp33.cpp
CMakeLists.txt
- set APPNAME to cmidiin_cmp33
- change c622_rt_cmidiin.cpp to hw621_cmidiin_cmp33.cpp in SOURCE_FILES
Assignment
Modify hw621_cmidiin_cmp33.cpp to display the output in CMidiPacket format.
It will require these changes.
- Add includes for hw332_CMidiPacket.h
- Add namespace using CMP33
- Rewrite the mycallback(…) function to display CMidiPacket data to std::cout.
- Modify the RtMidi deltatime in seconds (floating point microseconds) to CMidiPacket chronological ascending uint32_t timestamps in milliseconds.
Open VMPK and play some notes. You should see CMidiPacket display messages appear.
Copy paste these messages into MIDIDisplay_DLS and play them.
hw622_midiout_cmp33
This assignment will involve translating a CMidiPacket message into a RtMidi message in order to use the RtMidi sendMessage() function. It also replaces the sleep() function with the delay from hw423_CDelayMs.
Setup
cd $HOME312/cs312/hw62
mkdir hw622_midiout_cmp33
cd hw622_midiout_cmp33
mkdir build
touch CMakeLists.txt
touch hw622_midiout_cmp33.cpp
cp -R $HOME312/cs312/hw62/c622_rt_midiout/CMakeLists.txt .
CMakeLists.txt
- set APPNAME to midiout_cmp33
- modify SOURCE_FILES as needed
Here is the relevent section of RtMidi.h that defines a MidiMessage.
// A MIDI structure used internally by the class to store incoming
// messages.  Each message represents one and only one MIDI message.
struct MidiMessage {
  std::vector<unsigned char> bytes;

  //! Time in seconds elapsed since the previous message
  double timeStamp;

  // Default constructor.
  MidiMessage()
    : bytes(0), timeStamp(0.0) {}
};
There are two main differences:
- timeStamps are stored as type double
- the MIDI data is stored as a std::vector<unsigned char> bytes.
The initialization bytes(0) creates an empty vector.
The CMidiPacket class handles all MIDI message of length 2 or 3, status bytes 0x80-0xEF. RtMidi handles those as well and is also capable of handling status bytes 0xF0-0xFF with variable length data bytes.
Assignment
Rewrite hw622_rt_midiout_cmp33 to ::
- refactor RtMidi chooseMidiPort()
- store MIDI messages in a std::vector<CMidiPacket>
- convert hw331_CMidiPacket to RtMidi format before sending
- use hw423_CDelayMs instead of the sleep() function.
Rewrite chooseMidiPort(…)
/* Assuming midiprobe returned this
There are 2 MIDI output ports available.
  Output Port #0: IAC Driver Bus 1
  Output Port #1: DLSMusicDevice
*/
bool chooseMidiPort(RtMidiOut *rtmidi)
{
  rtmidi->openPort(1); // DLSMusicDevice
  return true;
}
hw622_rt_midiout_cmp33.cpp
Copy/paste
Use hw622_midiout_cmp33_je to help fill in the missing pieces.
// hw622_midiout_cmp33.cpp

//*****************************************//
//  midiout.cpp
//  by Gary Scavone, 2003-2004.
//
//  Simple program to test MIDI output.
//
//  modified for CS312
//*****************************************//

#include <iostream>
#include <cstdlib>

#ifndef RTMIDI_H
#include "RtMidi.h"
#endif

#ifndef HW332_CMIDIPACKET_H_
#include "hw332_CMidiPacket.h"
#endif

#ifndef HW421_CDELAYMS_H_
#include "hw421_CDelayMs.h"
#endif

using namespace CMP33;

RtMidiOut *midiout = 0;
std::vector<CMidiPacket> vplay;

bool chooseMidiPort(RtMidiOut *rtmidi)
{
  /* Assuming midiprobe returned:
There are 2 MIDI output ports available.
  Output Port #0: IAC Driver Bus 1
  Output Port #1: DLSMusicDevice
*/
  std::cout << "chooseMidiPort(RtMidiOut *rtmidi)\n";
  std::cout << "\topen Output Port for DLSMusicDevice\n";
  return true;
}

void sendCMidiPacket(const CMidiPacket &mp)
{
  // input is CMidiPacket
  // transform to RtMidi message format
  // send using midiout->sendMessage(&message);
  std::cout << "sendCMidiPacket(const CMidiPacket &mp)\n";
  std::cout << "\ttransform to RtMidi message format\n";
  std::cout << "\tsend using midiout->sendMessage(&message)\n";
}

void stuffPackets()
{
  // stuff CMidiPacket messages into std::vector<CMidiPacket> vplay
  // create a patch change message for instrument 0, piano
  // create a series of NON and NOF message
  // use all MIDI note numbers 60-72
  // NON timestamps are 0, 1000, 2000, ...
  // NOF timestamps are (NON+900)
  std::cout << "stuffPackets()\n";
  std::cout << "\tstuff CMidiPacket messages into std::vector<CMidiPacket> vplay\n";
  // dummy CMidiPacket
  CMidiPacket mp;
  vplay.push_back(mp);
}

bool openMidiOutPort()
{
  // copy all relevent try_catch blocks out of hw622_rt_midiout main()
  // and use them here
  // return true if port opened
  // return false on any error
  std::cout << "openMidiOutPort()\n";
  std::cout << "\tcopy all relevent try_catch blocks out of hw622_rt_midiout main()\n";
  std::cout << "\tcalls chooseMidiPort(0\n";
  return true;
}

void closeMidiOutPort()
{
  // delete midiout if it exists
  std::cout << "closeMidiOutPort()\n";
  std::cout << "\tdelete midiout if it exists\n";
}

/*========================
   Do not change main()
========================*/
int main()
{
  // OPEN RtMidiOut port
  if (!openMidiOutPort())
    return 0;

  // create vplay vector
  stuffPackets();
  // set tempo
  CDelayMs::s_tempo = 180;
  // play
  for (auto itr : vplay)
    sendCMidiPacket(itr);

  // CLOSE RtMidiOut port
  closeMidiOutPort();

  return 0;
}
Build and run
cd build
cmake .. && make && ./hw622_rt_midiout_CMP33
Output
openMidiOutPort()
        copy all relevent try_catch blocks out of hw622_rt_midiout main()
        calls chooseMidiPort()
stuffPackets()
        stuff CMidiPacket messages into std::vector<CMidiPacket> vplay
sendCMidiPacket(const CMidiPacket &mp)
        transform to RtMidi message format
        send using midiout->sendMessage(&message)
closeMidiOutPort()
        delete midiout if it exists
Submission format
Feel free to email jellinge@carleton.edu on any part of the homework that is unclear to you. Chances are if you have questions other students do too. I will answer those questions by email to everyone in the class. The original sender will remain anonymous. I have tried to provide clues to the homework in the web pages, reading assignments, and labs. Sometimes what seems obvious to me is not obvious to students just learning C++.
Create a folder named hwNN_LastnameFirstname_LastnameFirstname.
Substitute your name and your partner's name for LastnameFirstname_LastnameFirstname.
Remember
- Boilerplate header at top of every file.
- Make sure your program compiles before submitting.
- Programs that compile and produce partially correct output will be graded.
- You can send notes to me in your homework files by enclosing them in block comments.
- Programs that do not compile get an automatic F (59%).
- Submit the homework in only one of the partner's folders.
- Empty your build or build-debug folders using the command emptyBuildFolder.sh
- Only include .h, .cpp, Makefiles, CMakeLists.txt
- Do not include these folders/files
.git
.vscode Double check for the above two folders using this command
ls -a hwNN_LastnameFirstname1_LastnameFirstname2
# if either .git or .vscode exist in the folder you're submitting remove them with
# rm -fR .git
# rm -fR .vscode
Hand-in folder contents
$HOME312/common
├── RtMidi
│   ├── RtMidi.cpp
│   └── RtMidi.h
├── hw332_CMidiPacket.cpp
├── hw332_CMidiPacket.h
├── hw411_rand_int.cpp
├── hw411_rand_int.h
├── hw421_CDelayMs.cpp
├── hw421_CDelayMs.h
├── hw422_CAppleMidiSynth.cpp
├── hw422_CAppleMidiSynth.h
├── hw423_CMidiTrack.cpp
├── hw423_CMidiTrack.h
├── hw511_CInstrument.cpp
└── hw511_CInstrument.h

$HOME312/cs312/hw62
├── hw621_cmidiin_cmp33
│   ├── CMakeLists.txt
│   ├── build
│   └── hw621_cmidiin_cmp33.cpp
└── hw622_midiout_cmp33
    ├── CMakeLists.txt
    ├── build
    └── hw622_midiout_cmp33.cpp