CS 312 - Week 1.2
CS 312 Audio Programming Winter 2020
Table of Contents
1.2 Class
Notes for CMC labs
Shell prompt
The default shell prompt does not indicate what your current working directory is. You can change your shell prompt like this. It won't become permanent until you add it to your .bashrc file using the export term as shown in the last example. You can test various prompts by executing the following commands. The changes will appear instantly.
Mac Terminal
echo $PS1
# CMC
Set shell prompt to full pathname.
PS1="\w $"
Set shell prompt to last directory in full pathname.
PS1="\W $"
Set shell prompt to Volume:last directory user.
PS1="\h:\W \u\$"
In CMC you can append this to your .bashrc file.
No spaces surrounding =.
export PS1="<your_choice>"
Other choices from man bash.
When executing interactively, bash displays the primary prompt PS1 when it is ready to
read  a  command, and the secondary prompt PS2 when it needs more input to complete a
command. Bash displays PS0 after it reads a command but before executing it. Bash displays
PS4 as described above before  trac- ing each command when the -x option is enabled. Bash
allows these prompt strings to be customized by inserting a number of backslash-escaped
special characters that are decoded as follows:
  \a     an ASCII bell character (07)
  \d     the date in "Weekday Month Date" format (e.g., "Tue May 26")
  \D{format}
      the format is passed to strftime(3) and the result is inserted into the prompt  string;
     an  empty  format  results  in  a  locale-specific time representation.  The braces are
     required
  \e     an ASCII escape character (033)
  \h     the hostname up to the first `.'
  \H     the hostname
  \j     the number of jobs currently managed by the shell
  \l     the basename of the shell's terminal device name
  \n     newline
  \r     carriage return
  \s     the name of the shell, the basename of $0 (the portion following the final slash)
  \t     the current time in 24-hour HH:MM:SS format
  \T     the current time in 12-hour HH:MM:SS format
  \@     the current time in 12-hour am/pm format
  \A     the current time in 24-hour HH:MM format
  \u     the username of the current user
  \v     the version of bash (e.g., 2.00)
  \V     the release of bash, version + patch level (e.g., 2.00.0)
  \w     the current working directory, with $HOME abbreviated with a tilde
         (uses the  value  of the PROMPT_DIRTRIM variable)
  \W     the basename of the current working directory, with $HOME abbreviated with a tilde
  \!     the history number of this command
  \#     the command number of this command
  \$     if the effective UID is 0, a #, otherwise a $
  \nnn   the character corresponding to the octal number nnn
  \\     a backslash
  \[     begin  a  sequence  of non-printing characters, which could be used to embed a terminal
         control sequence into the prompt
  \]     end a sequence of non-printing characters
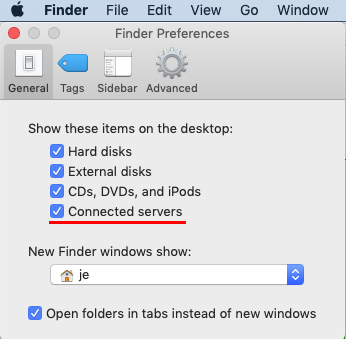
Class folder desktop icons
You can show icons for your class folder.
https://support.apple.com/guide/mac-help/connected-disks-devices-servers-mac-mchlp1039/mac
WCC startup scripts in detail
There were some issues in class 1.1 with the WCC setup. I've written the link below to explain in detail the scripts I created to setup the WCC lab environment for CS312. I'm unable to directly test your student accounts in WCC so I need your help in validating my approach.
Open and the link below and follow the directions.
Notify me if things you see are different from what I've written.
Continue with the Lab 1.2 section for this class.
Lab 1.2
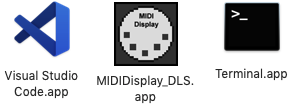
Applications used in this lab
- /Applications/Utility/Terminal
- /Applications/Visual Studio Code
- /Applications/MIDIDisplay_DLS
Open each of these Applications. They'll stay in the Dock until you logout.
MIDIDisplay_DLS
Written by John Ellinger for CS312. You'll have the skills to write this by the end of the term. DLS refers to DownLoadable Sounds, a sample sound format that can be used in Audio plugins. Apple licensed a General MIDI sound set from Roland Corporation to use in its built in MIDI synthesizer.
I did not write this app with the degree of error checking and reporting necessary for a commercial program. It was designed a a tool for experimenting with MIDI messages in the Carleton Music Technology classes I've taught in the past. Feel free to send me an email or talk to me in class if you discover a reproducible error. Reproducible means you can write down the steps that produce the error.
Open MIDIDisplay_DLS
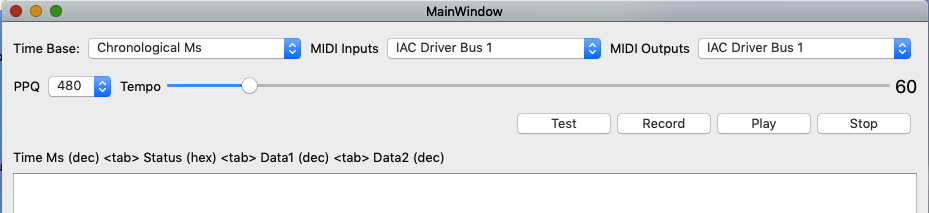
- Time Base
Leave at default Chronological Ms.
- MIDI Inputs
Leave at default IAC Driver Bus 1.
- MIDI Outputs
Leave at default IAC Driver Bus 1.
- PPQ menu
Leave at default 480.
- Tempo Slider
Changes the tempo (playback speed). Tempo changes are accurate only if the timestamp data was entered based on a tempo of 60 bpm.
- Test Button
Non functional at this time. Will crash.
- Record Button
Non functional unless a MIDI keyboard is connected and setup properly for Mac OS.
- Play Button
Plays the MIDI messages in the window.
- Stop Button
Sends a NOF message to notes 0-127 on all 16 MIDI channels. This command takes about four seconds to complete. The delay happens because MIDI can only send a a certain number of messages per millisecond. Sending all the messages at once could cause a "MIDI log jam."
- Data Entry Area
- The main window area is a text editor where you can enter MIDI data. It responds to the usual text editing commands.
- Status Header
The status header above the Data Entry Area reminds you that each MIDI message must be entered in a specific number base. The status number is a hex value but is not prefixed by 0x. Data2 is in parentheses because some MIDI messages do not use it.
time status data1 (data2) decimal hex decimal decimal - Conventions
- The MIDIDisplay_DLS data entry tempo is always 60 beats per minute.
- Rows beginning with a # are comments and will be ignored.
- One quarter note beat is 1000 milliseconds.
- MIDIDisplay_DLS does minimal error checking and expects your data to be error free.
- The MIDIDisplay_DLS data entry tempo is always 60 beats per minute.
MIDIDisplay_DLS test
Test 1
Copy/replace/paste into MIDIDisplay_DLS.
The # is a comment and only used visually separate the NON-NOF pairs.
Click the Play button.
0  90  60  100
1000 80  60  0
#
1000  90  62  100
2000 80  62  0
#
2000  90  64  100
3000 80  64  0
#
3000  90  60  100
4000 80  60  0
If you don't hear any sound
- Check that the volume control on the computer is turned up.
- Occasionally a MIDI note gets "stuck" and remains sounding after you click the Stop button. \ The only remedy is to Quit MIDIDisplay_DLS and reopen.
- Ask me.
Play your hw112_helloMidi.cpp
Delete all text from MIDIDisplay_DLS.
Recompile hw112_helloMidi.cpp in Mac Terminal.
cd $HOME312/cs312/hw11
cl hw112_hellomidi.cpp
# Copy the output of a.out to the clipboard
./a.out | pbcoppy
Switch to MIDIDisplay_DLS and immediately paste. It should work.
Notes:
- pbcopy, pbpaste
- Apple commands for copying and pasting. pb refers to pasteboard an internal buffer that holds the text copied.
- |
- the pipe operator. The output of the command on the left becomes the input to the command on the right.
Play my hw111_helloMidi.txt
Copy/paste my helloMidi.txt into MIDIDisplay.
# A MIDI message contains three or four numbers separated by a single tab character
# number 1 is a time stamp in milliseconds in decimal format
# number 2 is a MIDI status message in hexadecimal format without the 0x prefix (range 0x80 - 0xFF)
# number 3 is a MIDI data1 message in decimal format (range 0 - 127)
# number 4 is a MIDI data2 message in decimal format (range 0 - 127)

# status 0xC0 begins a a patch change message
# indicating which instrument sound to use
# patch change messages do not use data2
# data1 is the instrument number.
0 c0  0

# status 0x90 begins a Note On (NON) message
# NON messages use both data1 and data2
# data1 is the MIDI note number that corresponds to
# keys on a piano where Middle C is note number 60
# data2 is the velocity or how loud or soft the note sounds
0 90  60  110

# status code 0x80 begins a Note Off (NOF) message
# NOF messages use both data1 and data2
# data1 is the MIDI note number that corresponds to
# keys on a piano where Middle C is note number 60
# data2 should be set to zero
900 80  60  0

# Every NON must be followed by a NOF with a later time stamp
1000  90  55  80
1400  80  55  0

# You can also send a NOF using a NON with a velocity of 0
1500  90  55  60
1900  90  55  0

# More NON-NOF pairs
2000  90  56  100
2900  80  56  0
3000  90  55  80
4200  80  55  0

# Another patch change
4999  c0  56

# More NON-NOF pairs
5000  90  59  110
5900  80  59  0
6000  90  60  127
8000  80  60  0
Set the tempo to around 160.
Click the Play button.
Play again and try changing the tempo while it's playing.
There are two patch change messages in helloMidi
| time | status | data1 | instrument |
|---|---|---|---|
| 0 | 0xC0 | 0 | piano |
| 4999 | 0xC0 | 56 | trumpet |
General MIDI sound set
Edit in MIDIDisplay_DLS and change instruments as desired.
Remember to use zero based numbers.
Here's a list.
https://en.wikipedia.org/wiki/General_MIDI
Six properties of sound
| Physics | Music | MIDI |
|---|---|---|
| Fundamental Frequency | Pitch | Note number |
| Duration | Note Value | Timestamp difference NON-NOF |
| Amplitude, Intensity, Power | Dynamics | Velocity, Volume Ctrl, Expression Ctrl |
| Spectrum, Fourier Analysis | Timbre | Patch Change |
| Stereo field | Location | Pan Ctrl |
| Envelope | Articulation | Built in, Volume Ctrl, Expression Ctrl |
The following examples are meant to demonstrate using MIDI messages to modify the six properties of sound. Copy/replace/paste each example into MIDIDIsplay_DLS and play it.
Reset all controllers message
If you do these examples one after the other the changes made to Volume, Pan, Expression and Patch would carry over into the the next example. The Reset All Controllers (0xBn 121 0) message is used to return to a default state at the beginning of each example.
Pitch/frequency
The MIDIDisplay_DLS test demonstrated pitch using the first four notes of Frere Jacques.
# Reset all controllers
0  B0  121 0
#
0  90  60  100
1000 80  60  0
#
1000  90  62  100
2000 80  62  0
#
2000  90  64  100
3000 80  64  0
#
3000  90  60  100
4000 80  60  0
Frequency and pitch are often thought to be synonymous. However, there is a subtle distinction between them. A pure sine wave is the only sound that consists of one and only one frequency. Most musical sounds we hear contain a mix of several harmonically related frequencies. Jean Baptiste Fourier in the 1820's stated that every mathematical function f(x) can be expressed as a series of of sinusoids of integer multiples of x. The formula below is called the Fourier Series. We'll be using it later in the term to construct different types of waveforms.
\[anySound = \sum\limits_{n = 1}^\infty {{A_n}\sin (2\pi n{f_0} + {\theta _n})} \]
"F zero" or "f naught" is called the fundamental frequency. All other frequencies are integer multiples of f0 with different Amplitudes and phases.
Duration
The duration of each note in the first example was 1000 ms. (Legato in music).
In this example each note lasts 50 ms. (Staccato in music).
# Reset all controllers to default state
0  B0  121 0
#
0  90  60  100
50 80  60  0
#
1000  90  62  100
1050 80  62  0
#
2000  90  64  100
2050 80  64  0
#
3000  90  60  100
3050 80  60  0
Dynamics
In this example the notes gradually get softer using MIDI data2.
Dynamics in music use fff ff f mf mp p pp ppp from loudest to softest.
# Reset all controllers to default state
0  B0  121 0
#
0  90  60  127
500 80  60  0
#
1000  90  62  100
1500 80  62  0
#
2000  90  64  80
2500 80  64  0
#
3000  90  60  60
3500 80  60  0
Using the MIDI Control message (OxBn 7 data2) for volume with data2 kept constant.
# Reset all controllers to default state
0  B0  121 0
#
0  B0  7    127
0  90  60  100
500 80  60  0
#
1000  B0  7    100
1000  90  62  100
1500 80  62  0
#
2000  B0  7    80
2000  90  64  100
2500 80  64  0
#
3000  B0  7    60
3000  90  60  100
3500 80  60  0
Timbre
Pronounced "tam-burr" and refers to the tone color, or why the same note sounds different when played on a violin or clarinet. In digital audio it's because the amplitudes and phases of each sinusoid are different but the fundamental frequency is the same.
Using the MIDI patch change (0xCn data1) to change instruments.
# Reset all controllers to default state
0  B0  121 0
#
0  C0  11
0  90  60  127
800 80  60  0
#
1000  C0  17
1000  90  62  127
1800 80  62  0
#
2000  C0  66
2000  90  64  127
2800 80  64  0
#
3000  C0  100
3000  90  60  127
3800 80  60  0
Location/Stereo panorama
Using the MIDI control message for stereo panorama (0xBn 10 data2).
Usually referred to as pan control, or L/R balance.
Far left = 0.
Center = 64.
Far right = 127.
# Reset all controllers to default state
0  B0  121 0
#
0  C0  11
0  B0  10  0
0  90  60  127
800 80  60  0
#
1000  C0  17
1000  B0  10  64
1000  90  62  127
1800 80  62  0
#
2000  C0  66
2000  B0  10  127
2000  90  64  127
2800 80  64  0
#
3000  C0  100
3000  B0  10  64
3000  90  60  127
3800 80  60  0
Envelope
The envelope of a sound is the outline of the waveform's amplitude changing over time. A guitar has a loud attack and dies away quickly. Strings, brass, and wind instruments can sustain a note and increase or decrease using pressure.
Using the MIDI Control message for Expression (0xBn 11 data2).
The timestamp and data2 series between NON and NOF was created in Microsoft Excel using Fill/Series in the Edit menu.
In music this would be indicated by the terms crescendo, decrescendo.
# Reset all controllers to default state
0  B0  121 0
#
# cello
0  C0  42
0  B0  11  0
0  90  60  127
#
66  B0 11 63
132  B0 11 66
198  B0 11 69
264  B0 11 72
330  B0 11 75
396  B0 11 78
462  B0 11 81
528  B0 11 84
594  B0 11 87
660  B0 11 90
726  B0 11 93
792  B0 11 96
858  B0 11 99
924  B0 11 102
990  B0 11 105
1056  B0 11 108
1122  B0 11 111
1188  B0 11 114
1254  B0 11 117
1320  B0 11 120
1386  B0 11 123
1452  B0 11 126
1518  B0 11 127
1584  B0 11 123
1650  B0 11 120
1716  B0 11 117
1782  B0 11 114
1848  B0 11 111
1914  B0 11 108
1980  B0 11 105
2046  B0 11 102
2112  B0 11 99
2178  B0 11 96
2244  B0 11 93
2310  B0 11 90
2376  B0 11 87
2442  B0 11 84
2508  B0 11 81
2574  B0 11 78
2640  B0 11 75
2706  B0 11 72
2772  B0 11 69
2838  B0 11 66
2904  B0 11 63
2970  B0 11 60
#
3000 80  60  0
Playing a chord
# Reset all controllers to default state
0  B0  121 0
#
0  C0  0
0  90  60  100
0  90  64  100
0  90  67  100
0  90  72  100
#
2000  80  60  0
2000  80  64  0
2000  80  67  0
2000  80  69  0
Playing multiple channels
This example uses two MIDI channels out of a total of 16 available. Channel 10 (zero based 9) is reserved for drums. Channel 1 (zero based 0) is flute and channel 2 (zero based 1) is bassoon.
# Reset all controllers to default state
0  B0  121 0
#
0  C0  73
0  C1  70
#
0	90	67	100
0	91	55	100
#
900	80	67	0
900	81	55	0
#
1000	90	69	100
1000	91	53	100
#
1900	80	69	0
1900	81	53	0
#
2000	90	71	100
2000	91	50	100
#
2900	80	71	0
2900	81	50	0
#
3000	90	72	100
3000	91	48	100
#
3900	80	72	0
3900	81	48	0
Quit MIDI Display_DLS
If you still have time in class continue to the Homework section and start with vsCode settings.
Reading
MIDI
The MIDI Specification appeared in 1983 as a music industry hardware/software standard that allowed MIDI hardware devices made by different manufacturers (Roland, Yamaha, Korg …) to communicate directly with each other as well as communicate with different PC operating systems (DOS, Windows, Mac, Linux…). MIDI version 1 has been around for 37 years. In 2019 the MIDI version 2 specification was announced but hardware and software have yet to appear. It will be backward compatible with MIDI version 1.
My first computer was a Mac Plus that I purchased one week after it was introduced in 1986. Within a year I had written my first MIDI program. Two years later I was selling my first commercial MIDI program for jazz improvisiation on the Mac. It was written in Pascal, the language of the Mac operating system in those days.
MIDI Message Format
The official MIDI v.1 standard defines all MIDI messages to consist of a status byte followed by one or more data bytes.
A MIDI byte is an 8 bit unsigned integer. There are two types of bytes defined in MIDI: data bytes and status bytes.
- Data bytes
- have the range 0-127 (0x0-0x7F)
The MSB (Most significant bit in binary) is 0.
Example b01111111 = 0x7F - Status bytes
- have the range 128-255 (0x80-0xFF).
The MSB (Most significant bit in binary) is 1.
Example b10000000 = 0x80
Status bytes
Eight types of status bytes are defined for particular message types. The n refers to one of the sixteen (0 - 0xF) MIDI channels the status byte affects.
| Status | Message type | Number data bytes |
|---|---|---|
| 0x8n | Note Off (NOF) | 2 |
| 0x9n | Note On (NON) | 2 |
| 0xAn | Aftertouch | 2 |
| 0xBn | Control | 2 |
| 0xCn | Patch Change | 1 |
| 0xDn | Channel Pressure | 1 |
| 0xEn | Pitch Bend | 2 |
| 0xFn | System | variable |
The high four bits of a byte, called the high nibble, refer to the status message type.
The lower four bits, low nibble, refer to the MIDI channel.
A nibble is a small bite (byte). Get it?
You'll get used to thinking in hex for all status bytes. Its much easier to interpret 0x93 as a NON message for channel 3 (zero based) than seeing decimal 147.
MIDI Channels
There are sixteen MIDI channels available. MIDI allows you to write and play a song that uses sixteen different instruments simultaneously.
Users and user manuals prefer one based MIDI channels, 1 - 16.
Programmers use zero based hex value MIDI channels, 0-0xF (0-15).
- Examples
A user would read "Set MIDI channel 1 to flute".
A programmer would code this MIDI message 0xC0 75.
Programmers send and receive zero based MIDI messages but should display user interface settings as one based.
Common MIDI messages
The MIDI messages we'll use the most often in CS312 are
| 0x8n | Note Off (NOF) | n is MIDI channel, 0 - 0xF |
| 0x9n | Note On (NON) | n is MIDI channel, 0 - 0xF |
| 0xBn | Control | n is control type, Volume, Pan, Mod Wheel, etc. |
| 0xCn | Patch Change | n is instrument sound piano, trumpet, cello, etc. |
The smallest C++ data type for an unsigned (non negative) 8 bit integer type is unsigned char. However, as you discovered in hw111 the char type outputs text by default. It's not the easiest way to display numbers. We'll deal with that later.
General MIDI sounds
General MIDI defines 128 different instruments and specifies the MIDI patch change number from 0-127 that is used to access each of them. Manufacturers use the GM defined numbers for each instrument but can implement the sounds how they choose.
DLS sounds
Apple's built in synthezier uses a sample based format called Downloadable Sounds (DLS). Apple licensed a complete set of General MIDI from Roland corporation.
Samples and MIDI
Imagine creating a MIDI piano sample library where every key on a concert piano was recorded in high quality stereo at eight different loudness levels from extremely soft to extremely loud. That would take 704 separate recordings referred to as samples. If each sample was five seconds long the sample library could easily be over 1.2 gigabytes.
When a MIDI keyboard key is pressed down, the software would have to determine the key number pressed and the force used in order to match it with the correct sample at the appropriate volume level. Each individual sample would have an attack section, sustain section, and release section. These sections would be marked and located by known sample offsets from the beginning of the sample. The attack section is played when the key goes down, the sustain section loops as long as the key is held down, and the release section is played when the key comes up. That's a lot of work, both in recording and editing the audio, and writing the software. For the best realtime performance you'd want to load the entire sample library in memory.
There are very high quality orchestral sample libraries used by TV and film composers that can cost upwards of $10,000. That's still cheaper than renting an orchestra and recording studio.
Mac Finder
Quicklook
Select any text file in Finder and press the spacebar to see it's contents. Type down arrow or up arrow to display the next file. I often use this to quickly look at source code files in a folder.
Hide/Show Dot files
Unix systems (Mac OS) have a number of files and directories that are normally hidden from the user because their filename begins with a dot (a period), for example .bash_profile that we'll see later. You can view hidden files in the Terminal using these commands. # is a comment, don't bother typing it.
cd # cd without arguments goes to your home directory
pwd # print working directory - the full pathname to your home directory
ls -a # list all (including invisible) files
At the top of the output there are probably a number of files and directories beginning with a dot.
Show hidden files
This lab will be much easier if we can make these files visible in the Mac Finder.
- Keyboard shortcut
Cmd-Shift-.(Cmd-Shift-Period)
I've use these commands to always show hidden files.
defaults write com.apple.finder AppleShowAllFiles -boolean true
killall Finder
To make dot files hidden again, execute this command, but not now.
defaults write com.apple.finder AppleShowAllFiles -boolean false
killall Finder
Homework
This homework is to be done in the CMC labs.
Before starting the homework:
Reading
This Class 1.2 page, especially the MIDI and Mac Finder sections.
TCPP2
char § 1.4
Template § 6.1, 6.2
static_cast p. 53
formatting § 10.6
bitset § 13.4.2
vsCode settings
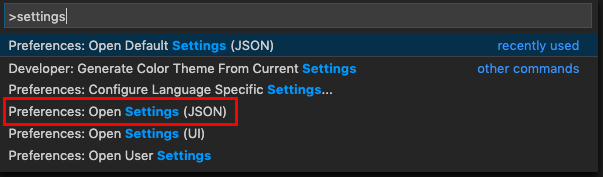
Choose Command Palette from the View menu.
Shortcut: Command-Shift-P
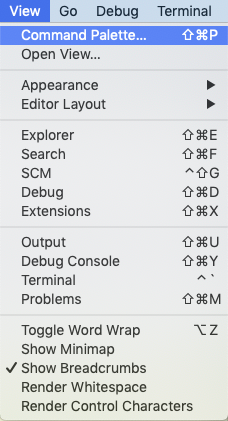
Enter settings in the search bar and then select /Preferences: Open Settings (JSON)
- Note
- If the settings.json window that opens is empty copy/paste the code below.
If the settings.json window already contains code between curly braces leave it there and append the statements between the curly braces just above the closing curly brace.
{
    "editor.multiCursorModifier": "ctrlCmd",
    "editor.formatOnPaste": true,
    "editor.formatOnSave": true,
    "editor.fontSize": 14,
    "window.zoomLevel": 0,
    "terminal.integrated.shell.osx": "/bin/bash",
    "terminal.integrated.fontSize": 14,
    "terminal.integrated.scrollback": 32000,
    "C_Cpp.clang_format_style": "Visual Studio",
    "C_Cpp.clang_format_path": "/usr/local/bin/clang-format",
    "terminal.integrated.cursorStyle": "line",
    "editor.tabSize": 2,
    "editor.insertSpaces": false,
    "[cpp]": {},
    "editor.defaultFormatter": "ms-vscode.cpptools",
    "clang-format.executable": "/usr/local/bin/clang-format",
    "clang-format.language.cpp.fallbackStyle": "LLVM",
    "clang-format.fallbackStyle": "LLVM",
    "window.restoreWindows": "none",
    "editor.minimap.enabled": false
}
Homework 1.2 Setup
First we'll turn your boilerplate executable into a command line tool.
Recompile hw111_boilerplate.cpp with this command.
cd $HOME312/cs312/hw11
cl hw111_boilerplate.cpp -o boilerplate
./boilerplate
You should see the output of boilerplate in the terminal.
Move boilerplate into the $HOME312/bin directory.
mv boilerplate $HOME312/bin/
Execute the boilerplate command.
boilerplate
You should see the text appear. This works because $HOME312/bin has been added to the $PATH environment variable.
Create the hw12 folders and files
Execute these commands in Terminal.
You can copy the entire contents and paste into Terminal.
cd $HOME312/cs312
mkdir hw12
cd hw12
touch hw121_charOutput.cpp
touch hw122_charOutputTemplate.cpp
touch hw123_charLoop.cpp
touch hw124_asciiTool.cpp
touch hw125_printMajorScale.cpp
code . # . refers to the current directory, in this case
Vscode should open the $HOME312/cs312/hw12 directory with the five source files displayed on the left.
Now try this in Terminal
boilerplate | pbcopy
pbpaste >> hw121_charOutput.cpp
Open hw12_charOutput.cpp in vsCode and you should see your boilerplate text appear.
Edit the filename and the assignment lines.
The date and time should be current.
If the file on the right of >> doesn't exist it will be created.
You can use this method to add boilerplate to the other four homework files.
Notes:
- >>
- the redirection operator. \
The output of the command on the left (must be text) is redirected to the file on the right.
A double angle >> appends the text at the end of the file.
A single angle > deletes the content of the file before appending.
Be careful when you use the single angle for redirection. - pbcopy, pbpaste
- Apple commands for copying and pasting.
pb refers to pasteboard, an internal buffer that holds the copied text. - |
- the pipe operator.
The output of the command on the left becomes the input to the command on the right.
hw121_charOutput.cpp
Copy/paste this code. Add the code below the boilerplate header.
#include <iostream>

int main()
{
  // MIDI message
  unsigned char status = 144;
  char data1 = 60;
  char data2 = 100;

  std::cout << "status: = " << status << std::endl;
  std::cout << "data1: = " << data1 << std::endl;
  std::cout << "data2: = " << data2 << std::endl;
}
Open the vsCode Terminal with Ctrl-` (Control-backtick).
Compile and run the program in vsCode terminal.
Try this shortcut: type cl hw121<TAB>.
The TAB key auto-completes file and command names.
cl hw121_charOutput.cpp -o hw121_charOutput && ./hw121_charOutput
Output
You'd expect to see numbers but instead you see this.
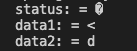
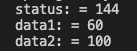
Assignment hw121
Modify the program to display the actual number assigned to the three variables. You must keep the type char. You want the program to display the output shown below.
Question: Why did this happen?
Append a block comment at the end of your source code and explain.
hw122_charOutputTemplate.cpp
Assignment hw122
Implement the template void print(T x, std::string msg) to display each char type as:
- decimal
- hexadecimal
- hexadecimal with 0x prefix
- binary
#include <iostream>
#include <string>
#include <bitset>

template <typename T>
void print(T x, std::string msg) {
 // you write
 }

int main() {
  char c = 9;
  signed char sc = 250;
  unsigned char uc = 144;

  print(c, "c: = ");
  print(sc, "sc: = ");
  print(uc, "uc: = ");
}
Hint: I used these.
- static_cast<type>(value)
- std::hex
- std::dec
- std::showbase
- std::noshowbase
- std::bitset<8>
The reading assignment above and Google will help. Use Google to figure out what std libraries to include for the above statements.
Why use a template
The reason is to avoid writing three separate functions that would all use the same code in the function body.
void print(char x, std::string msg);
void print(signed char x, std::string msg);
void print(unsigned char x, std::string msg);
Compile and run
You'll get a compiler warning but you'll still get output.
warning: implicit conversion from 'int'
     to 'signed char' changes value from 250 to -6 [-Wconstant-conversion]
 signed char sc = 250;
Output
c: = 9
c: = 9
c: = 0x9
c: = 00001001

sc: = -6
sc: = fffffffa
sc: = 0xfffffffa
sc: = 11111010

uc: = 144
uc: = 90
uc: = 0x90
uc: = 10010000
Warnings are good but they need to be fixed.
Fix the error by changing the signed char value to 50.
Output
c: = 9
c: = 9
c: = 0x9
c: = 00001001

sc: = 50
sc: = 32
sc: = 0x32
sc: = 00110010

uc: = 144
uc: = 90
uc: = 0x90
uc: = 10010000
When you use a plain char type to represent numbers there is no range checking. Using signed char and unsigned char incorrectly will issue a warning when you compile the program but it will still run. You should make it a habit to fix compiler warnings.
hw123_charLoop.cpp
This program is supposed to print the ascii characters from 0 to 127 but instead goes into an infinite loop.
#include <iostream>

int main() {
  for (char c = 0; c <= 127; ++c)
    std::cout << static_cast<int>(c) << " = " << c << std::endl;
}
- Compile and run
Press Ctrl-C to exit the loop.
Assignment hw123
Fix it.
Output when fixed
0 =
1 =
2 =
3 =
4 =
5 =
6 =
7 =
8 =
9 =
10 =

11 =

12 =

13 =
14 =
15 =
16 =
17 =
18 =
19 =
20 =
21 =
22 =
23 =
24 =
25 =
26 =
27 =
8 =
29 =
30 =
31 =
32 =
33 = !
34 = "
35 = #
36 = $
37 = %
38 = &
39 = '
40 = (
41 = )
42 = *
43 = +
44 = ,
45 = -
46 = .
47 = /
48 = 0
49 = 1
50 = 2
51 = 3
52 = 4
53 = 5
54 = 6
55 = 7
56 = 8
57 = 9
58 = :
59 = ;
60 = <
61 = =
62 = >
63 = ?
64 = @
65 = A
66 = B
67 = C
68 = D
69 = E
70 = F
71 = G
72 = H
73 = I
74 = J
75 = K
76 = L
77 = M
78 = N
79 = O
80 = P
81 = Q
82 = R
83 = S
84 = T
85 = U
86 = V
87 = W
88 = X
89 = Y
90 = Z
91 = [
92 = \
93 = ]
94 = ^
95 = _
96 = `
97 = a
98 = b
99 = c
100 = d
101 = e
102 = f
103 = g
104 = h
105 = i
106 = j
107 = k
108 = l
109 = m
110 = n
111 = o
112 = p
113 = q
114 = r
115 = s
116 = t
117 = u
118 = v
119 = w
120 = x
121 = y
122 = z
123 = {
124 = |
125 = }
126 = ~
127 =
Question: What caused the infinite loop?/
Append your answer in a block comment at the end of your source code.
hw124_asciTool.cpp
This program will create a useful tool called ascii that you'll copy to your ~/bin folder.
Assignment hw124
Paste your corrected code from hw123_charLoop.cpp into hw124_asciiTool.cpp. Then modify it to produce the ASCII chart shown below. The chart displays the decimal value, hexadecimal value, and printed character for each ascii character 0-127.
Compile using this command to save the ascii tool directly to your ~/bin folder
cl hw124_asciiTool.cpp -o $HOME312/bin/ascii
Test it
Execute
ascii
Output
0 (0) = �
1 (0x1) =
2 (0x2) =
3 (0x3) =
4 (0x4) =
5 (0x5) =
6 (0x6) =
7 (0x7) =
8 (0x8) =
9 (0x9) =
10 (0xa) =
11 (0xb) =
12 (0xc) =
13 (0xd) =
14 (0xe) =
15 (0xf) =
16 (0x10) =
17 (0x11) =
18 (0x12) =
19 (0x13) =
20 (0x14) =
21 (0x15) =
22 (0x16) =
23 (0x17) =
24 (0x18) =
25 (0x19) =
26 (0x1a) =
27 (0x1b) =
28 (0x1c) =
29 (0x1d) =
30 (0x1e) =
31 (0x1f) =
32 (0x20) =
33 (0x21) = !
34 (0x22) = "
35 (0x23) = #
36 (0x24) = $
37 (0x25) = %
38 (0x26) = &
39 (0x27) = '
40 (0x28) = (
41 (0x29) = )
42 (0x2a) = *
43 (0x2b) = +
44 (0x2c) = ,
45 (0x2d) = -
46 (0x2e) = .
47 (0x2f) = /
48 (0x30) = 0
49 (0x31) = 1
50 (0x32) = 2
51 (0x33) = 3
52 (0x34) = 4
53 (0x35) = 5
54 (0x36) = 6
55 (0x37) = 7
56 (0x38) = 8
57 (0x39) = 9
58 (0x3a) = :
59 (0x3b) = ;
60 (0x3c) = <
61 (0x3d) = =
62 (0x3e) = >
63 (0x3f) = ?
64 (0x40) = @
65 (0x41) = A
66 (0x42) = B
67 (0x43) = C
68 (0x44) = D
69 (0x45) = E
70 (0x46) = F
71 (0x47) = G
72 (0x48) = H
73 (0x49) = I
74 (0x4a) = J
75 (0x4b) = K
76 (0x4c) = L
77 (0x4d) = M
78 (0x4e) = N
79 (0x4f) = O
80 (0x50) = P
81 (0x51) = Q
82 (0x52) = R
83 (0x53) = S
84 (0x54) = T
85 (0x55) = U
86 (0x56) = V
87 (0x57) = W
88 (0x58) = X
89 (0x59) = Y
90 (0x5a) = Z
91 (0x5b) = [
92 (0x5c) = \
93 (0x5d) = ]
94 (0x5e) = ^
95 (0x5f) = _
96 (0x60) = `
97 (0x61) = a
98 (0x62) = b
99 (0x63) = c
100 (0x64) = d
101 (0x65) = e
102 (0x66) = f
103 (0x67) = g
104 (0x68) = h
105 (0x69) = i
106 (0x6a) = j
107 (0x6b) = k
108 (0x6c) = l
109 (0x6d) = m
110 (0x6e) = n
111 (0x6f) = o
112 (0x70) = p
113 (0x71) = q
114 (0x72) = r
115 (0x73) = s
116 (0x74) = t
117 (0x75) = u
118 (0x76) = v
119 (0x77) = w
120 (0x78) = x
121 (0x79) = y
122 (0x7a) = z
123 (0x7b) = {
124 (0x7c) = |
125 (0x7d) = }
126 (0x7e) = ~
127 (0x7f) =
Question: Why is the ASCII chart is discontinuous at numbers 10, 11, 12, and 27?
Append a block comment at the end of your source code to explain why.
Add your boilerplate header and turn in as asciiTool_124.cpp
When your compile succeeds try these examples in a Terminal
grep (General Regular Expression Parser)
ascii | grep A
Output is not what's expected.
Binary file (standard input) matches
From man grep
Normally grep will simply print
``Binary file ... matches'' if files contain binary characters.
Also from man grep describing the -a or --text option
Treat all files as ASCII text...Use of this option forces grep
to output lines matching the specified pattern
Search for ascii value of A
ascii | grep --text
ascii | grep -a A
65 (0x41) = A
65 (0x41) = A
Search for ascii value a.
ascii | grep -a a
grep found every a in the file
10  (0xa)  =
26  (0x1a)  =
42  (0x2a)  =  *
58  (0x3a)  =  :
74  (0x4a)  =  J
90  (0x5a)  =  Z
97  (0x61)  =  a
106  (0x6a)  =  j
122  (0x7a)  =  z
Searching for <space>a or <space>A will work. The -i flag is case insensitive.
ascii | grep -ai " a"
65  (0x41)  =  A
97  (0x61)  =  a
ascii | grep -a 0
0 (0) =
1 (0x1) =
2 (0x2) =
3 (0x3) =
...
127 (0x7f) =
ascii | grep -a "= 0"
48 (0x30) = 0
hw125_printMajorScale.cpp
Assignment 1.2.5
Write a program to print the notes in MIDIDisplay_DLS format needed to play a major scale on any starting note. Then test your output in MIDIDisplay to verify that it works. Here's the outline of the program.
#include <iostream>

void print_major_scale( int start_note) {
  // you write
}

int main() {
  // whatever's needed
  int note = 60; // starting pitch
  print_major_scale( note );
}
Rules
- timestamp
- every NON (note on) is separated by 500 ms
every NOF (note off) timestamp occurs 400 ms after its corresponding NON - status (hex value without 0x)
- use 90 for the NON status byte
use 80 for the note off NOF status byte - data1 (decimal value)
- The pattern for the major scale starting at note zero is: 0, 2, 4, 5, 7, 9, 11, 12.
The same pattern could be expressed as: 0, 2, 2, 1, 2, 2, 2, 1 where those numbers were understood to be the differences between adjacent numbers in the pattern above.
If you add these offsets to any starting note it will form a major scale. - data2 (decimal value)
- use 100 for all NON velocities
use 0 for all NOF velocities - NON and NOF pairs
- every note on (NON) message MUST be followed by a matching note off (NOF).
Example
If you wanted to play a major scale starting on MIDI note number 60 (middle C) the notes (data1) used would be:
# using offsets from starting note 0 2 4 5 7 9 11 12
60 + 0 = 60
60 + 2 = 62
60 + 4 = 64
60 + 5 = 65
60 + 7 = 67
60 + 9 = 69
60 + 11 = 71
60 + 12 = 72
# using adjacent differences after starting note 2 2 1 2 2 2 1
60 = 60 # starting note
60 + 2 = 62
62 + 2 = 64
64 + 1 = 65
65 + 2 = 67
67 + 2 = 69
69 + 2 = 71
71 + 1 = 72
Here's the beginning of the correct output.
0       90      60      100
400     80      60      0
500     90      62      100
900     80      62      0
1000    90      64      100
1400    80      64      0
Test it in MIDIDisplay_DLS to make sure it works.
Submission Format
Feel free to email jellinge@carleton.edu on any part of the homework that is unclear to you. Chances are if you have questions other students do too. I will answer those questions by email to everyone in the class. The original sender will remain anonymous. I have tried to provide clues to the homework in the web pages, reading assignments, and labs. Sometimes what seems obvious to me is not obvious to students just learning C++.
Create a folder named hwNN_LastnameFirstname1_LastnameFirstname2.
Substitute your name and your partner's name for LastnameFirstname1_LastnameFirstname2.
Remember
- Boilerplate header at top of every file.
- Make sure your program compiles before submitting.
- Programs that compile and produce partially correct output will be graded.
- You can send notes to me in your homework files by enclosing them in block comments.
- Programs that do not compile get an automatic F (59%).
- Each partner must submit identical homework folders to the course Hand-in folder.
- If only one partner submits the homework send me an email explaining why.
- Empty your build or build-debug folders using the command emptyBuildFolder.sh
- Only include .h, .cpp, Makefiles, CMakeLists.txt
- Do not include these folders/files
.git
.vscode Double check for the above two folders using this command
ls -a hwNN_LastnameFirstname1_LastnameFirstname2
# if either .git or .vscode exist in the folder you're submitting remove them with
# rm -fR .git
# rm -fR .vscode
Code to turn in
hw11_LastnameFirstname1_LastnameFirstname2
\342\224\234\342\224\200\342\224\200 hw121_charOutput.cpp
\342\224\234\342\224\200\342\224\200 hw122_charOutputTemplate.cpp
\342\224\234\342\224\200\342\224\200 hw123_charLoop.cpp
\342\224\234\342\224\200\342\224\200 hw124_asciiTool.cpp
\342\224\234\342\224\200\342\224\200 hw125_printMajorScale.cpp
Example boilerplate header. Use yours not my example.
/***************************************************************
hw111_boilerplate.cpp
Copyright (c) Carleton College CS312 free open source
Assignment: hw111_boilerplate
Man Super sman@carleton.edu
Woman Wonder wwoman@carleton.edu
DATE: 2019-12-15
TIME: 14:46:25
****************************************************************/