CS 312 - Week 1.1
CS 312 Audio Programming Winter 2020
Table of Contents
- 1.1 Class
- WCC 138 Lab Setup
- c111_hello.cpp
- c112_putto.cpp
- c113_numberbase.cpp
- c114_print_overload.cpp
- c115_arithmetic_types.cpp
- c116_struct_test.cpp
- More C++
- Homework
- CMC Lab Setup
- CMC homework commands
- hw111_boilerplate.cpp
- hw112_helloMidi.cpp
- Submission Format
WCC 138 Lab Setup
The /StuWork/<email_name> folder inside the courses folder is where you'll save your files before you submit your homework. The hand-in is where you'll submit your homework when finished. We'll set up scripts that make it possible to work during class in the WCC lab and finish your homework in any CMC lab using the course folder. We'll also set up a backup folder inside your CMC home folder as a safety net.
There is only one user account in that lab and her/his name is labuser. You'll have to go through these steps at the beginning of each class. The steps to setup your account in CMC are similar and will be explained in the CMC Lab Setup section below.
1. Start the Mac and login.
2. Mount your courses folder for CS312
Choose Go to Server from the Go menu in Finder.
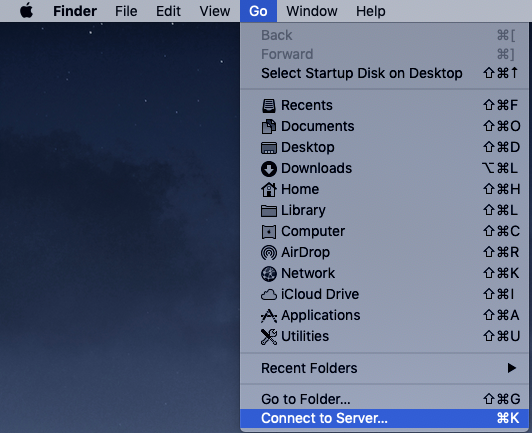
Login with your Carleton email name and password.
Mount your cs312 courses folder.
smb://courses.ads.carleton.edu/COURSES/cs312-00-w20
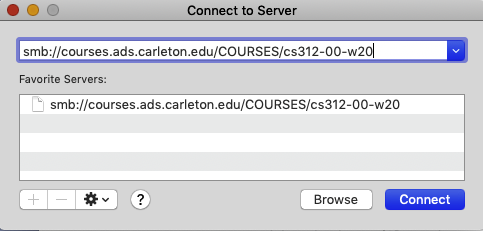
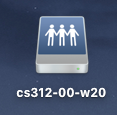
A courses folder icon will appear on the Desktop.
3. Open Mac Terminal in /Applications/Utilities
4. Execute setup312 your_email_name
Type this command and press Return.
setup312 <your_email_name>
Type this command to display your current directory
The # is comment. You don't have to type comments.
# This is a comment. Read and learn but don't type
# Print Working Directory
pwd
# should display something like
/Volumes/COURSES/cs312-00-w20/StuWork/<your_email_name>
Execute this command.
echo $HOME312
# should display same thing
/Volumes/COURSES/cs312-00-w20/StuWork/<your_email_name>
If everything worked continue. If not ask me for help.
Terminal Commands
The terminal runs a command line application called a shell. There are many shells available. Mac OS uses bash.
Quit and restart Terminal.
Test the following commands.
echo $PATH
You want to see
/Volumes/COURSES/cs312-00-w20/StuWork/<your_email_name>/bin
at the beginning of the $PATH.
Aliases
Define typing shortcuts for lengthy commands
Prints a list of all defined aliases.
alias
Decimal to Hex and Hex to Decimal
Functions written as a bash script.
dtoh 147 #Decimal to Hex
You should see 0x93.
htod 0xC5 #Hex to Decimal
You should see 197
You can view the code for these two bash functions in .bashrc.
ls variations for listing files in a directory. Try each.
cd           # go to your account home directory
ls           # default listing
ls -l        # long listing
ls -a        # list hidden files, omit . and ..
ls ls -d */  # directories only
ls -lS       # long listing sorted by size descending
ls -lR       # long and recursive
You can make your own aliases for any commands you use frequently and take too long to type.
You can do this in CMC but not in WCC.
Just add them to .bash_aliases and then execute.
cd
source .bash_aliases
Terminal Keyboard shortcuts
Memorize and start using these Terminal shortcuts.
Ctrl is the Control key not the Command key.
- up and down arrow
- move backward and forward through your command history
- Ctrl-a
- Move the cursor to the beginning of the command
- Ctrl-e
- Move the cursor to the end of the command
- Ctrl-k
- Delete everything to the right of the cursor
- Ctrl-u
- Delete everything to the left of the cursor
- Option right and left arrow
- move the cursor right or left quickly by word boundaries
Copy/paste
Select some text in Terminal and then press the mouse scroll wheel to paste.
Pipes
The vertical bar | is the Unix pipe symbol. It pipes the output of the command on the left to the input of the command on the right. The tail -10 command prints the last 10 lines of history. The grep command searches is a very powerful search command. In this example grep searches for cs312 in your command history.
history | tail -10
history | grep cs312
ls | sort    # Upper case before lower case
ls | sort -f #ignore case
man pages
You can read documentation for any Terminal command, by typing man followed by the command name.
man ls
man bash # very long
Scrolling man pages with the mouse scroll wheel is specific to the Mac. These three commands are universal.
| Action | command |
|---|---|
| scroll | mouse scroll wheel (Mac only) |
| page down | Ctrl-f or space bar |
| page up | Ctrl-b |
| quit | q |
c111_hello.cpp
"Hello world!" as a test message was influenced by an example program in the seminal book The C Programming Language[citation needed]. The example program from that book prints "hello, world" (without capital letters or exclamation mark), and was inherited[citation needed] from a 1974 Bell Laboratories internal memorandum by Brian Kernighan, Programming in C: A Tutorial, which contains the first known version:
Open Terminal in /Applications/Utilities and execute these commands. Execute means typing Enter after you've typed the command.
cd $HOME312
 # IMPORTANT: make certain you are in your courses folder
pwd
If pwd returned /Volumes/COURSES/cs312-00-w20/StuWork/<your_email_name> continue. If not do not continue and ask me for help.
Setup for class11
Copy/paste/execute these commands.
# folder and directory mean the same thing
# the directory and file separator is /
cd $HOME312
mkdir bin
mkdir common
mkdir cs312
cd cs312/
mkdir hw11
cd hw11
mkdir class11
cd class11
touch c111_hello.cpp
touch c112_putto.cpp
touch c113_numberbase.cpp
touch c114_print_overload.cpp
touch c115_arithmetic_types.cpp
touch c116_struct_test.cpp
code .
Important:
Often the last line is not executed and is still showing at the Terminal prompt. You'll have to type Return/Enter to execute it. If a closing return is missing in the last line will still be sitting there. Once all commands have been executed you'll return to a blank prompt. This frequently happens. Always check.
Notes:
- #
- comments begin with #
- cd
- Change Directory
- mkdir
- Make Directory
- touch
- Create a file
- code
- Open the class11 directory in Visual Studio Code
When I develop a series of commands like this I often don't get it right the first time. It that case execute one line at a time and observe the results.
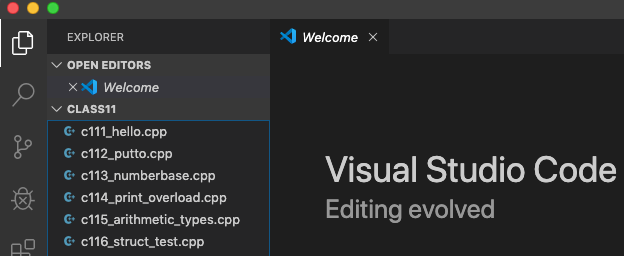
Visual Studio Code
Hereafter called vsCode.
The vsCode window should be open and displaying the contents of the class11 directory on the left.
The vsCode Terminal
vsCode has a built in terminal. Open it using the shortcut below.
Shortcut: Control-backtick
Check output of these commands in vsCode Terminal
# change to your user home directory
cd
# is an alias in .bash_aliases
cd312
# Print Working Directory
pwd
# LiSt files
ls
pwd: It should be /Volumes/COURSES/cs312-00-w20/StuWork/<your_email_name>/cs312
ls: LiSt files in your cs312 directory.
You should see this directory structure in Mac Finder looking at the cs312 folder inside your cs312-00-w20 course folder.
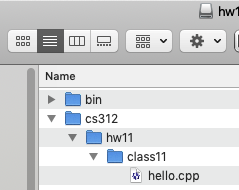
The bin directory will be used throughout the course to hold executable commands you'll write.
The hw11 directory for your homework assignments and class lab projects.
Folder names
Every class will add a new hwNN folder from hw11 to hw93.
Class projects are kept in a classNN folder.
The first N is week, the second N is class session.
\hw12\ folder is week one, Wednesday.
File names
Class lab projects are prefixed with cNNN_.
The first N is week, the second N is class session, the third N is class lab project number.
\c132_filename\ is week 1, Friday, lab project 2.
cs312/hw11/class11
├── c111_hello.cpp
├── c112_putto.cpp
├── c113_numberbase.cpp
├── c114_print_overload.cpp
├── c115_arithmetic_types.cpp
└── c116_struct_test.cpp
You should finish all class projects on the web page even if they are not specifcally marked as homework.
Class projects often contain code that help with the homework.
Execute this command.
echo $PATH
# should display something like at the beginning
/Volumes/COURSES/cs312-00-w20/StuWork/<your_email_name>/bin:
If everything worked continue. If not ask me for help.
For class11 the homework assignments are named
- hw111_boilerplate.cpp
- hw112_helloMidi.cpp
c111_hello.cpp
Click the c111_hello.cpp filename on the left and type this code into the c111_hello.cpp window.

c111_hello.cpp notes
- #include <iostream>
#include is C++ directive that tells the compiler which files are required to compile a program.
<iostream> is a C++ library that provides functions to read from standard input and write to standard output. Standard input and output is provided through the Terminal.
- #include <file> vs. #include "file"
File names in angle brackets <…> are system library header files that were installed by the operating system and compiler language.
File names in double quotes "…" are user or third party header files that are supplied by the programmer and are required to compile the program.
- #include <string>
- <string> is a C++ library that provides functions to manipulate a sequence of text characters.
- "hello, world"
- Text enclosed in double quotes is a C++ string.
- int main()
- main( ) is a function that takes no parameters and returns an int.
- { }
- Curly braces enclose code blocks and are scope delimiters. Any local variables declared with the curlies are allocated on the stack and are only visible to the program within that scope.
- }
- The closing brace is the closest thing C++ has to garbage collection. When execution reaches the closing }, all local variables declared within that code block are destroyed.
- std::cout
cout is the C++ library function that outputs text to the Terminal. If you've done any C programming it's a modern replacement of the printf() function.
std is a C++ namespace. All C++ library functions are declared in the namespace std. The double colons are the namespace scope operator. Tying function names to namespaces helps avoid name collisions that might otherwise occur between C++ libraries, third party libraries, and user defined names.
- << (put to)
- The double less than is called the "put to" operator and sends whatever is on the right to the device on the left. In this case the device is the Terminal. It can also be used to write data to a memory locations, strings, and files.
- >> (get from)
- The double greater than than is called the "get from" operator that reads input from the Terminal and uses it to set the value of the variable on the right.
- std::endl
- std::endl is the name of a function that outputs a return character, or endline. It is defined in the namespac std.
You can include an endline character in a string using the \n escape character. - ; (semicolon)
- Normal C++ statements end with a semicolon. There are other uses that you'll learn about as the course continues.
Header and Source files
- header files
- End with .h (In older code you may see .hh and .hpp used)
Header files are declarations that make constants, variables, and functions visible to other files that #include them. - implementation (source) files
- End with .cpp and should be paired with a header file of the same name.
Source files contain code for the functions declared in their header file and often contain many other supporting functions that are not visible to the outside world.
Compile
Execute this command in vsCode terminal. You should read the comments but you don't have to type them.
# clang++ (C Language ++) is the name of the C++ compiler used by Apple
# it is open source and is part of the LLVM compiler suite for many languages
# According to wikipedia its contributors include Apple, Microsoft, Google, ARM, Intel
clang++ c111_hello.cpp
Run
a.out is the default name for executables unless otherwise specified. It's name appeared in the first edition of UNIX in 1971. I'm sure most of you know that the underlying OS used in Macs is a flavor of UNIX.
# ./ refers to the current directory and is required
 ./a.out
Output
hello, world
This time name the output hello using the -o option.
clang++ c111_hello.cpp -o hello
Run
./hello
Output
hello, world
This time name do it all on one line using the cl alias.
The code to the right of the && will only execute if the code on the left was successful.
cl c111_hello.cpp -o hello && ./hello
c112_putto.cpp
- << (put to) operators can be chained together
Open c112_putto.cpp
Copy/paste.
/*
  This example demonstrates the chaining property of
  the "put to" operator<< to std::cout.
*/
#include <iostream>

int main() {
  std::cout << "hello, world" << std::endl;
  // is equivalent to
  std::cout << "hello"
            << ", "
            << "world" << std::endl;
  // is equivalent to
  std::cout << "hello, w "
            << "o"
            << " r l d"
            << std::endl;
  // \n can be used inside a string as a return character
  std::cout << "\nhello,\nworld" << std::endl;
}
Build and Run
Output
hello, world
hello, world
hello, w o r l d

hello,
world
c113_numberbase.cpp
- the "put to" operator
<<can be used to display integers in different number bases - std::dec decimal base 10
std::hex hexadecimal base 16
std::showbase will use 0x prefix with hexadecimal base 16
std::oct octal base 8
Open c113_numberbase.cpp
Copy/paste.
/*
  This example demonstrates formatting integers in decimal, hexadecimal, and octal
*/
#include <iostream>

int main() {
  const int i = 1234;   // decimal base 10
  const int h = 0xBAD;    // hexadecimal base 16 prefix 0x
  const int o = 04567;    // octal base 8 prefix 0

  std::cout << "DECIMAL(dec) HEXADECIMAL(hex) OCTAL(oct)"<< std::endl << std::endl;

  std::cout << "DECIMAL"<< std::endl;
  std::cout << "dec 1234 base(10)\t" << i << std::endl;
  std::cout << "hex 0xBAD base(10)\t" << h << std::endl;
  std::cout << "oct 04567 base(10)\t" << o << std::endl;
  std::cout << std::endl;

  std::cout << "HEXADECIMAL"<< std::endl;
  std::cout << "dec 1234 base(16)\t" << std::hex << i << std::endl;
  std::cout << "hex 0xBAD base(16)\t" << std::hex << h << std::endl;
  std::cout << "oct 04567 base(16)\t" << std::hex << o << std::endl;
  std::cout << std::endl;

  std::cout << "OCTAL"<< std::endl;
  std::cout << "dec 1234 base(8)\t" << std::oct << i << std::endl;
  std::cout << "hex 0xBAD base(8)\t" << std::oct << h << std::endl;
  std::cout << "oct 04567 base(8)\t" << std::oct << o << std::endl;
  std::cout << std::endl;

  std::cout << "AS DECLARED" << std::endl;
  std::cout << "dec 1234 base(10)\t" << std::dec << i << std::endl;
  std::cout << "hex 0xBAD base(16)\t" << std::hex << h << std::endl;
  std::cout << "oct 04567 base(8)\t" << std::oct << o << std::endl;
  std::cout << std::endl;

  std::cout << "back to hex using int 1234" << std::endl;
  std::cout << std::hex << i << std::endl; // set to hex
  std::cout << i << std::endl;             // remains hex
  std::cout << "WATCH OUT - conversions remain until changed" << std::endl;
  std::cout << "meant to be decimal but forgot << std::dec" << std::endl;
  std::cout << h << std::endl; // set to decimal
  std::cout << std::endl;
}
Build and run
Output
DECIMAL(dec) HEXADECIMAL(hex) OCTAL(oct)

DECIMAL
dec 1234 base(10)       1234
hex 0xBAD base(10)      2989
oct 04567 base(10)      2423

HEXADECIMAL
dec 1234 base(16)       0x4d2
hex 0xBAD base(16)      0xbad
oct 04567 base(16)      0x977

OCTAL
dec 1234 base(8)        02322
hex 0xBAD base(8)       05655
oct 04567 base(8)       04567

AS DECLARED
dec 1234 base(10)       1234
hex 0xBAD base(16)      0xbad
oct 04567 base(8)       04567

back to hex using int 1234
0x4d2
0x4d2
WATCH OUT - conversions remain until changed
meant to be decimal but forgot << std::dec
0xbad
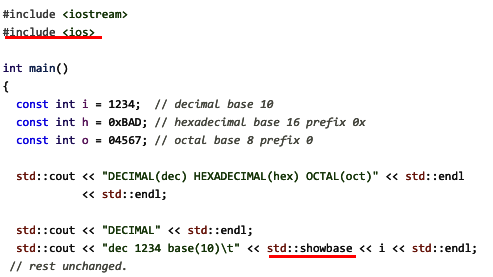
Number base prefixes
You'll notice that all numbers look like base 10 numbers, excluding the bad one. C++ uses standard prefixes for different number bases: 0x for base 16 and 0 for base 8. Try the running c113_numberbase.cpp again after making the two changes underlined in red.
Build and Run
Output
DECIMAL(dec) HEXADECIMAL(hex) OCTAL(oct)

DECIMAL
dec 1234 base(10)       1234
hex 0xBAD base(10)      2989
oct 04567 base(10)      2423

HEXADECIMAL
dec 1234 base(16)       0x4d2
hex 0xBAD base(16)      0xbad
oct 04567 base(16)      0x977

OCTAL
dec 1234 base(8)        02322
hex 0xBAD base(8)       05655
oct 04567 base(8)       04567

AS DECLARED
dec 1234 base(10)       1234
hex 0xBAD base(16)      0xbad
oct 04567 base(8)       04567

back to hex using int 1234
0x4d2
0x4d2
WATCH OUT - conversions remain until changed
meant to be decimal but forgot << std::dec
0xbad
c114_print_overload.cpp
In C++ two or more functions can have the same name as long as their parameters are of different numbers or types. In this example the print() function is overloaded.
Open c114_print_overload.cpp
Copy/paste.
#include <iostream>
#include <string>

void print()
{
  const std::string str(64, '*');
  std::cout << str << std::endl;
}

void print(std::string msg)
{
  std::cout << msg << std::endl;
}

int main()
{
  print();
  print("\tHello World!");
  print();
}
Build and run
Output
****************************************************************
  Hello World!
****************************************************************
c115_arithmetic_types.cpp
Arithmetic types can be divided into integer types and floating point types. Integer types represent whole numbers, floating point types represent numbers with decimal places. There are different sizes of both types. The size of a type tells how much space it occupies in memory as well as setting its minimum and maximum values.
- Integer types
- There are six integer types if you count bool which is either true or false. False is defined as zero and true is anything else.
| bool | ||
| char | signed char | unsigned char |
| short | signed short | unsigned short |
| int | signed int | unsigned int |
| long | signed long | unsigned long |
| long long | signed long long | unsigned long long |
According to Bjarne Stroustrup you should use int unless you have a good reason not to.
- Floating point types
- There are two floating point types: float and double.
| type | size (bytes) |
|---|---|
| float | 4 |
| double | 8 |
| long double | 16 |
This program displays the size of each arithmetic type in bytes and bits using the sizeof() function.
Open c115_arithmetic_types.cpp
Copy/paste
#include <iostream>

int main()
{
// integer types
    bool mybool;
    char mychar;
    short myshort;
    int myint;
    long mylong;

// floating point types
    float myfloat;
    double mydouble;
    long double mylongdouble;

    std::cout << std::endl;
    std::cout << "Size of variable types in bytes" << std::endl;
    std::cout << "sizeof bool            " << sizeof( mybool ) << std::endl;
    std::cout << "sizeof char            " << sizeof( mychar ) << std::endl;
    std::cout << "sizeof short           " << sizeof( myshort ) << std::endl;
    std::cout << "sizeof int             " << sizeof( myint ) << std::endl;
    std::cout << "sizeof long            " << sizeof( mylong ) << std::endl;
    std::cout << "sizeof float           " << sizeof( myfloat ) << std::endl;
    std::cout << "sizeof double          " << sizeof( mydouble ) << std::endl;
    std::cout << "sizeof long double    " << sizeof( mylongdouble ) << std::endl;

    std::cout << std::endl;
    std::cout << "There are 8 bits in a byte" << std::endl;
    std::cout << std::endl;

    std::cout << "Size of variable types in bits" << std::endl;
    std::cout << "sizeof bool            " << sizeof( mybool ) * 8 << std::endl;
    std::cout << "sizeof char            " << sizeof( mychar ) * 8 << std::endl;
    std::cout << "sizeof short          " << sizeof( myshort ) * 8 << std::endl;
    std::cout << "sizeof int            " << sizeof( myint ) * 8 << std::endl;
    std::cout << "sizeof long           " << sizeof( mylong ) * 8 << std::endl;
    std::cout << "sizeof float          " << sizeof( myfloat ) * 8 << std::endl;
    std::cout << "sizeof double         " << sizeof( mydouble ) * 8 << std::endl;
    std::cout << "sizeof long double   " << sizeof( mylongdouble ) * 8 << std::endl;
}
Build and Run
Output
Size of variable types in bytes
sizeof bool            1
sizeof char            1
sizeof short           2
sizeof int             4
sizeof long            8
sizeof float           4
sizeof double          8
sizeof long double    16

There are 8 bits in a byte

Size of variable types in bits
sizeof bool            8
sizeof char            8
sizeof short          16
sizeof int            32
sizeof long           64
sizeof float          32
sizeof double         64
sizeof long double   128
c116_struct_test.cpp
Struct
A C++ struct is an object that can contain data as well as the functions that process that data. The data can be of mixed types. All data and functions in a struct is public and is visible to any other class that uses it.
Here's a simple example that contains two string types and two functions that print the strings.
struct Hello {
  // delcare struct variables
  std::string str1;
  std::string str2;
  // delcare struct function
  void print();
  void print( const std::string a, const std::string b);
}; // structs end with semicolon
Open c116_struct_test.cpp
Copy/paste
#include <iostream>
#include <string>

struct Hello {
  // delcare struct variables
  std::string str1;
  std::string str2;
  // delcare struct function
  void print();
  void print( const std::string a, const std::string b);
}; // structs end with semicolon

// implement struct function
void Hello::print() {
  std::cout << str1 << str2 << std::endl;
}

void Hello::print( const std::string a, const std::string b) {
  std::cout << a << b << std::endl;
}

int main() {
  // create an Hello struct
  Hello hs;

  // initialize struct variables
  hs.str1 = "Hello,";
  hs.str2 = " World!";

  hs.print();
  hs.print("Hi", " CS 312 :>)");

  hs.str1 = "What's, ";
  hs.str2 = "up?";
  hs.print();

  return 0;
}
Build and Run
Output
Hello, World!
Hi CS 312 :>)
What's, up?
More C++
C++ Libraries
During the course we'll be using functions from these C++ std libraries. The libraries we'll use the most are shown in bold.
<iostream>
<string>
<vector>
<sstream>
<fstream>
<chrono>
<cmath>
<random>
<algorithm>
<numeric>
<ios>
<iomanip>
<regex>
<map>
main()
You'll see the main() function called in different ways.
The original main function dates back to C, predating C++. In those days many programs were executed from the command line. The two function parameters allowed data to be passed in to the program. The argc parameter held the number of parameters. The argv was a variable length array that contained the data passed in. Data of different types could be passed in but the program had to have knowledge of the order and type of the parameters expected. If they didn't match, the program failed.
int main(int argc, char const *argv[])
{
  std::cout << "hello, world" << std::endl;
  return 0;
}
These invocations also work if you're not passing data to the executable.
Does not return a value.
void main()
{
  std::cout << "hello, world" << std::endl;
}
Returns a value of zero. The zero return value of a C++ function indicates "success", no errors occurred.
int main()
{
  std::cout << "hello, world" << std::endl;
  return 0;
}
Declares a return value but ignores it. The program exits at the closing brace whether it succeeded or failed.
int main()
{
  std::cout << "hello, world" << std::endl;
}
C++ Comments
- ⁄ ⁄
- The double slash is used as a single line comment. The double slash and any remaining text on that line is ignored by the compiler.
- ⁄* … *⁄
- Multiple lines comments are enclosed by /* and */.
/*
  Line 2 comment
  Line 2 comment
  Line 3 comment
*/
It's easy to comment out blocks of code with the #if ... #endif directives.
#if 0 // or #if false
  code statement;
  code statement;
  code statement;
#endif
Operators
- Arithmetic
| + | add | x + y |
| - | subtract | x - y |
| * | multiply | x * y |
| % | modulo (remainder) | x % y |
- Comparison
| == | equal to | x == y |
| != | not equal | x != y |
| < | less than | x < y |
| > | greater than | x > y |
| <= | lesss than or equal to | x <= y |
| >= | greater than or equal to | x >= y |
- Assignment
| = | assignment | x = y |
| ++ | increment (pre) | ++x |
| ++ | increment (post) | x++ |
| -- | decrement | –x, x-- |
| += | add and assign | x += y ⇔ x = x + y |
| -= | subtract and assign | x -= y ⇔ x = x - y |
| *= | multiply and assign | x *= y ⇔ x = x * y |
| /= | divide and assign | x /= y ⇔ x = x / y |
| %= | modulo and assign | x %= y ⇔ x = x % y |
- Logical
| && | and | if (x && y) == true |
| || | or | if (x || y) == false |
| ! | not | if x != y |
- Bitwise
| & | and | 1010 & 0010 = 0010 (10 & 2 = 2) |
| | | or | 1010 \vert 0100 = 1110 (10 & 4 = 13) |
| ^ | xor | 1010 ^ 1001 = 0011 (10 & 9 = 3) |
| << | shift left | 0010 << 1 = 0100 (2 << 1 = 4) |
| >> | shift right | 1000 >> 1 = 0100 (8 >> 1 = 4) |
CS 312 C++ style guidelines
A lot of CS 312 style formatting happens auto-magically when you save your files in vsCode, but it can't do everything. These are additional guidelines you should follow for CS 312.
Naming Conventions - snake_case and camelCase
C++ standard libraries and TCPP2 use snake case. Many other third party libraries uses camel case. We'll use a mixture of both styles.
- Snake case
- a_variable_using_snake_case // preferred
- Camel case
- aVariableUsingCamelCase
Variables
- Use descriptive names for variables
- It may mean more typing in the short term but will save time in the long term when you have to update your code in the future. Descriptive names can often take the place of comments. Short names are ok for local variables within smallish function bodies. Use longer desciptive names for functions and variables used by other functions in the same file or in other files.
- variable names are lower_snake_case (preferred)
double radians_per_second = kTWO_PI * 440;
- Avoid magic numbers
- Especially if they're used more than once.
const double kPIover4 = 0.78540;
const int kMAXLENGTH = 13;

// good
double x = std::cos(kPIover4);
int y = x * kMAXLENGTH;

// Bad
double x = std::cos(0.78540);
int y = x * 13;
- One variable definition per line
// Good
int x;
int y;
int z;

// Bad
int x, y, z;
- Declare variables near point of use
// some code above
bool done = false;
while (!done) {
  // some lenghty process
  done = true;
}
- Initialize every variable when it comes into existence
 int x;
 //  lots of code follows
 // finally
 std::cout << x << std::endl; // prints garbage, x never defined

 // should have said
int x{9999}; // assign it to something, you can always change it later.
int x = 9999; // same thing
Constants
- lowercase k followed by UPPER_SNAKE_CASE
kSPEED_OF_SOUND
Function names
- Use descriptive lower_snake_case names for functions
void calc_duration_of_track_1();
Function parameters
- Use
const ¶maters as much as possible When the parameter is not changed within the function it should be declared as a const reference.
int add2( const int& x, const int& y )
{
  int z = x + y;
  return z;
}
Precedence
- Use parens ( ) to make things clear, even if you know the C++ precedence rules
x = 12 * 3 + 5;   // precedence is * comes before +
x = (12 * 3) + 5; // makes it clear
x = 12 * (3 + 5); // this is really what I wanted
Prefer ++x over x++
- ++x avoids creating a temporary variable and it's faster than post increment
for ( int n = 0; n < 10; ++n)
    std::cout << n << std::endl;
- Place pre and post increment statements on their own line
// Good
mystring[i];
++i;

// Bad
mystring[i++];
File names
- No spaces in any file file name. Your choice of naming convention
Good
a_really_long_filename.cpp
aReallyLongFilename.cppOK
areallylongfilename.cppBad
AREALLYLONGFILENAME.CPP
Use fully qualified namespaces
You may read about the using namespace std directive. It may make things easier to type for quick one off tests but not for production code. CS 312 always writes production quality code and always uses the fully qualified std:: namespace scope operator.
Do this
#include <iostream>

  int main() {
      using namespace std;
      int x = (3 + 5) * 2;
      int y = 3 + (5 * 2);
      int z = 3 + 5 * 2;
      std::cout << "x = " << x << std::endl;
      std::cout << "y = " << y << std::endl;
      std::cout << "z = " << z << std::endl;
  }
Not this
#include <iostream>

int main() {
    using namespace std;
    int x = (3 + 5) * 2;
    int y = 3 + (5 * 2);
    int z = 3 + 5 * 2;
    cout << "x = " << x << endl;
    cout << "y = " << y << endl;
    cout << "z = " << z << endl;
}
Output
x = 16
y = 13
z = 13
Homework
- CMC Labs 304 and 306 are both setup for CS312 homework.
- All homework is to be done with a pair partner.
- This homework is to be done in the CMC labs.
- I would recommend doing all your homework in CMC although Weitz 138 is an alternive
Before starting the homework:
- Complete the CMC Lab Setup
- above
- Do the reading
- About CS312
This web page
TCPP2 (A Tour of C++ 2nd Edition)
- Chapter 1 all
- Chapter 2 through §2.3
- Chapter 9 through §9.2.1
- Chapter 10 §10.1-10.3
- Watch this video
- Learn C++ in one hour
Watch it more than once throughout the term. - Review
- Homework Naming Conventions in About CS312
CMC Lab Setup
You have your own account and home folder in the CMC labs. We'll need to create/modify a few login scripts before you can follow the same steps we did in the WCC lab. In WCC the scripts were already there. I'd recommend you do your homework in the CMC because that resembles what you'd find in the workplace.
Create bash startup scripts for Terminal
Terminal runs a program called a shell. On the Mac the default shell is bash. All CS 312 assignments and examples assume you're using the bash shell. When Terminal starts up it executes commands found in the .bash_profile file in your home directory. You've may never have seen it because its filename begins with a dot. Dot files on the Mac are hidden. You can make them visible in a Finder window by typing Command-Shift-Period. You can see dot files in the Terminal using the ls -a command.
We'll use these two files to customize the bash Terminal for CS312:
- .bash_profile
- executed once at login and executes .bashrc
- .bashrc
- executed every time a new Terminal window or tab is opened
.bash_profile
In the CMC labs .bash_profile must be present in order to login. You'll need to append some specific CS312 commands to the end of ./bash_profile/.
Execute these terminal commands.
The # symbol is a bash comment you don't have to type.
Open .bash_profile.
# change directory to your home directory
cd
# open BBEdit to edit the file
bbedit .bash_profile
IMPORTANT: Do not delete or modify any text that is already present.
Move the text cursor to a blank line at the end of ./bash_profile/.
APPEND this text to the end of .bash_profile.
Copy/paste
if [ -f ~/.bashrc ]; then
   source ~/.bashrc # execute commands in .bashrc
fi
Save and close file.
.bashrc
This file contains shortcuts for Termainal commands, PATH settings, and a variable, $HOME312, that refers to your cs312 courses folder.
Open .bashrc
# Change Directory to home
cd
# open/edit the file in BBEdit
bbedit .bashrc
IMPORTANT: Do not delete or modify any text that is already present.
- If .bashrc does not exist BBEdit will open to a blank window.
Copy/paste the following script. - If .bashrc exists there will be text in the window. Do not delete the text.
APPEND the following script after the existing text.
export TERM=xterm-256color
export HISTCONTROL=ignoredups

# needed by VS Code to override an error message
# see last comment on https://github.com/Microsoft/vscode-cpptools/issues/1445
export CPPTOOLS_DEV=1

# useful commands
## from http://linuxcommando.blogspot.com/2008/04/quick-hex-decimal-conversion-using-cli.html
htod () { printf '%d\n' $1; }
dtoh () { printf '0x%x\n' $1; }

# interactive remove, asks yes/no
alias rm="rm -i"

# for ls
# G:colorize
# F:add slash suffix to directories
# h:use unit suffixes for size
alias ls="ls -GFh"

# C++ compiler no debug info
alias clang++="clang++ -std=c++17 -Wall "

# use cl for cs312 compiles -g flag adds debug information
alias cl="clang++ -g -std=c++17 -Wall "

# export PATH=~/bin:$PATH

# thanks to Danny Maya and Justin Washington
# for collaborating on setup312()
# and helping test between CMC and WCC labs
setup312() {
if [ 1 -ne $# ]; then
 echo "Usage:\tsetup312 <your_carleton_email_name>"
 exit 1
fi

student=$1

coursefolder=/Volumes/COURSES/cs312-00-w20/StuWork
export HOME312=$coursefolder/$student

echo "export PATH=$HOME312/bin:$PATH" >> "/Accounts/$student/.bashrc"
cd $HOME312
source ~/.bashrc
}

# shortcuts
alias cd312='cd $HOME312/cs312/'
Save and close .bashrc
Testing 1 2 3…
1. Mount your courses folder for CS312
Choose Go to Server from the Go menu in Finder.
Login with your Carleton email name and password.
Mount your cs312 courses folder.
smb://courses.ads.carleton.edu/COURSES/cs312-00-w20
2. Execute this command in Terminal and press Return.
source .bashrc
3. Execute this command in Terminal and press Return.
setup312 <your_email_name>
4. Execute this command in Terminal and press Return.
# Print Working Directory
pwd
# should display
# /Volumes/COURSES/cs312-00-w20/StuWork/<your_email_name>
5. Execute this command.
echo $HOME312
# should display same thing
# /Volumes/COURSES/cs312-00-w20/StuWork/<your_email_name>
6. Execute these commands.
 # cd by itself should take you to your /Accounts home directory
cd
pwd
# cd312 should take you back to /Volumes/COURSES/cs312-00-w20/StuWork/<your_email_name>
# provided your courses folder is mounted
cd312
pwd
If you finished Ex1 Hellow World in C++ these folders will already be present in your courses folder.
cd $HOME312
ls

/Volumes/cs312-00-w20/StuWork/<your_email_name>
├── cs312
  ├── bin
  ├── hw11
  │   ├── class11
  │   │   └── c111_hello.cpp
If not you'll need to create that directory structure by hand.
If everything worked continue.
If not email jellinge@carleton.edu and explain the problem.
CMC homework commands
You should only have to do the above setup commands once. Each time you login after that you'll still need to start your homework with these two steps:
- Mount your courses folder for cs312
- Run this command in Terminal
setup312 <your_email_name>
hw111_boilerplate.cpp
Open Terminal in /Applications/Utilities and execute these commands. Execute means typing Enter after you've typed the command.
cd $HOME312
 # IMPORTANT: make certain you are in your cs312 courses folder
pwd
If pwd returned YOUR_COURSES_FOLDER/cs312 continue with these commands. If not, figure out why not. Repeat the CMC Lab Setup instructions.
touch hw111_boilerplate.cpp
touch hw112_helloMidi.cpp
code .
# the . at the end of the last command refers to the current directory
This should open the vsCode text editor that you will use for the first 2/3 of the course. You'll learn more about vsCode in class 1.2.
When vsCode opens, click the boilerplate.cpp code in the left side tree view.
Copy this code into the main editor section. Then save the file.
#include <iostream>
#include <string>

const std::string str_header{"/***************************************************************"};
const std::string str_footer{"***************************************************************/"};

void write_header() {
  std::cout << str_header << std::endl;
}

void write_body() {
  std::cout << "body" << std::endl;
}

void write_footer() {
  std::cout << str_footer << std::endl;
}

int main() {
  write_header();
  write_body();
  write_footer();
}
Open Terminal and execute this command.
cl hw111_boilerplate.cpp && ./a.out
You should see this output.
/***************************************************************
body
***************************************************************/
Assignment hw111_boilerplate
Implement write_body() to produce the following output.
Important : Use you and your partners names: Last First email.
/***************************************************************
hw111_boilerplate.cpp
Copyright (c) Carleton College CS312 free open source
Assignment: hw111
Duck Donald dduck@carleton.edu
Mouse Minny mmouse@carleton.edu
DATE: 2019-12-15
TIME: 14:46:25
****************************************************************/
Hint: Date and Time
Run this command in Terminal
date '+DATE: %Y-%m-%d' && date '+TIME: %H:%M:%S'
Google std::system for one way of capturing shell commands in C++.
Here's code I modified from one of the sites google returned: https://en.cppreference.com/w/cpp/utility/program/system
Copy/paste this code into a new file named /date.cpp.
#include <iostream>
#include <cstdlib>

int main()
{
}
    std::system("date"); // execute the UNIX command date
Compile and run
cl date && ./a.out
Output
Sun Dec 15 22:16:01 CST 2019
Modify it for use in boilerplate.cpp.
hw112_helloMidi.cpp
Open hw112_helloMidi.cpp in vsCode.
Copy/paste this code and Save.
// helloMidi.cpp
#include <iostream>
#include <string>

// write_comment()
// prints lines that start with # followed by string s
// string s does not contain the "# " (pound space) to start the line
void write_comment(const std::string &s) {
  std::cout << "  write_comment()\t\t// you write" << std::endl;
}

// write_midi_message_nodata2(...)
// 0xC0 status bytes are followed by one data byte
// prints lines that begin with numbers
void write_midi_message_nodata2(int32_t time_stamp, int16_t status,
                                int16_t data1)
{
  std::cout << "  write_midi_message_nodata2()\t// you write" << std::endl;
}

// write_midi_message_hasdata2(...)
// 0x80 and 0x90 status bytes are followed by two data bytes
// use  hasData2() to insure that the 0xC0 does not output data2
void write_midi_message_hasdata2(unsigned int timeStamp, unsigned char status,
                                 unsigned char data1, unsigned char data2)
{
  std::cout << "  write_midi_message_hasdata2()\t// you write" << std::endl;
}

// write formatted output exactly as shown below
// use the three functions you implemented above
int main() {
  std::cout << "If line begins with # use" << std::endl;
  write_comment(" ");

  std::cout << "\nIf midi message status is 0xC0 use" << std::endl;
  write_midi_message_nodata2(0, 0, 0);

  std::cout << "\nElse if midi message status is 0x80 or 0x90 use" << std::endl;
  write_midi_message_hasdata2(0, 0, 0, 0);
}
Execute this code in Terminal.
cl hw112_helloMidi.cpp -o helloMidi && ./helloMidi
You should see this.
If line begins with
  write_comment()   // you write

If midi message status is 0xC0 use
  write_midi_message_nodata2()  // you write

Else if midi message status is 0x80 or 0x90 use
  write_midi_message_hasdata2() // you write
We'll be using MIDI messages for the next several weeks. You'll need to implement these three functions to produce the output shown below. Study the comments in the output of this assignment.
Assignment hw112_helloMidi
Implement these three functions to produce the output shown below.
// write lines beginning with #
void write_comment(const std::string& s);

// write lines where the status byte does not use a data2 byte
void write_midi_message_nodata2(int32_t timeStamp,
                                int16_t status,
                                int16_t data1);

 void write_midi_message_hasdata2(unsigned int timeStamp,
                                  unsigned char status,
                                  unsigned char data1,
                                  unsigned char data2);
Output
Your final output must match this exactly. Study the comments (lines beginning with #)
# A MIDI message contains three or four numbers separated by a single tab character
# number 1 is a time stamp in milliseconds in decimal format
# number 2 is a MIDI status message in hexadecimal format without the 0x prefix (range 0x80 - 0xFF)
# number 3 is a MIDI data1 message in decimal format (range 0 - 127)
# number 4 is a MIDI data2 message in decimal format (range 0 - 127)

# status 0xC0 begins a a patch change message
# indicating which instrument sound to use
# patch change messages do not use data2
# data1 is the instrument number.
0	c0	0

# status 0x90 begins a Note On (NON) message
# NON messages use both data1 and data2
# data1 is the MIDI note number that corresponds to
# keys on a piano where Middle C is note number 60
# data2 is the velocity or how loud or soft the note sounds
0	90	60	110

# status code 0x80 begins a Note Off (NOF) message
# NOF messages use both data1 and data2
# data1 is the MIDI note number that corresponds to
# keys on a piano where Middle C is note number 60
# data2 should be set to zero
900	80	60	0

# Every NON must be followed by a NOF with a later time stamp
1000	90	55	80
1400	80	55	0

# You can also send a NOF using a NON with a velocity of 0
1500	90	55	60
1900	90	55	0

# More NON-NOF pairs
2000	90	56	100
2900	80	56	0
3000	90	55	80
4200	80	55	0

# Another patch change
4999	c0	56

# More NON-NOF pairs
5000	90	59	110
5900	80	59	0
6000	90	60	127
8000	80	60	0
Notes
- The # symbol is a comment. Include it as the first character of the line followed by a space.
- Non comment lines are MIDI messages that contain 3 or 4 numbers.
- All numbers are separated by a single tab character.
- A tab character can be coded like this.
const char kTAB = '\t';
std::cout << 0 << kTAB << 90 << kTAB << 60 << kTAB << 100 << std::endl
We'll play it in the next class and you can hear what it sounds like.
Submission Format
Feel free to email jellinge@carleton.edu on any part of the homework that is unclear to you. Chances are if you have questions other students do too. I will answer those questions by email to everyone in the class. The original sender will remain anonymous. I have tried to provide clues to the homework in the web pages, reading assignments, and labs. Sometimes what seems obvious to me is not obvious to students just learning C++.
Create a folder named hwNN_LastnameFirstname1_LastnameFirstname2.
Substitute your name and your partner's name for LastnameFirstname1_LastnameFirstname2.
Remember
- Boilerplate header at top of every file.
- Make sure your program compiles before submitting.
- Programs that compile and produce partially correct output will be graded.
- You can send notes to me in your homework files by enclosing them in block comments.
- Programs that do not compile get an automatic F (59%).
- Each partner must submit identical homework folders to the course Hand-in folder.
- If only one partner submits the homework send me an email explaining why.
- Empty your build or build-debug folders using the command emptyBuildFolder.sh
- Only include .h, .cpp, Makefiles, CMakeLists.txt
- Do not include these folders/files
.git
.vscode Double check for the above two folders using this command
ls -a hwNN_LastnameFirstname1_LastnameFirstname2
# if either .git or .vscode exist in the folder you're submitting remove them with
# rm -fR .git
# rm -fR .vscode
Create a folder named hw11_LastnameFirstname_LastnameFirstname.
Substitute your name and your partner's name for LastnameFirstname_LastnameFirstname.
My folder would be called hw11_EllingerJohn_StroustrupBjarne. Yours will be named in a similar format.
Code to turn in
hw11_LastnameFirstname1_LastnameFirstname2
├── hw111_boilerplate.cpp
├── hw112_helloMidi.cpp
Example boilerplate header. Use yours not my example.
/***************************************************************
hw111_boilerplate.cpp
Copyright (c) Carleton College CS312 free open source
Assignment: hw111_boilerplate
Man Super sman@carleton.edu
Woman Wonder wwoman@carleton.edu
DATE: 2019-12-15
TIME: 14:46:25
****************************************************************/