MUSC 108. Introduction to Music Technology - Fall 2013
[Syllabus]
Final Audio Project Details
Class Presentation
Saturday, Nov. 13, from 12:00 - 2:30 pm during the scheduled Final Exam time.
Options
You have three options for your final project:
- Continuation and expansion of your midterm SMF
- An SMF you've found on the internet
- An original composition.
Requirements
Your final audio project should be at least 2-3 minutes in length. Scoring
for four or more instruments is required. A printed score is helpful.
Requirement For Option 2 only when using a pre-existing MIDI file
- If you using e a pre-existing MIDI file tell me you must place the original SMF in the course Hand-in folder when you start your project.
- You will have to remove all Meta Events (FF), Control messages (Bn), Pitch Bend (En) messages, Patch Changes (Cn), Aftertouch message (An and Dn), and SysEx (Fn) messages in the file. All NON velocities must be set t0 100 as described in 15Lab3.
Project Outline
- A printed copy of your score is helpful but not required. If you are using option 1 you already have one.
- Option 2 only. Remove everything except NON and NOF messages and with all NON velocities set to 100 as described in 15Lab3.
- Choose your instrumentation. High Quality sounds are
available within Logic.
- Create Markers in Logic at significant score points for ease of navigation.
- Once you've chosen the instrumentation, edit the MIDI data in Logic to
emulate a human performance. Utilize real time editing features to create
articulations, dynamics, tempo changes. You can split a single instrument
into multiple tracks to create different dynamics, timbres, bowings, articulations
for the same instrument.
- Save a copy of your Logic project as: your_email_name_final.logic.
- Open the Logic mixer and set
the volume and pan settings for each instrument.
- Record automation as needed. You can automate faders, effects, add reverb, compression, etc. to
create the perfect mix.
- Add Mastering effects to optimize sound levels and create "presence" in the final mix. Mixing axiom "Less is more." Only use an insert effect if you think it makes your project sound better. Just because you learned it in a lab doesn't mean you have to use it.
- Adjust final volumes and pan settings using the MultiMeter plug in.
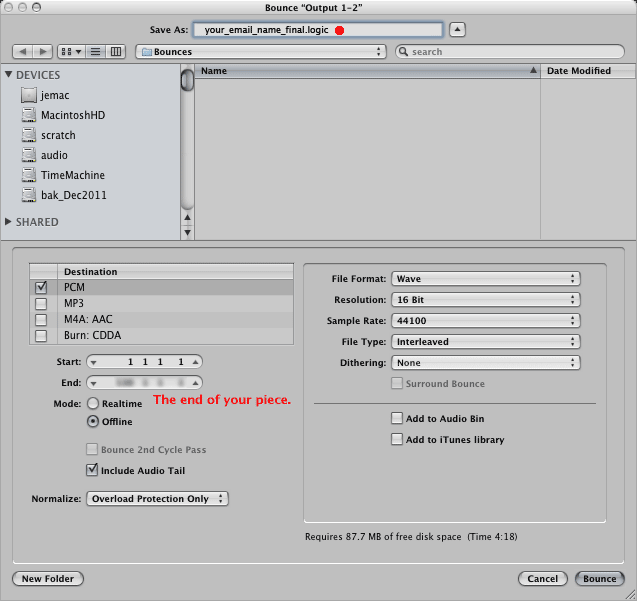
- Bounce your mix in to a two track stereo wave
file. Important: NOT MP3.
- Play your wave file on headphones and on speakers through a stereo system.
Class Presentation
Maximum presentation time is 6 minutes. Plan accordingly.
Discuss your project.
- Explain why you chose this piece.
- Show the musical score you worked from.
- How did you mark up the score to facilitate the data entry?
- How did you mark up the score to indicate an expressive performance?
- Discuss your methods of realizing a musical performance.
- Discuss interesting features of your project, as well as problems encountered
and solutions found.
Play your stereo audio wave file using the classroom computer player. Order of presentation is determined by lottery. Maximum presentation time is 5 minutes.
You'll Turn In Materials in Printed and Course Hand-in Folder format
Items To Be Turned In as Printed Copies
- Your final paper. You must turn in a printed copy.
- Your working score (if using your midterm SMF).
Final Paper
Describe
the process in a to 4-8 page paper.
Section 1 must contain this information - Can be Outline Format
- Your name
- Date
- Title of Song
- Composer
- Arranger (optional)
- Number of tracks
- Instrument assignments for each track
Section 2 - Must Be Essay Format
- Why you chose the piece.
- How you obtained a score or created the starter MIDI file.
- Your working process in Logic.
- How you chose the instrumentation.
- Recording
MIDI or Audio if used.
- Mixing and effects processing.
- Describe the effects you choose for each track and why you chose them.
- Describe
problems encountered and solutions found.
- Describe how you made your recording sound realistic as if played by human
musicians.
- Describe things you wish you could
have done but weren't able to.
- Describe things you were especially pleased
with.
- How close did you come to realizing your goals.
- What were the shortcomings?
- How could they be overcome?
Working Score
The score you worked from, if any.
Items to be Turned in to the Course Hand-in Folder
- Your internet starter file you based your project on (if applicable).
- Your stereo audio "wav" file.
- Your Four to eight page paper in Word,
Open Office, or RTF format.
- The filled in Excel Project Data Sheet
[FinalAudioProjectDataSheet.zip] same as
[FinalAudioProjectDataSheet.xls]
- Your entire Logic Project Folder
- Your entire Logic Project Folder compressed as a ".zip" file.
1. Starter file - This is prior to "cleaning" as described in 15Lab1.
Your original starting MIDI file with all of these messages removed or altered:
- all velocities = 100
- all control messages removed (MIDI status Bn)
- all patch change messages removed (MIDI Status Cn)
- all pitch bend messages removed (MIDI Status En)
- all after touch messages removed (MIDI Status An and Dn)
- all System Exclusive and Meta-Event messages removed (MIDI Status Fn)
2. Stereo Audio Wave File - NOT MP3
Your final project two track stereo "wav" file. Use these "Bounce" options.
You'll play your stereo wave file in class. Test it
at home before class. Make a separate backup copy of all materials for yourself.
I'll keep the DVDs you turn in.
3. Your Final Paper
Described above.
4. Your Excel Project Data Sheet
Fill in all details that pertain to your
project.
[FinalAudioProjectDataSheet.zip] same [FinalAudioProjectDataSheet.xls]
These files are also in the course common folder.
5. your Logic MIDI Project Folder
This is the final state of your Logic project just before bouncing to the stereo wave file.
The Logic Save As or Save Copy As dialog has several Advanced options for saving. Use these settings.
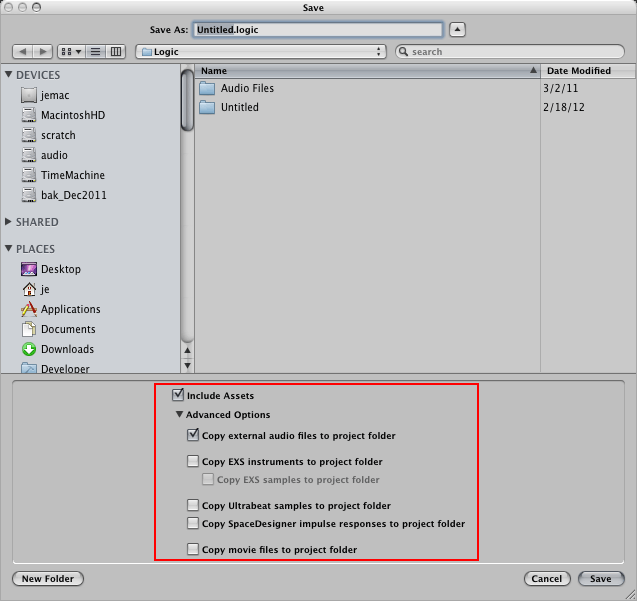
Important: I will be using this Logic project for grading. I must be able to open and play your Logic project with all instruments, effects, and automation used just prior to "bouncing" your stereo wave file. Be sure it's your final Logic project before copying it to the Hand-in folder. As a precaution, copy it to a USB memory stick, and see if you can open and play it in Logic Pro from the memory stick.
6. A compressed (zip or gz) file of your Logic project folder. Right click on your Logic project folder and choose "Compress..." This is a redundant safeguard against file corruption when dragging your project folder to the Hand-in folder. Zip files are rarely corrupted.
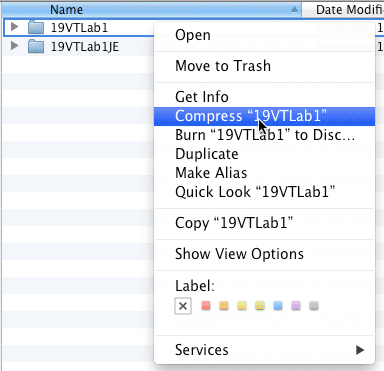
A zip file will be created.

[Syllabus]