CS 312 - Week 9.1 Class
CS 312 Audio Programming Winter 2020
Table of ContentsClose
Final Project Proposal - due week 9.2
Submit your Final Project proposal to me by email before class 9.2.
9.1 Class
Audio Effects
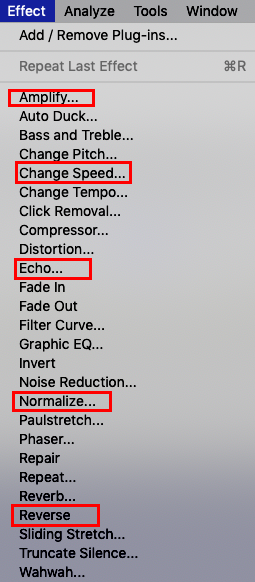
You've probably noticed some of the effects available in Audacity. In hw911 you're going to implement the effects outlined in red. I've written a lot of the Qt GUI code for you, but you'll have to implement the effects.
hw911_stats_effects
Overview of hw911_stats_effects
This assignment applies effects to the samples of the opened sound file. I've already implemented the GUI interface. You'll need to add code to make it functional. Some of the code can be reused from hw81/hw82. Most of the effect functions are left to you. I've also place my working application in the course common folder.
Setup
cd $HOME312/cs312
mkdir hw91
Download the code here
Unzip it and move the folder to /hw91.
Open hw911_stats_effects.pro in QtCreator
Build and run.
Open the the cs312.wav.
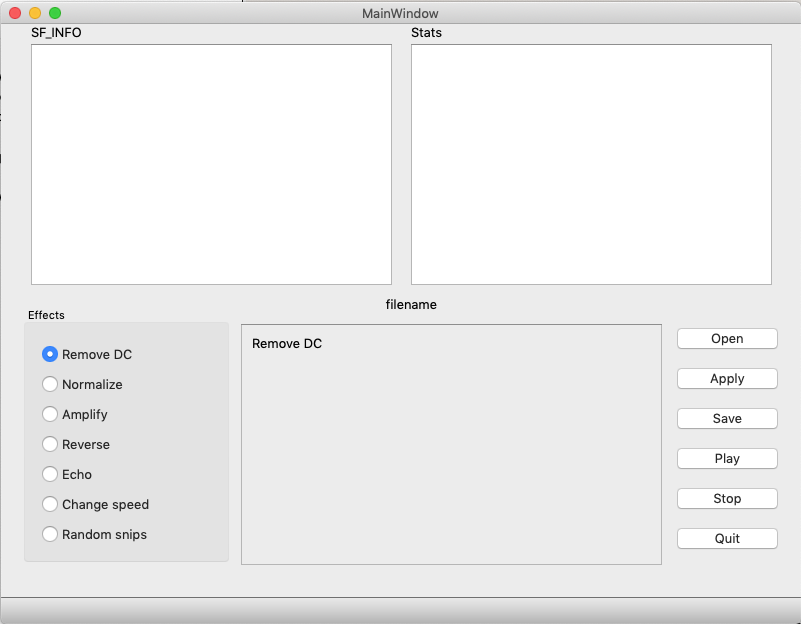
You should see this.
 `
`
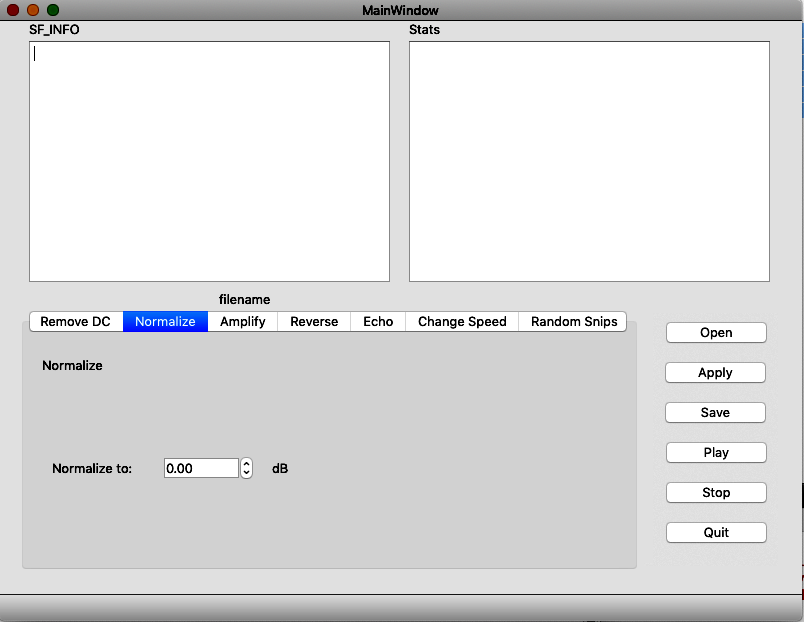
The SF_INFO and Stats panels are unchanged from hw811_qtwavio_stats. What's new is the lower half of the window. On the left you'll see seven Effects buttons. Click each one and you'll see the center panel update with controls for that effect. Click each of the Effects radio buttons and observe the center panel display GUI widgets for each effect.
mainwindow.ui
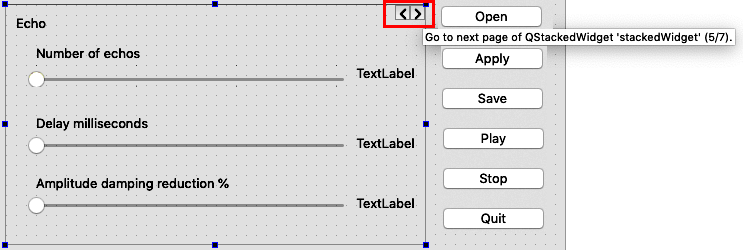
The new item in the GUI is the QStackedWidget that displays the controls related to the selected effect in their own panel. I'veIt is not hard to create or implement. You just drag it onto your window form and add widgets to it. Right click to insert/delete a new page. Use the < > buttons in the upper right to navigate through the pages.
Alternatively I could have developed the app using the QTabbed Widget. The implementation code is nearly identical.
The seven effects
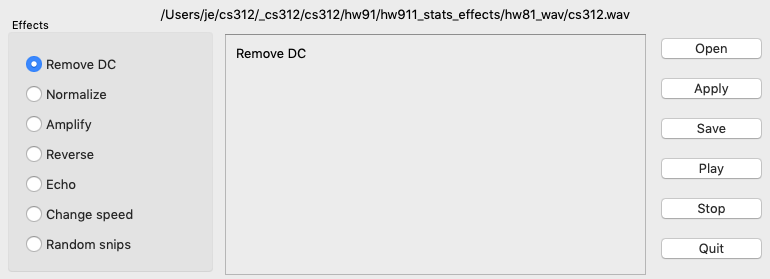
Remove DC
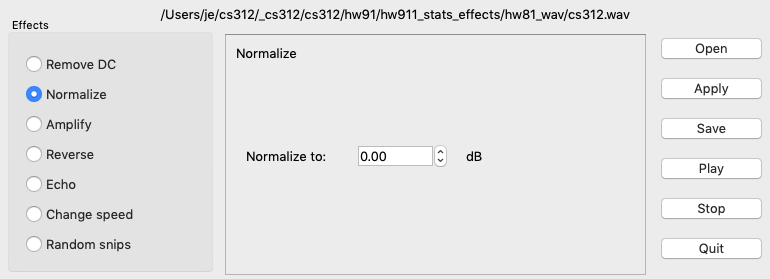
Normalize
The Double Spin Box sets dB values from -48 dB up to 0 dB (max amplitude).
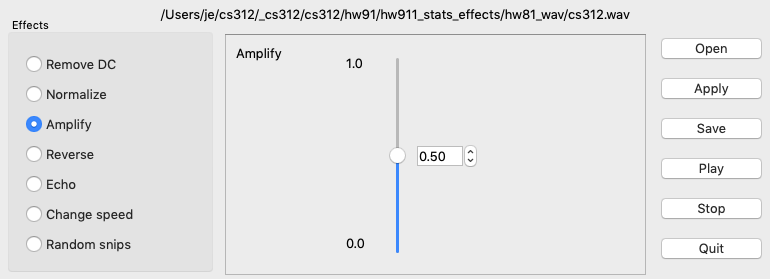
Amplify
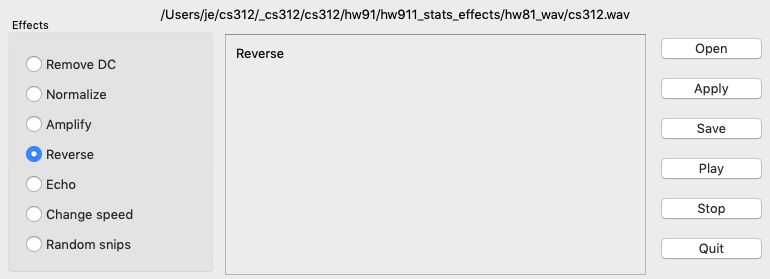
Reverse
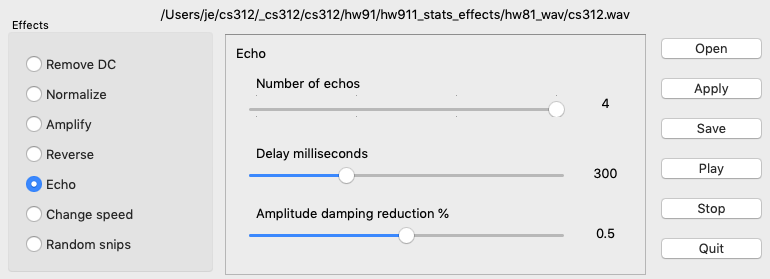
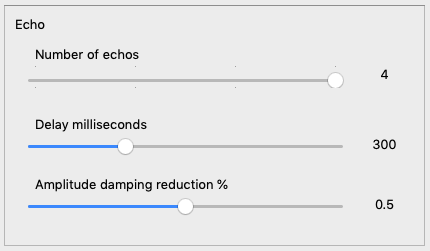
Echos
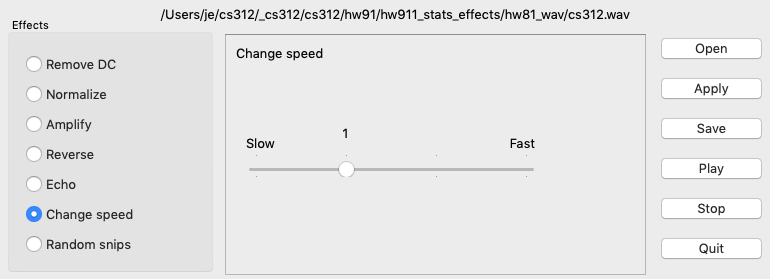
ChangeSpeed
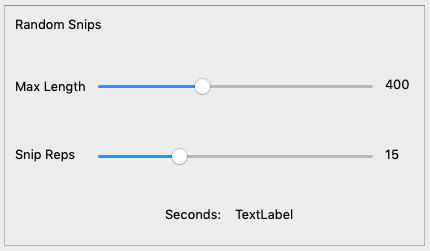
RandomSnips
Implementing the effects
The instructions below assume
- You've implemented the missing code in wavstats.cpp with your code from hw812/813
- You've opened the cs312.wav file and are applying the effect to that file.
- vsamps holds the samples of the file you've opened (declared in wavstats.h).
- veffect holds the samples of the after processing the effect (delcared in waveffects.h.)
db2amp and amp2db formulas
These formulas will come in handy.
\[\eqalign{ & dB = 20 \bullet {\log _{10}}\left( {\frac{{amp}}{{1.0}}} \right){\text{ provided 0}} \leqslant {\text{amp}} \leqslant {\text{ 1.0}} \cr & \cr & amp = amp = {10^{\frac{{dBval}}{{20}}}}{\text{ provided dBval }} \leqslant {\text{ 0}} \cr} \]
Remove DC
The term DC (direct current) comes from electrical engineering and refers to a current that is unchanging. An unchanging current implies that the voltage is also unchanging (assuming resistance remains constant). A DC value of 0 means the are under the positive amplitude equals the area under the negative amplitudes.
For digital samples a DC value of 0 means the sum of all positive amplitudes equals the sum of all negative amplitudes. If there is a difference the DC value will me non zero and can be either positive or negative.
Audio file processing gives the most accurate results if the file you're working with has a DC offset of zero.
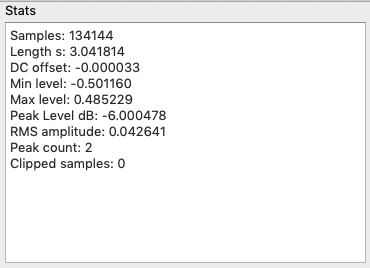
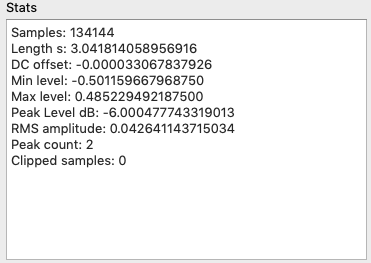
The cs312.wav DC value is shown to be -0.000033.
If we add +0.000033 to every sample value we should get a DC value of zero.
Copy/replace in waveffects.cpp
void doRemoveDC()
{
    veffect = vsamps;
    for ( size_t n = 0; n < veffect.size(); ++n )
        veffect.at( n ) += 0.000033;
}
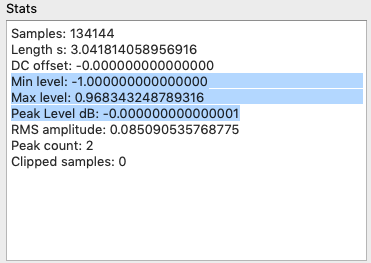
After building, running, opening, applying, and saving cs312.wav the Stats should show this.

Do not save the file.
float vs. double accuracy
In C++ a float has 7 decimal digits of precision. I displayed six digits after the decimal point to match the resolutions of the sox command. The number of decimal places is controlled with the QString…arg command in wavstats.cpp. The 'f', 6 parameters indicate floating point non-scientific format with 6 decimal places.
qs = QString( "Length s: %1" ).arg( secs, 0, 'f', 6 );
We can increase the accuracy of our calculations by increasing the number of decimal places. A double (MY_TYPE) has 15 decimal digits of precision.
Open wavstats.cpp in QtCreator.
Scroll to a point in the file where .arg( secs, 0, 'f', 6 ) appears.
Type Command-F to open the Find/Replace panel in Qt Creator.
Enter this text.
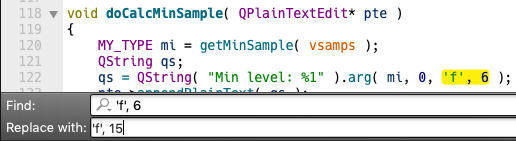
Click the Replace All text to the right.
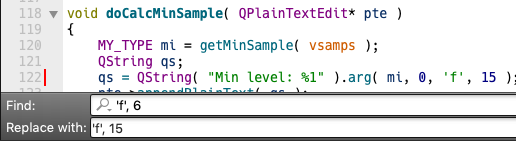
Build and run
Open the cs312.wav.
You should see this.
The DC value is the same up to six decimal places but now there are nine more.
Edit/replace doRemoveDC() with this code.
getDCoffset() is from /wavstats.cpp and needs to be implemented as done in hw812/813.
void doRemoveDC()
{
    veffect = vsamps;
    MY_TYPE dc = getDCoffset( veffect );
    for ( size_t n = 0; n < veffect.size(); ++n )
        veffect.at( n ) += -dc;
}
Build, run, and open the original cs312.wav.
You should see this.

Normalize
Normalize is used to bring the amplitude of the file up to a maximum of 0 dB. Any further than that would cause clipping. Clipping is to be avoided at all costs because it sounds horrible when played.
Here's how to implement void doNormalize( MY_TYPE val )
- The val parameter is passed in from ui->doubleSpinBox_normalize->value()
- Set veffect = vsamps
- get file peak dB
- ui_dB = slider value to dB
- calculate the dB difference between ui_dB and file peak dB (subtract dBs)
- convert dB difference to amplitude
- multiply every sample by new amplitude
cs312.wav was normalized to 0 dB
Amplify
Here's how to implement void doAmplify( MY_TYPE val )
- The val parameter is passed in from ui->doubleSpinBox_amplify->value()
- Set veffect = vsamps
- get file max sample
- ui_amp = slider value
- calculate dB ratio between ui_amp and file amp
- convert dB ratio to amplitude
- multiply every sample by new amplitude
cs312.wav at 0 dB was amplified down to -6 dB
Reverse
Play the samples from end to beginning.
Consult the internet for std::reverse.
Echos
Here's what I did.
void doEchos()
{
/*
  calculate the number samples needed for the GUI delay of Delay milliseconds
  multiply that number by the GUI number of echos

  create GUI number of echo vectors of length vsamps.size() + the samples needed for GUI number of echos
  set all samples in each of the vector 1 to zero
  set the other vectors = vector 1 (all zeros)

  copy vsamps into new vector 1 beginning at sample[0]
  copy vsamps into new vector 2 beginning with the sample that equals the delay time
  copy vsamps into new vector 3 beginning with the sample that equals the 2 times the delay time
  copy vsamps into new vector 4 beginning with the sample that equals the 3 times the delay time

  as you're copying the samples adjust the amplitude reduction accordingly
  new vector 1 = original amplitude
  new vector 2 = original amplitude multiplied by damping reduction
  new vector 3 = original amplitude times multiplied by 2 times reduction
  new vector 4 = original amplitude times multiplied by 3 times reduction

  veffect = sample by sample sum of the four new vectors
  check veffect for clipping
*/
}
ChangeSpeed
The idea here is to allow fractional sample indices and estimate what the sample value would have been based. Use linear interpolation for the estimate.
From: https://en.wikipedia.org/wiki/Linear_interpolation
\[{\text{y}} = {y_0} + \left( {{x} - {x_0}} \right)*\left( {\frac{{{y_1} - {y_0}}}{{{x_1} - {x_0}}}} \right)\]
The y's are sample values and the x's are sample indices. Subscript 0 is the left neighbor and subscript 1 is the right neighbor.
void doChangeSpeed(MY_TYPE rate)
{
    /*
    Variable names I used - you can make up your own
    Try to use names that someone else reading the code would understand right away
    MY_TYPE indx_now{0};
    MY_TYPE indx_prev{0};
    MY_TYPE outsamp{0};
    size_t file_sz;
    size_t new_sz;;
    size_t indx_left;
    size_t indx_right;
    MY_TYPE indx_RL;
    MY_TYPE samp_RL;

    parameter rate is the speed we're reading through vsamps
        rate = 1.0 is the normal sample rate
        rate = 2.0 we're reading every other sample, new_sz = 0.5 * file_sz
        rate = 0.5 we're reading sample[n], then computing a sample
                half way between sample[n] and sample[n+1]
                then reading sample[n+1], new_sz = 2 * file_sz

    calc file_sz equals vsamps size
    calc new_sz = file_sz / rate
    resize veffect to new_sz

    for loop n =  0 to new_sz
        set indx_now to fmod(indx_prev + rate, file_sz)
        set indx_left to floor of indx_now

        while indx_left >= file_sz
            indx_left %= file_sz

        set indx_rigth = indx_left + 1;
        while indx_right >= file_sz
            idx_right %= file_sz

        set indx_RL = indx_right - indx_left
        set samp_RL = vsamps indx_right = vsamps indx_left
        outsamp = vsamps indx_left + (indx_now - indx_left) * sampRL/indxRL
        veffect at n = outsamp;
        indx_prev = indx_now
    end for loop
*/
Normal speed 1.0
hw911_ChangeSpeed_1dot0.mp3
Faster speed 1.7
hw911_ChangeSpeed_1dot7.mp3
Slower speed 0.7
hw911_ChangeSpeed_dot7.mp3
Slowest speed 0.1 (not full length)
hw911_ChangeSpeed_dot1.mp3
RandomSnips
Finish the other six effects and then copy this code for the final effect. Interesting sounds.
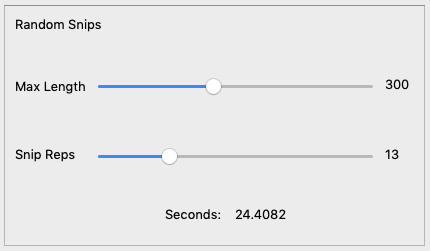
void doRandomSnips( QLabel* label )
{
    // my treat
    // snip_maxLen and snip_reps are set in mainwindow.cpp widget slot functions
    int count{0};
    veffect.clear();
    veffect.reserve( 2 * 60 * FS ); // two minutes
    std::vector<MY_TYPE> vsnip;
    vsnip.reserve( 2 * 60 * FS ); // two minutes

    int sz = static_cast<int>( vsamps.size() );
    int numSnips = 300;

    for ( int n = 0; n < numSnips; ++n )
    {

        // calculate snip start and end points
        int snipStart = static_cast<int>( get_rand_int( 1, sz ) );
        int snipEnd = snipStart + snip_maxLen;
        // wrap around
        if ( snipEnd > sz )
            snipEnd -= sz;

        // k=1 makes sure there's at least one trip through the for loop
        for ( int k = 1; k < snip_reps; ++k )
        {
            // stuff al samples between snipBegin and snipEnd
            for ( int ix = snipStart; ix < snipEnd; ++ix )
            {
                vsnip.push_back( vsamps.at( static_cast<size_t>( ix ) ) );
                ++count;
            }
        }

        // stuff vsnip into veffect on this trip through the for loop
        std::copy( vsnip.begin(), vsnip.end(), std::back_inserter( veffect ) );

        // clear for next time through the loop
        vsnip.clear();
    }
    // This displays the playback time and gives you a chance to click the Stop button
    MY_TYPE seconds = 1.0 * count / FS;
    label->setNum( seconds );
    qDebug() << "count " << count << " " << veffect.size();
}
Assignment hw911
Your assignment is to implement code necessary to make your app match my app.
My app is here.
Program usage
- Click the Open button to open a wave file.
- Choose an effect.
- Edit the controls, if any.
- Click the Apply button.
- Click the Play button to hear the effect.
- Repeat 3-5 as desired.
- Click the Save button to save the file with a new name.
- Click Stop to stop a lengthy effect (It's not crash proof if the songs already finished).
- Click Quit to exit.
Note:
It would be nice if you could chain the effects but that is not implemented in this version. You have to apply them one at a time. You can then save the file, open the new file and add another effect.
Submission
Feel free to email jellinge@carleton.edu on any part of the homework that is unclear to you. Chances are if you have questions other students do too. I will answer those questions by email to everyone in the class. The original sender will remain anonymous. I have tried to provide clues to the homework in the web pages, reading assignments, and labs. Sometimes what seems obvious to me is not obvious to students just learning C++.
Create a folder named hwNN_LastnameFirstname_LastnameFirstname.
Substitute your name and your partner's name for LastnameFirstname_LastnameFirstname.
Remember
- Boilerplate header at top of every file.
- Make sure your program compiles before submitting.
- Programs that compile and produce partially correct output will be graded.
- You can send notes to me in your homework files by enclosing them in block comments.
- Programs that do not compile get an automatic F (59%).
- Submit the homework in only one of the partner's folders.
- Empty your build or build-debug folders using the command emptyBuildFolder.sh
- Only include .h, .cpp, Makefiles, CMakeLists.txt
- Do not include these folders/files
.git
.vscode Double check for the above two folders using this command
ls -a hwNN_LastnameFirstname1_LastnameFirstname2
# if either .git or .vscode exist in the folder you're submitting remove them with
# rm -fR .git
# rm -fR .vscode
Hand-in folder contents
/common
├── RtAudio
│   ├── RtAudio.cpp
│   └── RtAudio.h
├── RtMidi
│   ├── RtMidi.cpp
│   └── RtMidi.h
├── hw332_CMidiPacket.cpp
├── hw332_CMidiPacket.h
├── hw411_rand_int.cpp
├── hw411_rand_int.h
├── hw421_CDelayMs.cpp
├── hw421_CDelayMs.h
├── hw422_CAppleMidiSynth.cpp
├── hw422_CAppleMidiSynth.h
├── hw423_CMidiTrack.cpp
├── hw423_CMidiTrack.h
├── hw511_CInstrument.cpp
├── hw511_CInstrument.h
├── libsndfile
│   ├── sndfile.h
│   └── sndfile.hh
└── qcustomplot
    ├── qcustomplot.cpp
    └── qcustomplot.h

hw91/hw911_stats_effects
├── build-debug (empty)
├── hw911_stats_effects.pro
├── main.cpp
├── mainwindow.cpp
├── mainwindow.h
├── mainwindow.ui
├── rtaudioutils.cpp
├── rtaudioutils.h
├── waveffects.cpp
├── waveffects.h
├── wavio.cpp
├── wavio.h
├── wavstats.cpp
└── wavstats.h