CS 312 - Week 7 Class 1
CS 312 Audio Programming Winter 2020
Table of Contents
7.1 Class
Project 1 class presentations.
Homework 7.1
hw711_Qt_cmidiin_gui
Qt crash course (no pun intended)
- Qt folder path
- WCC /Users/labuser/Qt
CMC /Applications/Qt - Qt IDE application used to design, build, and run applications
- "Qt Creator"
Setup
Execute in Mac terminal.
cd $HOME312/cs312/
mkdir hw71
mkdir hw71/build-hw711
mkdir hw71/build-hw712
mkdir hw71/build-hw713
# for WCC double quotes required because of space in filename
open "/Users/labuser/Qt/Qt Creator.app"

# for CMC double
# open "/Applications/Qt/Qt Creator.app"
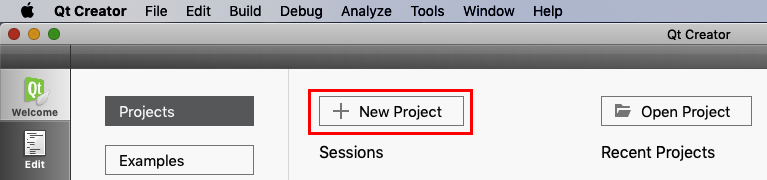
Open the QtCreator application.
The above script should have opened Qt Creator for you. If not, navigate to the Qt folder and double click Qt Creator.
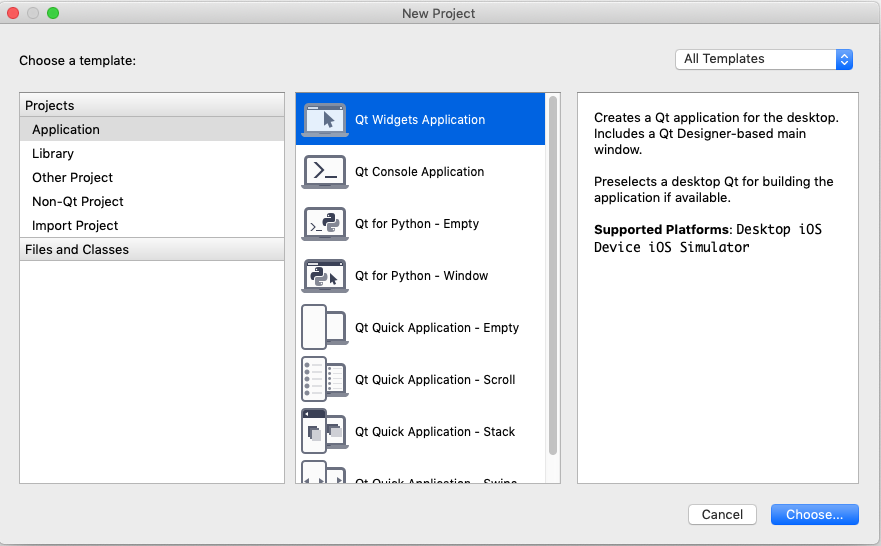
Choose New Project
When the New Project window appears use these settings and click the Choose button.
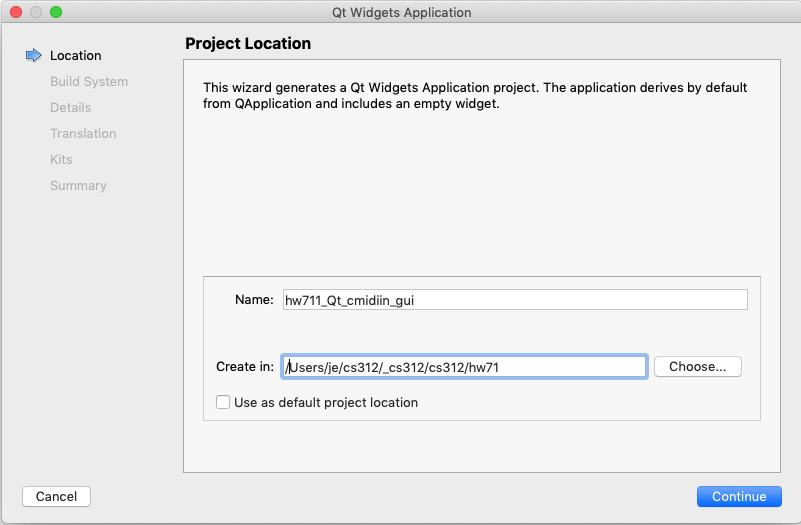
Name the project and set the project location.
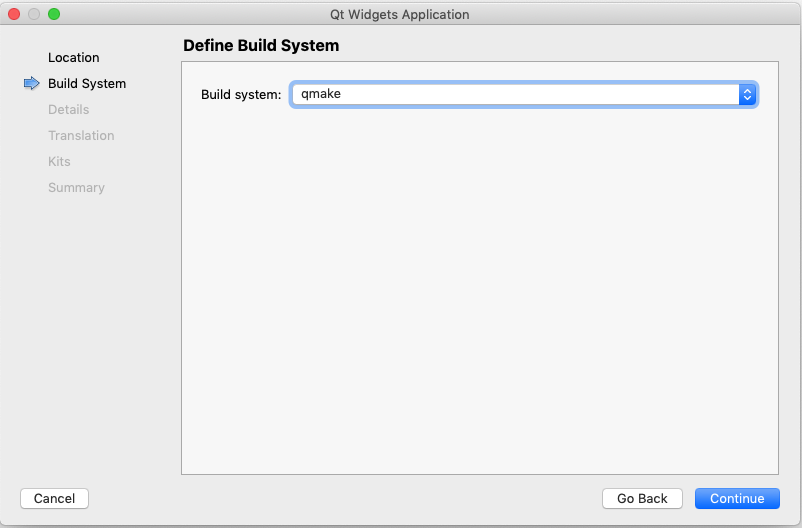
Define the build system as qmake.
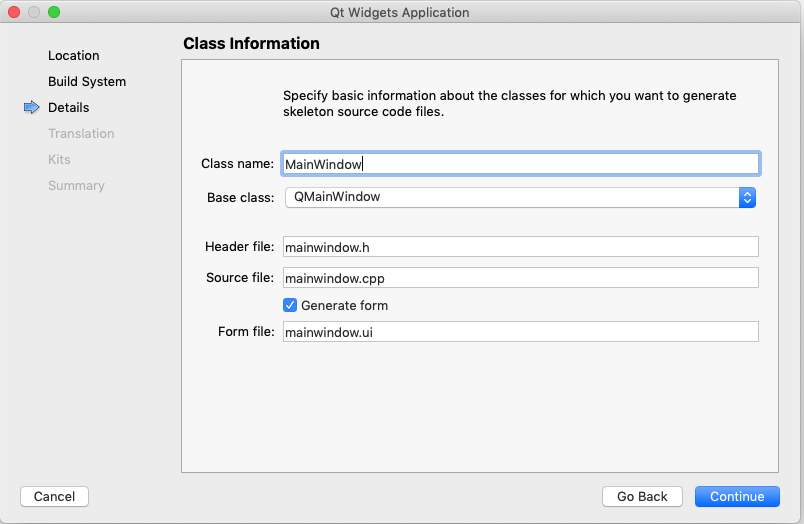
Class Information can be left unchanged.
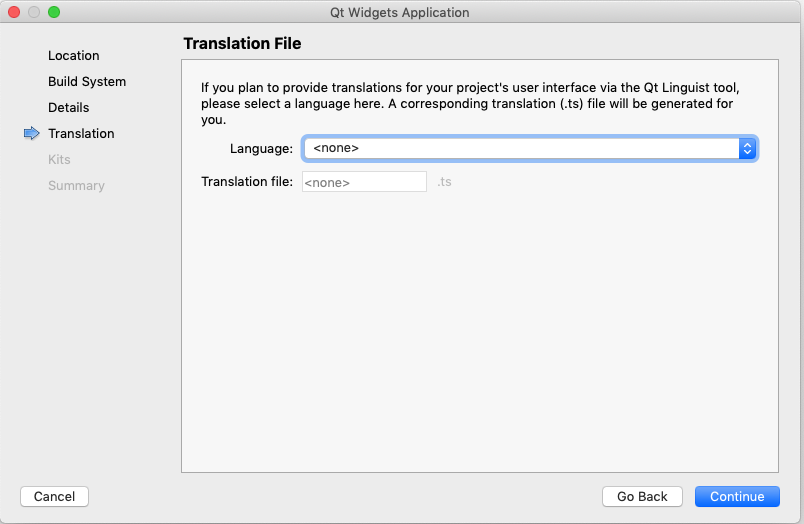
Translation File can be left as <none>
Kit Selection - Desktop Qt … clang 64bit

No version control
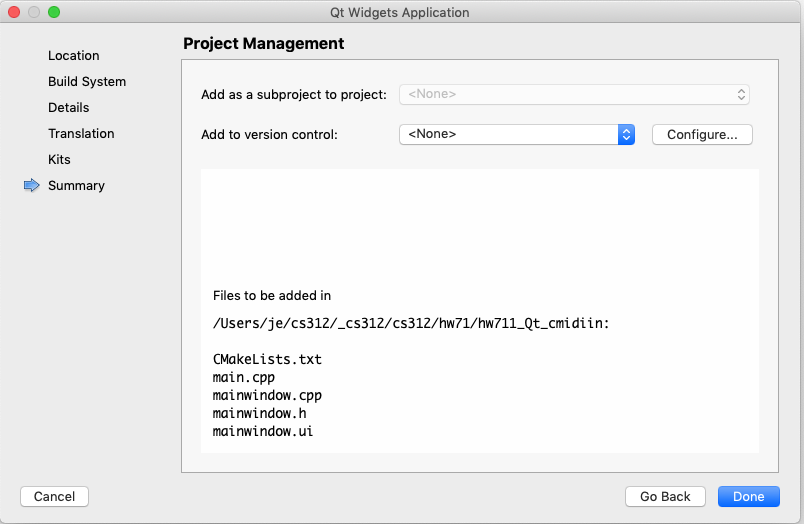
Click Done and the project explorer opens. At first it appears there are errors while QtCreator is checking the project. In a few seconds the errors should disappear.
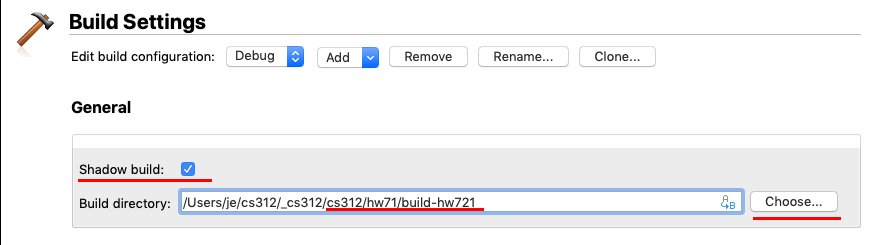
Set the build folder
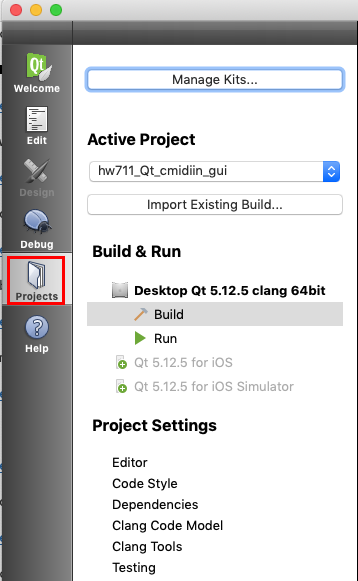
Project tool
Click the Project tool in the left toobar
Make these settings.
- Shadow build checked
Click the Choose button and navigate to the build-hw71 folder.
Build and Run
Click the green arrow on the left toolbar to build and run the application.
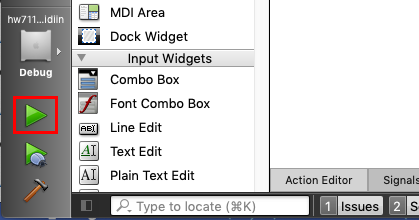
Note:
The icon directly below Run is the "Debug Run" button. Qt comes with an excellent debugger based on llvm and clang.
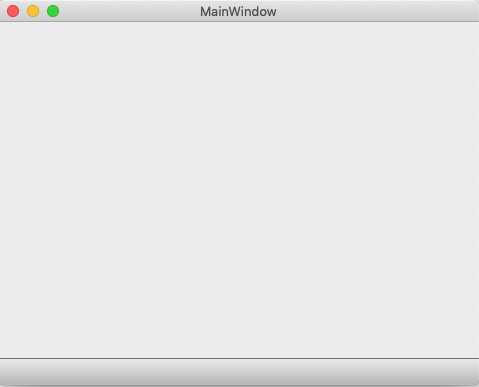
A blank window will appear with the title "MainWindow".
- You can move it around and resize it.
- The red, yellow, and green buttons in the window title bar buttons work as expected.
- There is an hw711_cmidiin_gui menu that you can use to Quit the app.
You can also quit by clicking the red close button in the window title bar.
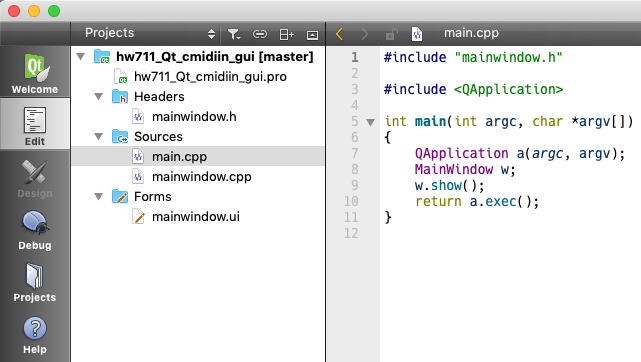
Edit tool
The Edit tool gives you access to all your project files. The main.cpp file has been selected. You'll notice how few lines of code it uses. The mainwindow.cpp file is where you code responses to GUI actions like mouse clicks, key presses, and menu choices. The mainwindow.ui file contians the GUI design you've create.
Design tool
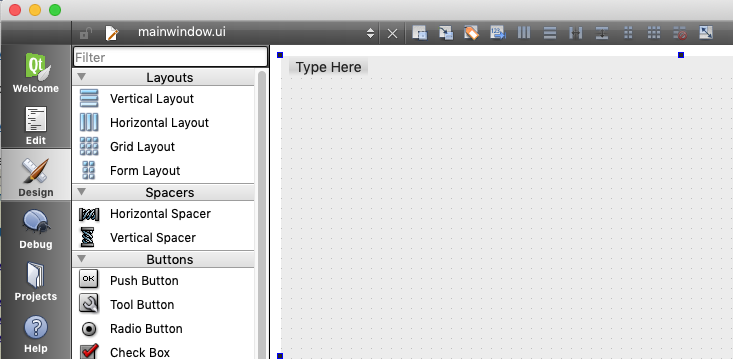
Double click the mainwindow.ui file. The .ui extension is used for User Interface files that are built using the Design tool. A blank window representing the MainWindow will open. A list of widgets you can drag into the form are shown on the left.
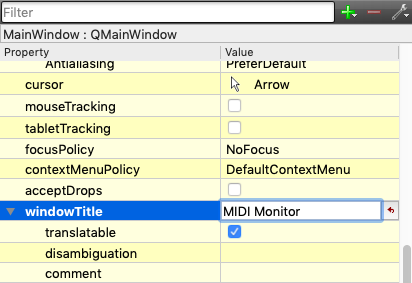
Select the MainWindow form and name the window MIDI Monitor in the windowTitle field on the right. You'll have to scroll to find it.
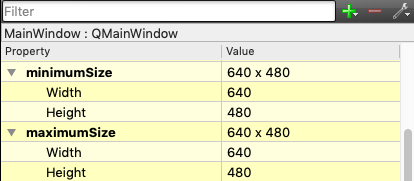
Set the minimumSize and maximumSize to give the window a fixed dimension.
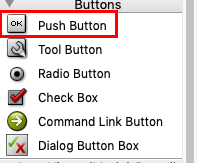
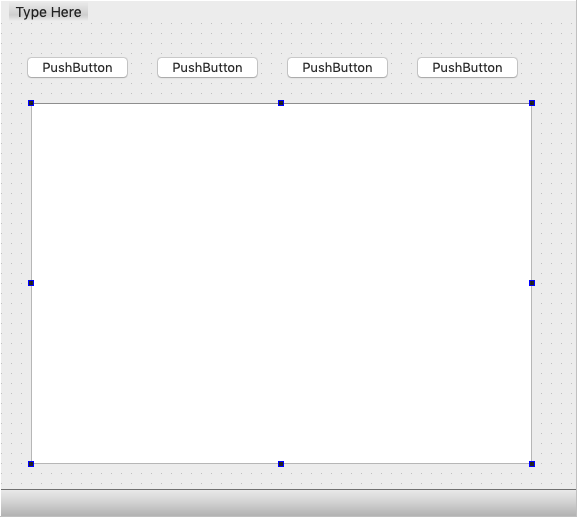
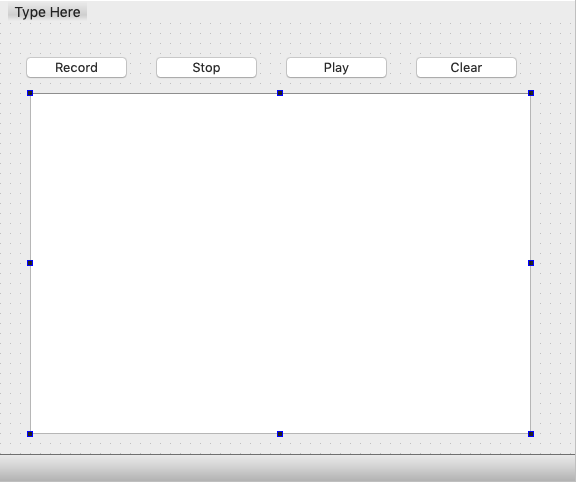
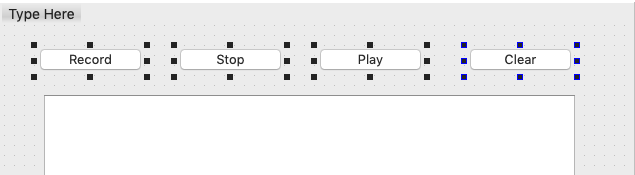
Drag a single Push Button widget into the ui window. Then create the other three by selecting the button you just placed and Option-dragging to create copies.
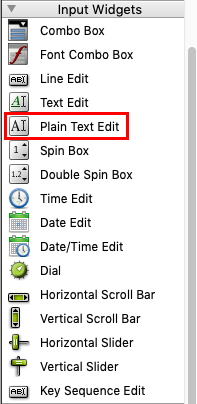
Add a plainTextEdit widget.
Arrange them like this.
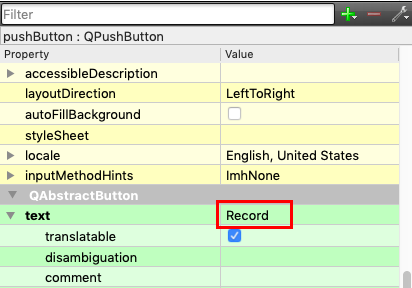
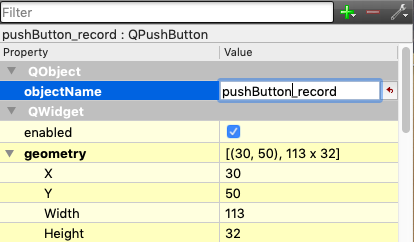
Double click the push button text to change the button names as shown.
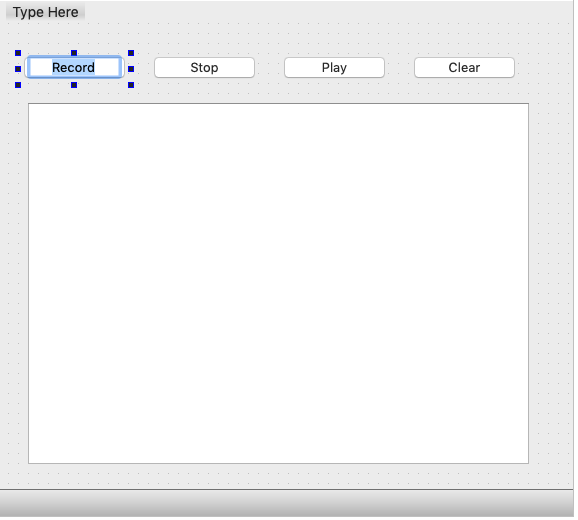
Or type the name in the object properties list.
Assign the the variable name pushButton_record to Record button. That name will be used to reference the Record button in your code.
Assign these variable names to the other three buttons.
- pushButton_play
- pushButton_stop
- pushButton_clear
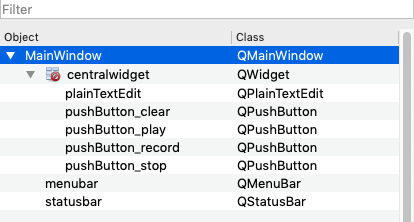
The variable names and types of the UI objects appear in the upper right panel. This panel can also be used to select objects on the main form.
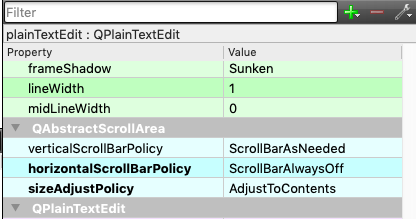
Select the plainTextEdit widget. We'll accept the default name, plainTextEdit, because it's the only on on the form.
Add the ScrollBar policies.
Build and Run
Click the green arrow on the left toolbar to build and run the application.
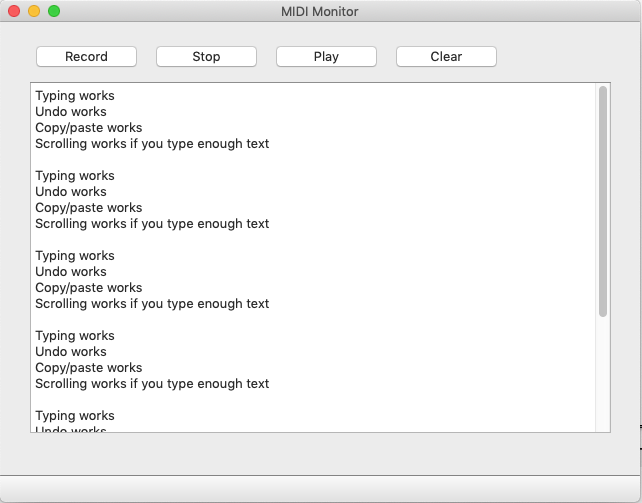
The window will appear with the title "MIDI Monitor".
- You can move it around but you cannot resize it.
- You can type into the text area.
- If you fill the text area a scroll bar will appear and you can scroll through the text.
- Copy and paste works.
- Undo works.
- Select all works.
- Text cursor movement using arrow keys works.
- Command-UpArrow takes you to the top of the text.
- Command-DownArrow takes you to the bottom of the text.
- You can click the buttons and they highlight as long as the mouse is held down.
- You can close the window using the red close button.
- You can close the window using the Quit command in the hw711_Qt_cmidiin_gui menu.
All this comes for free.
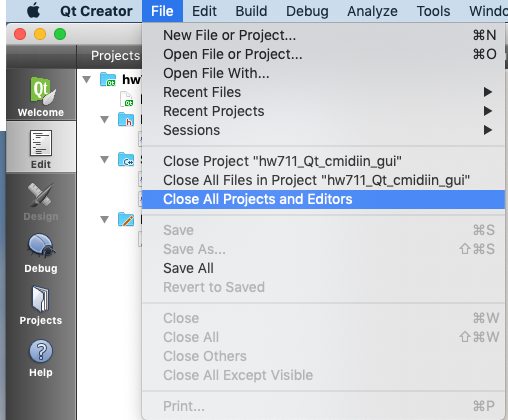
Close the project from the Qt Creator File menu.
hw712 and hw713 requirements
- See class 6.2 for detailed instructions.
- IAC Driver must be enabled in Audio MIDI Setup app.
- Au Lab must be open with the DLSMusicDevice setup correctly.
- VMPK must be open.
- You must have a working midiprobe command line tool in your courses bin folder
hw712_Qt_rtmidiin
In this assignment we'll display rtmidiin messages in CMidiPacket format inside the QEditPlainText widget.
Setup
cd $HOME312/Cs312/hw71
cp -R $HOME312/cs312/hw71/hw711_Qt_cmidiin_gui $HOME312/cs312/hw71/hw712_Qt_rtmidiin
cd $HOME312/cs312/hw71/hw712_Qt_rtmidiin
mv hw711_Qt_cmidiin_gui.pro hw712_Qt_rtmidiin.pro
mv hw711_Qt_cmidiin_gui.pro.user hw712_Qt_rtmidiin.pro.user
sed -i '' s/hw711_Qt_cmidiin_gui/hw712_Qt_rtmidiin/g hw711_Qt_cmidiin_gui.pro.user
cp $HOME312/common/RtMidi.h .
cp $HOME312/common/RtMidi.cpp .
cp $HOME312/common/hw332_CMidiPacket.h .
cp $HOME312/common/hw332_CMidiPacket.cpp .
Double click hw712_Qt_rtmidiin.pro to open it in QtCreator
qmake
Qt uses a build system called qmake and the .pro files are counterparts to cmake's CMakeLists.txt file. Qt is working towards importing and using a CMakeLists.txt file but it was not accurate enough for use in this class.
You can add files to your project by adding them to the qmake project file, hw711_Qt_cmidiin.pro.
Task 1 - Add RtMidi and hw331_CMidiPacket files
Open the hw712_Qt_cmidiin.pro file. You should see this.
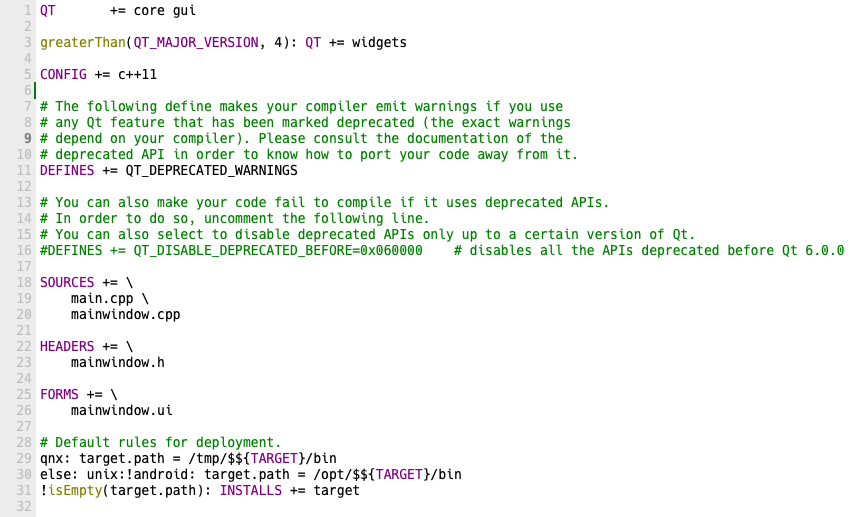
Make these changes. Copy/paste snippets are shown below the screenshot.
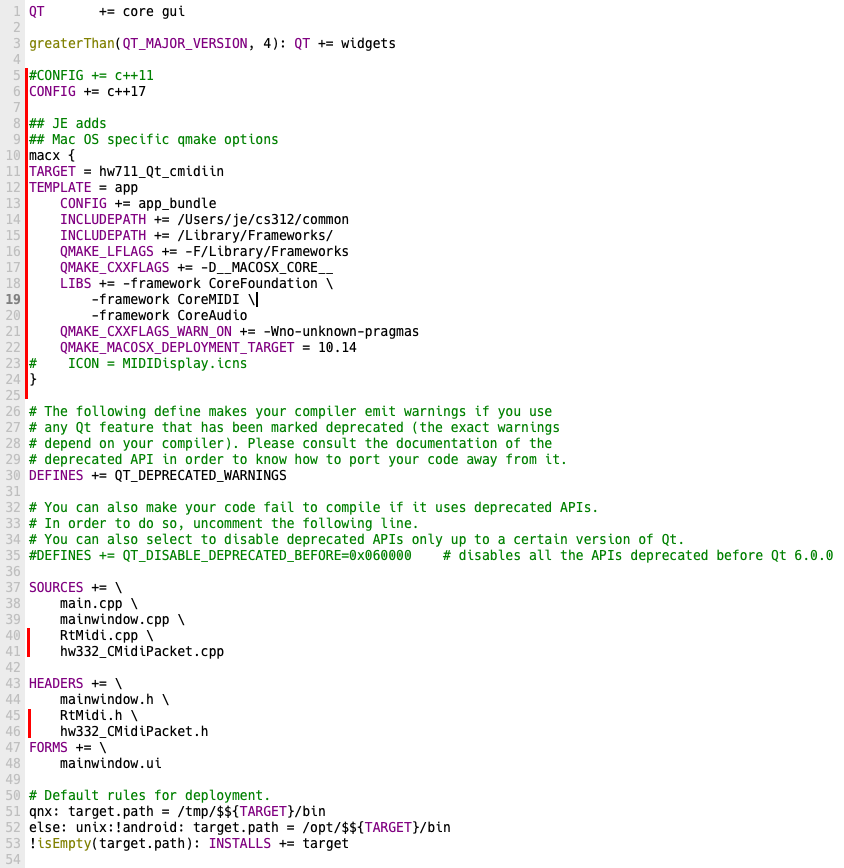
You can copy/paste sections from here. Be sure to match up with the picture above.
#CONFIG += c++11
CONFIG += c++17

## Mac OS specific qmake options
macx {
TARGET = hw711_Qt_cmidiin
TEMPLATE = app
    CONFIG += app_bundle
    INCLUDEPATH += /Users/je/cs312/common
    INCLUDEPATH += /Library/Frameworks/
    QMAKE_LFLAGS += -F/Library/Frameworks
    QMAKE_CXXFLAGS += -D__MACOSX_CORE__
    LIBS += -framework CoreFoundation \
        -framework CoreMIDI \
        -framework CoreAudio
    QMAKE_CXXFLAGS_WARN_ON += -Wno-unknown-pragmas
    QMAKE_MACOSX_DEPLOYMENT_TARGET = 10.14
#    ICON = MIDIDisplay.icns
}

SOURCES += \
    main.cpp \
    mainwindow.cpp \
    RtMidi.cpp \
    hw332_CMidiPacket.cpp

HEADERS += \
    mainwindow.h \
    RtMidi.h \
    hw332_CMidiPacket.h
FORMS += \
    mainwindow.ui
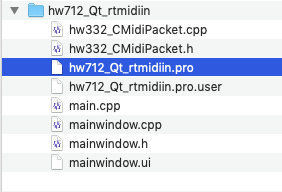
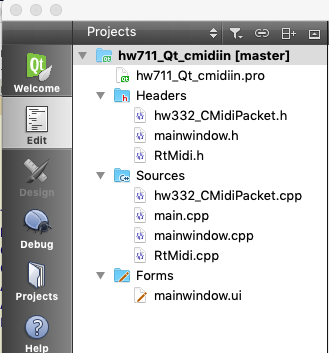
After a short pause you should see the files appear in the Edit panel.
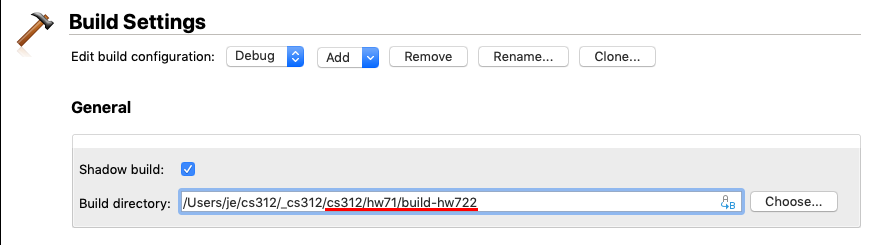
Change the project build folder to build-hw722
Click the Project tool and make these changes.
Build and run
You should have no errors at this point.
Task 2 - Add code to open RtMidiIn and RtMidiOut
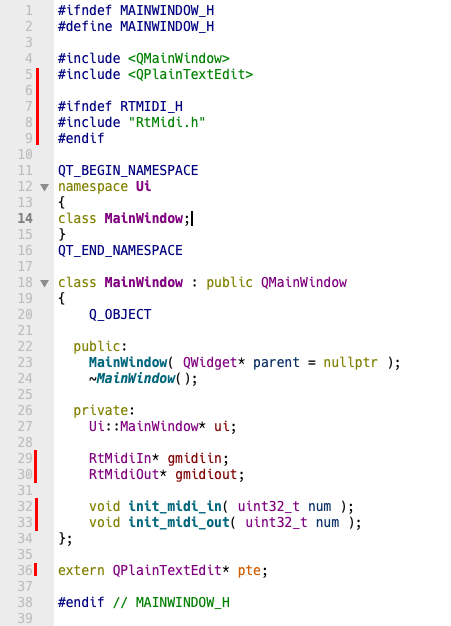
mainwindow.h
Make these changes.
VMPK and midiprobe
- If VMPK is not open, open it.
- Run /midiprobe.
- Make note of the VMPK Input and the DLSMusicDevice Output port numbers.
je$ midiprobe

Compiled APIs:
  OS-X CoreMIDI

Current input API: OS-X CoreMIDI

There are 2 MIDI input sources available.
  Input Port #0: IAC Driver Bus 1
  Input Port #1: VMPK Output

Current output API: OS-X CoreMIDI

There are 3 MIDI output ports available.
  Output Port #0: IAC Driver Bus 1
  Output Port #1: DLSMusicDevice
  Output Port #2: VMPK Input
It's slightly confusing the way MIDI is connected. This is true for both hardware and software.
- The device Output (VMPK Output) connects to the computer input (RtMidiIn).
- The computer output (DLSMusicDevice) connects to the device input (IAC Driver Bus 1).
mainwindow.cpp
Make these changes
Then copy and implement this code below the MIDI Utilities comment.
void mycallback( double deltatime, std::vector<unsigned char>* message, void* /*userData*/ )
{
    // This is the same callback you wrote for hw621_cmidiin_cmp33
    // to convert message into CMidiPacket data
    // up until you got to std::cout

    /*
      This is new
      You cannot use std::cout
      You have to use the QPlainTextEdit function insertPlainText.
      Click the Help icon in QtCreator and read about
      QPlainTextEdit
      QString
      Remember the variable pte is a pointer to a QPlainTextEdit widget
      You have to use this
      pte->insertPlainText(const QString &text)
      You've already got a CMidiPacket and you can use mp.to_string();
      Use Qt Help or google to find out how to convert a std::string into a QString.
    */

    // I did it in two lines of code
}

void MainWindow::init_midi_in( uint32_t num )
{
    // copy from c622_rt_cmidiin
    try
    {
       // gmidiin varaiable is in .h class
       // create gmidiin
    }

    catch ( RtMidiError& error )
    {
        error.printMessage();
        exit( EXIT_FAILURE );
    }

//    open midiin port( num ); // num is from result of midiprobe.
//    set midiin callback
//    maybe call ignoreTypes
}

void MainWindow::init_midi_out( uint32_t num )
{
    // copy from c623_rt_cmidiout
    try
    {
       // gmidiout varaiable is in .h class
       // create gmidiout
    }

    catch ( RtMidiError& error )
    {
        error.printMessage();
        exit( EXIT_FAILURE );
    }
//    open midiout port( num ); // num is from result of midiprobe.
}
Task 3 - Capture MIDI input data and display it
You can use most of the same code you used the hw621_cmidiin_cmp33 callback function.
Eliminate any warnings displayed in the code
Type conversion warning can be fixed using static_cast.
Build and Run the project
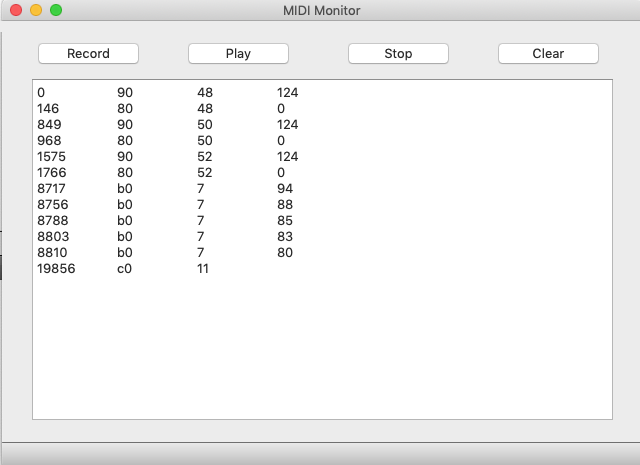
If there are no errors the MIDI Monitor window will appear.
Play notes and move controls on the VMPK software keyboard. You should see CMidiPacket messages appear with timestamps in the QPlainTextEdit widget.
hw713_rtmidiin_buttons
In this assignment we'll hook up the pushButton widgets.
Setup
cd $HOME312/Cs312/hw71
cp -R $HOME312/cs312/hw71/hw712_Qt_rtmidiin $HOME312/cs312/hw71/hw713_Qt_rtmidiin_buttons
cd $HOME312/cs312/hw71/hw713_Qt_rtmidiin_buttons
mv hw712_Qt_rtmidiin.pro hw713_Qt_rtmidiin_buttons.pro
mv hw712_Qt_rtmidiin.pro.user hw713_Qt_rtmidiin_buttons.pro.user
sed -i '' s/hw712_Qt_rtmidiin/hw713_Qt_rtmidiin_buttons/g hw713_Qt_rtmidiin_buttons.pro.user
Change the project build folder to build-hw723
Click the Project tool and make these changes.
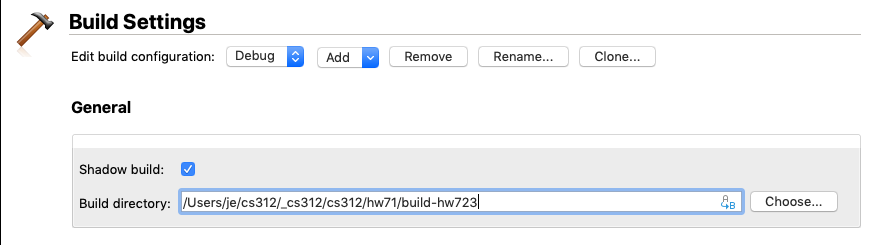
Build and run
You should have no errors at this point.
Variables needed
mainwindow.h
Add at bottom of the file outside of the mainwindow class. Use extern.
// hw711 variables
extern QPlainTextEdit* pte;
// hw713 variables
extern bool isRecording;
extern bool isFirstTimestampCaptured;
extern uint32_t firstRecordTimestamp;
extern std::vector<CMidiPacket> vplay;

#endif // MAINWINDOW_H
mainwindow.cpp
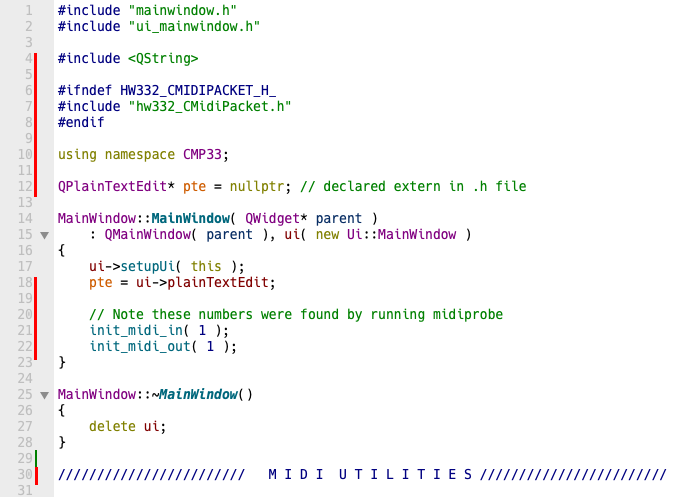
Add after the include section. Remove extern and initialize the variables.
#include "mainwindow.h"
#include "ui_mainwindow.h"

#include <QString>

#ifndef HW332_CMIDIPACKET_H_
#include "hw332_CMidiPacket.h"
#endif

using namespace CMP33;

// hw711 variables
QPlainTextEdit* pte = nullptr;
// hw713 variables
bool isRecording = false;
bool isFirstTimestampCaptured = false;
uint32_t firstRecordTimestamp = 0;
std::vector<CMidiPacket> vplay;
Functions needed
Qt responds user actions in the GUI through a signal-slot mechanism. For the most part this is transparent to your code. We won't get into advanced uses of this mechanism here.
In the mainwindow.ui form right click the Record button and choose Go to slot.
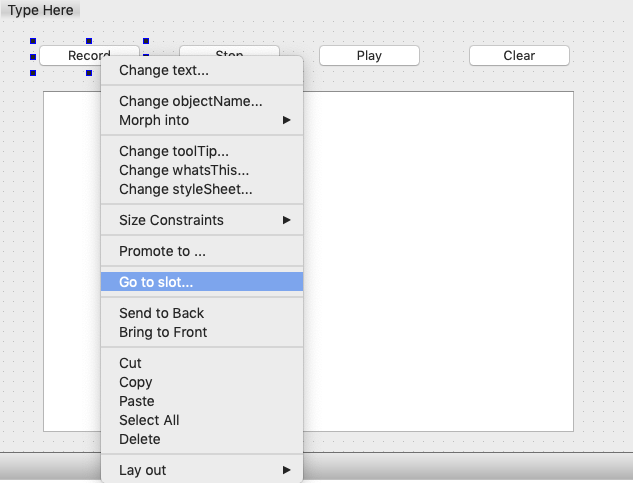
The available signals are displayed. Choose clicked() and click OK.
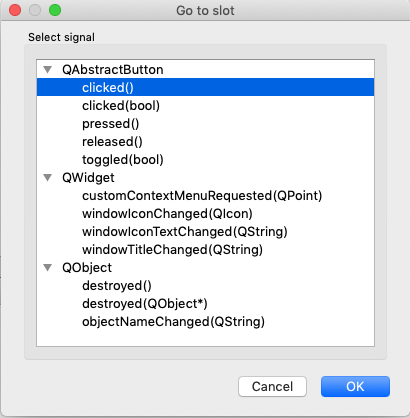
You'll go the the implementation of the button click in mainwindow.cpp.

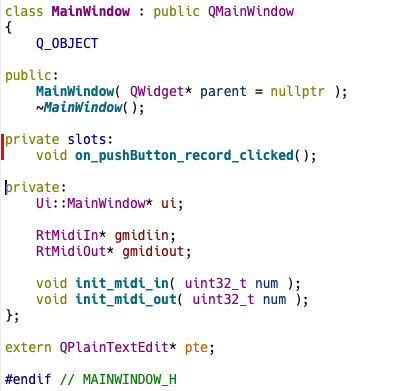
A new private slots: section has also been added to the /MainWindow class in mainwindow.h.
Repeat these steps for the Stop, Play, and Clear buttons
Record button
- No MIDI messages are recorded or displayed if isRecording == false.
- On click sets isRecording to true.
- Messages received from rtmidiin are displayed in CMidiPacket format.
- On each Record button click convert the first rtmidiin timestamp to CMidiPacket format and set firstRecordTimestamp to that value.
- Set isFirstTimestampCaptured to true.
- On future clicks the rtmidiin timestamp will not be zero but the CMidiPacket timestamp needs be reset to zero.
- Use the firstRecordTimestamp to adjust the CMidiPacket timestamp back to zero
- Clear std::vector<CMidiPacket> vplay.
Add this code to on_pushButton_record_clicked()
void MainWindow::on_pushButton_record_clicked()
{
    isRecording = true;
    isFirstTimestampCaptured = false;
    vplay.clear();
}
Stop button
- Stop recording and displaying MIDI messages.
- The RtMidi timestamp clock keeps running.
Add this code to on_pushButton_stop_clicked()
void MainWindow::on_pushButton_stop_clicked()
{
    isRecording = false;
    isFirstTimestampCaptured = true;
}
Play button
- This is left as an exercise for the reader.
Add this code to on_pushButton_play_clicked().
void MainWindow::on_pushButton_play_clicked()
{
    isRecording = false;
    isFirstTimestampCaptured = true;
    // now make it play
}
Clear button
- Clear the contents of QPlainTextEdit.
- Turn off the isRecording flag.
Add this code to on_pushButton_stop_clicked()
void MainWindow::on_pushButton_clear_clicked()
{
    pte->clear();
    isRecording = false;
    isFirstTimestampCaptured = true;
    vplay.clear();
}
Button highlighting
We'll make each button remain highlighted until another button is clicked. Buttons act like toggles.
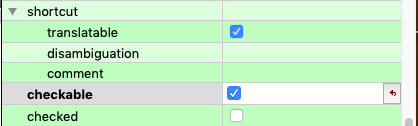
In Design view hold down the command key and select all 4 push buttons.
Then add the checkable property.
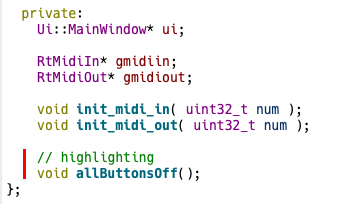
mainwindow.h
Add the allButtonsOff() function.
mainwindow.cpp
Add this code for void MainWindow::allButtonsOff()
void MainWindow::allButtonsOff()
{
    ui->pushButton_record->setChecked( false );
    ui->pushButton_stop->setChecked( false );
    ui->pushButton_play->setChecked( false );
    ui->pushButton_clear->setChecked( false );
}
Then turn on each pushButton in its on_pushButton_name_clicked() implementation. For example.
void MainWindow::on_pushButton_record_clicked()
{
    // highlighting
    allButtonsOff();
    ui->pushButton_record->setChecked( true );

    isRecording = true;
    isFirstTimestampCaptured = false;
    vplay.clear();
}
Repeat these steps for each button.
Enable MIDI Output
Make these connections in VMPK.
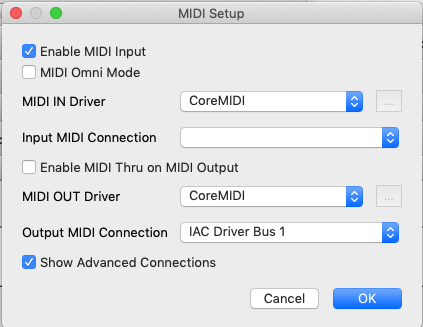
Choose MIDI connections from the Edit menu.

Choose these settings.
Build and run
You should hear the notes you play in VMPK and see the messages appear in the MIDI Monitor window.
Submission Format
Feel free to email jellinge@carleton.edu on any part of the homework that is unclear to you. Chances are if you have questions other students do too. I will answer those questions by email to everyone in the class. The original sender will remain anonymous. I have tried to provide clues to the homework in the web pages, reading assignments, and labs. Sometimes what seems obvious to me is not obvious to students just learning C++.
Create a folder named hwNN_LastnameFirstname_LastnameFirstname.
Substitute your name and your partner's name for LastnameFirstname_LastnameFirstname.
Remember
- Boilerplate header at top of every file.
- Make sure your program compiles before submitting.
- Programs that compile and produce partially correct output will be graded.
- You can send notes to me in your homework files by enclosing them in block comments.
- Programs that do not compile get an automatic F (59%).
- Submit the homework in only one of the partner's folders.
- Empty your build or build-debug folders using the command emptyBuildFolder.sh
- Only include .h, .cpp, Makefiles, CMakeLists.txt
- Do not include these folders/files
.git
.vscode Double check for the above two folders using this command
ls -a hwNN_LastnameFirstname1_LastnameFirstname2
# if either .git or .vscode exist in the folder you're submitting remove them with
# rm -fR .git
# rm -fR .vscode
Hand-in folder contents
$HOME312/common
├── hw332_CMidiPacket.cpp
├── hw332_CMidiPacket.h
├── hw411_rand_int.cpp
├── hw411_rand_int.h
├── hw421_CDelayMs.cpp
├── hw421_CDelayMs.h
├── hw422_CAppleMidiSynth.cpp
├── hw422_CAppleMidiSynth.h
├── hw423_CMidiTrack.cpp
├── hw423_CMidiTrack.h
├── hw511_CInstrument.cpp
├── hw511_CInstrument.h
└── hw511_CInstrument.h

$HOME312/cs312/hw71
├── hw711_Qt_cmidiin_gui
│   ├── hw711_Qt_cmidiin_gui.pro
│   ├── hw711_Qt_cmidiin_gui.pro.user
│   ├── main.cpp
│   ├── mainwindow.cpp
│   ├── mainwindow.h
│   └── mainwindow.ui
├── hw712_Qt_rtmidiin
│   ├── hw332_CMidiPacket.cpp
│   ├── hw332_CMidiPacket.h
│   ├── hw712_Qt_rtmidiin.pro
│   ├── hw712_Qt_rtmidiin.pro.user
│   ├── main.cpp
│   ├── mainwindow.cpp
│   ├── mainwindow.h
│   └── mainwindow.ui
└── hw713_Qt_rtmidiin_buttons
    ├── hw332_CMidiPacket.cpp
    ├── hw332_CMidiPacket.h
    ├── hw713_Qt_rtmidiin_buttons.pro
    ├── hw713_Qt_rtmidiin_buttons.pro.user
    ├── main.cpp
    ├── mainwindow.cpp
    ├── mainwindow.h
    └── mainwindow.ui